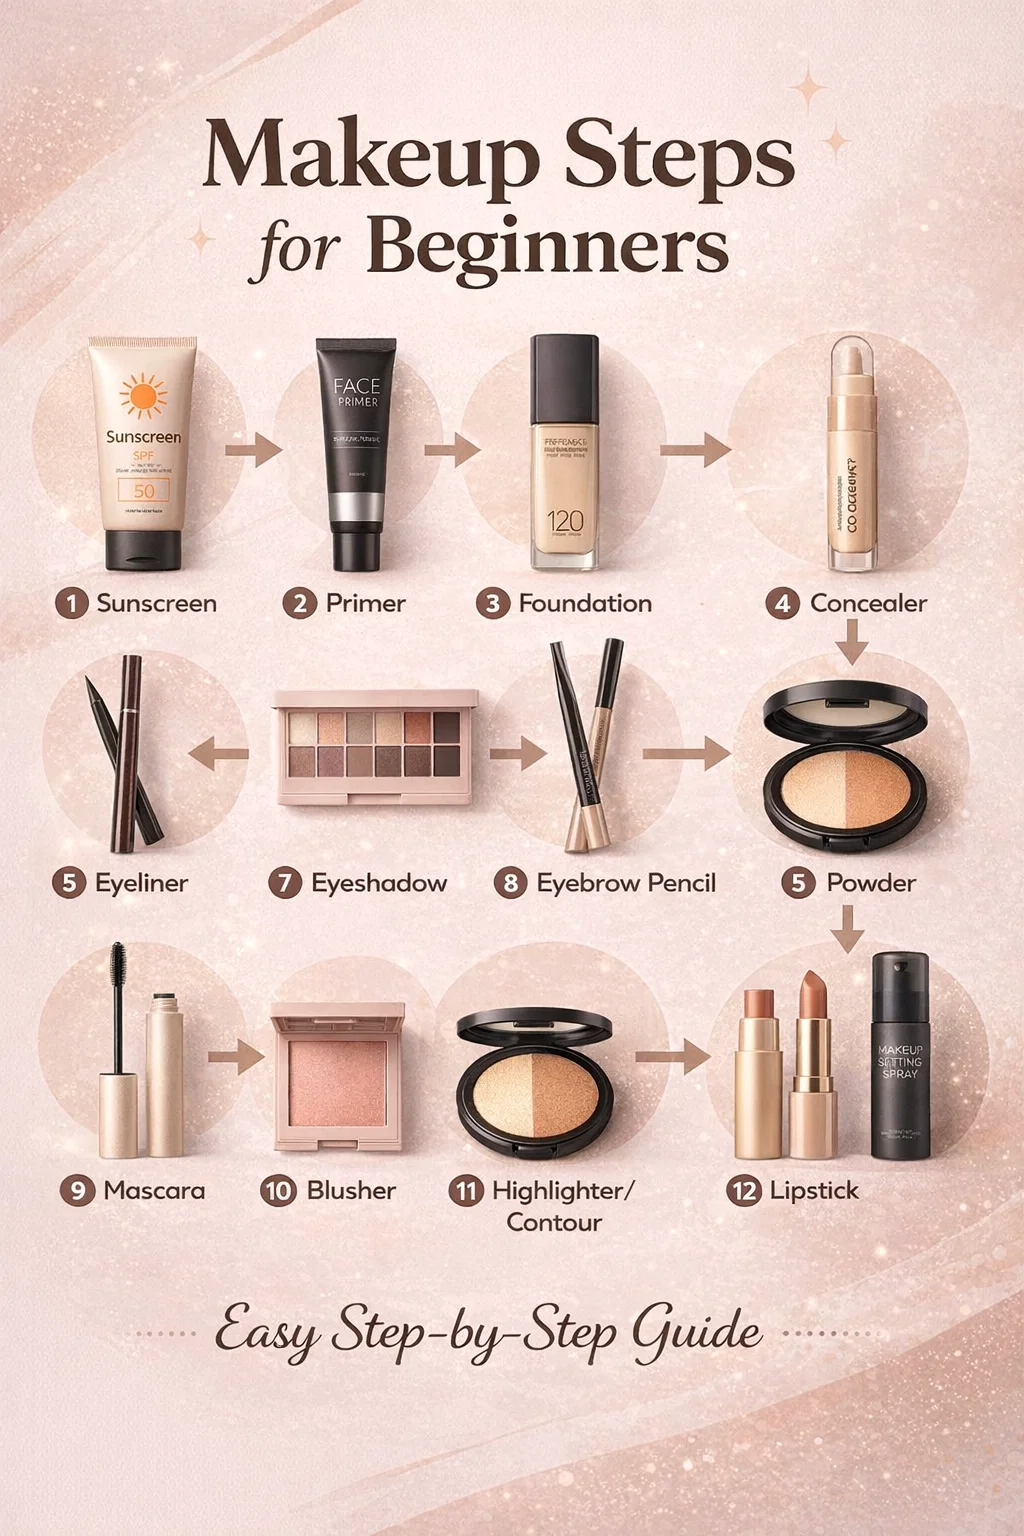
13 Easy Makeup Steps for Beginners A Complete Step-by-Step Routine Guide
Stepping into the world of cosmetics can feel like walking into a massive, colorful labyrinth. With thousands of products, brushes, and techniques available, it is easy to feel overwhelmed before you even pick up a sponge. However, achieving a flawless look is less about having expensive tools and more about understanding the logical flow of application. By following a structured sequence, you ensure that each product performs its specific job without interfering with the others. This guide breaks down the essential thirteen steps to help you master your morning routine and achieve a professional finish every single time.
Phase One: Preparing the Perfect Canvas
Before you even think about color or coverage, you must focus on the health and texture of your skin. Professional makeup artists will always tell you that the finish is only as good as the preparation underneath. Skip these steps, and you risk your makeup looking cakey or sliding off by lunchtime.
Step 1: Sunscreen is Non-Negotiable
The foundation of every great face starts with protection. Applying a broad-spectrum sunscreen with at least SPF 30 is the most important thing you can do for your skin. Not only does it prevent premature aging and sun damage, but many modern formulas also act as a lightweight moisturizer. Allow your sunscreen to sink in for at least two minutes so it creates a smooth, dry surface for the next layer.
Step 2: The Power of Primer
Think of primer as the bridge between your skincare and your makeup. A good primer fills in fine lines, blurs the appearance of pores, and creates a grippy surface that holds onto your foundation. If you have oily skin, look for a mattifying primer. For those with dry skin, a hydrating or luminous formula will keep your face looking fresh and dewy throughout the day.
Phase Two: Building Your Base
Once your skin is prepped, it is time to even out your skin tone. The goal here is not to create a mask, but to enhance your natural complexion while concealing any areas that need a little extra help.
Step 3: Foundation for Even Tone
Foundation serves as the backdrop for the rest of your look. Whether you prefer a sheer tinted moisturizer or a full-coverage liquid, the application technique matters. Start from the center of your face where redness is usually most prominent and blend outward toward your hairline and jaw. Always remember to blend down onto your neck to avoid the dreaded mask effect.
Step 4: Targeted Concealing
While foundation evens things out, concealer does the heavy lifting. Use a brightening concealer under your eyes to hide dark circles and a thicker, skin-tone-matching concealer for any blemishes or spots. By applying concealer after foundation, you actually end up using less product because the foundation has already covered minor imperfections.
Step 5: Setting with Powder
To ensure your hard work stays in place, you must set your liquid products with powder. If you have dry skin, you might only need a light dusting in your T-zone. If you are prone to oiliness, a translucent setting powder will help lock in the foundation and concealer, preventing them from creasing into fine lines or sliding off as the day progresses.
Phase Three: Defining the Windows to the Soul
With the skin looking flawless, it is time to bring focus to your eyes and brows. This is where your personality can really shine through, whether you want a natural daytime look or something more dramatic.
Step 6: Framing with Eyebrow Pencils
Brows are the frame of your face. A well-defined brow can instantly lift your features and make you look more awake. Use an eyebrow pencil to fill in any sparse areas with short, hair-like strokes. Follow the natural arch of your brow and use a spoolie brush to blend the pigment so there are no harsh, blocky lines.
Step 7: Adding Depth with Eyeshadow
Eyeshadow adds dimension to your lids. For beginners, a neutral palette with a few matte browns and a shimmer shade is perfect. Apply a light transition shade in the crease, a darker shade on the outer corner for depth, and a pop of shimmer on the center of the lid. This simple three-step method works for almost any eye shape.
Step 8: Defining the Lash Line with Eyeliner
Eyeliner defines the shape of your eyes and makes your lashes look thicker. You can use a pencil for a soft, smudged look or a liquid liner for a sharp, precise wing. If you are just starting out, try tight-lining by applying pencil liner to your upper waterline. It creates an invisible boost to your lash volume without looking like heavy makeup.
Step 9: Opening the Eyes with Mascara
Mascara is the finishing touch for every eye look. It darkens, lengthens, and volumizes your lashes, making your eyes appear wider and brighter. Wiggle the wand at the base of your lashes and sweep upward. Two coats are usually plenty to achieve a beautiful, wide-eyed effect.
Phase Four: Adding Color and Dimension
Now that the eyes and base are set, your face might look a bit flat or one-dimensional. This phase is all about bringing back the “life” and structure to your features.
Step 10: A Healthy Flush of Blusher
Blush adds a youthful glow and a healthy pop of color. Smile and apply your blush to the apples of your cheeks, blending upward toward your temples. This mimics a natural flush and prevents the face from looking washed out by the foundation.
Step 11: Sculpting with Highlighter and Contour
Contouring creates shadows to define your bone structure, while highlighter brings forward the high points of your face. Apply contour under your cheekbones and along your jawline to sharpen your silhouette. Follow up with highlighter on the tops of your cheekbones, the bridge of your nose, and your cupid’s bow for a luminous, lit-from-within glow.
Phase Five: The Finishing Touches
You are almost there! The final steps ensure your lips look perfect and your entire face stays put for hours on end.
Step 12: Perfecting the Pout with Lipstick
Whether you choose a bold red, a soft nude, or a simple tinted balm, lipstick pulls the entire look together. If you want longevity, start with a lip liner to define the edges and prevent feathering. Fill in with your favorite lipstick shade to add a final touch of polish to your appearance.
Step 13: Setting Spray for Longevity
The final, and perhaps most satisfying step, is setting spray. A few mists over your finished face will meld all the layers together, removing any powdery finish and creating a long-lasting seal. This ensures that your makeup remains vibrant from your morning coffee until your evening wind-down.
Conclusion: Confidence in Every Step
Mastering a makeup routine is a journey of practice and patience. While thirteen steps might seem like a lot at first, each stage serves a specific purpose in creating a cohesive and durable look. By following this logical order, you avoid the frustration of products clumping together or fading prematurely. Remember that makeup is an art form, and while these rules provide a fantastic foundation, you should always feel free to experiment and find what makes you feel most confident. With these steps in your beauty arsenal, you are ready to face the world with a flawless, professional-grade finish every single day.