5 DIY Natural Soap Recipes for Beginners Easy Homemade Olive Oil Shea Butter Soap Guide
Stepping into the world of DIY soap making can feel a bit like entering a chemistry lab, but it is actually one of the most rewarding creative outlets you can explore. There is something deeply satisfying about taking raw, natural ingredients like olive oil, shea butter, and dried botanicals and transforming them into a functional piece of art that nourishes your skin. If you have ever flipped over a store-bought bar of soap only to be met with a list of synthetic detergents and hard-to-pronounce chemicals, you are in the right place. Creating your own soap at home allows you to take full control over what touches your body, ensuring every wash is packed with vitamins and moisture rather than harsh foaming agents.
The Magic of Cold Process Soap Making
The recipes we are diving into today focus on the cold process method. While it requires a bit of patience during the curing phase, it is widely considered the gold standard for high-quality, long-lasting bars. This method involves a chemical reaction called saponification, where fats and oils are mixed with an alkali (lye) to create soap. By using high-quality fats like olive oil and shea butter, you create a bar that is naturally rich in glycerin, which is often stripped out of commercial soaps to be sold in expensive lotions. In your kitchen, that glycerin stays right in the bar, providing a creamy lather that leaves your skin feeling soft and hydrated.
Essential Safety Gear and Precautions
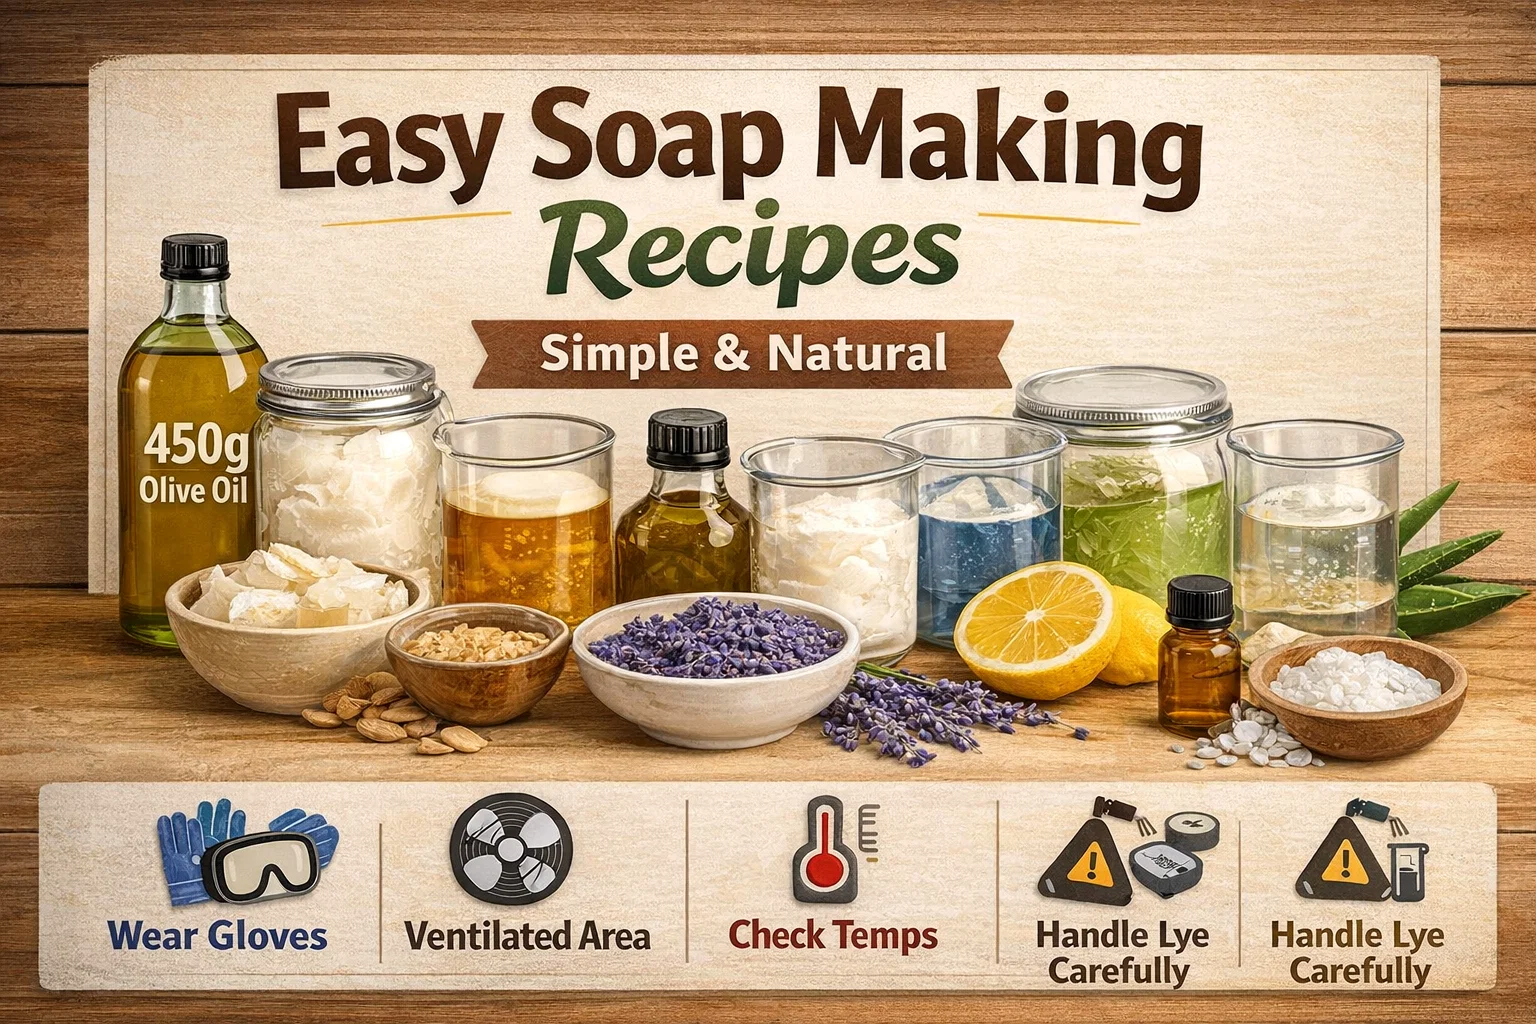
Before you measure out your first gram of oil, we have to talk about safety. Working with lye (sodium hydroxide) is the only way to make real soap, but it must be handled with respect. When lye is mixed with water, it creates an exothermic reaction that produces heat and fumes. Always wear long sleeves, nitrile gloves, and safety goggles to protect your skin and eyes. Work in a well-ventilated area, perhaps near an open window or under a kitchen vent fan. A golden rule in the soap room is to always add your lye to the water, never the other way around. Adding water to lye can cause a “lye volcano” due to the rapid heat generation. Keep a tidy workspace and ensure no pets or children are underfoot while you are mixing your lye solution.
Recipe 1: The Reliable Basic Olive Oil Soap
For those just starting out, simplicity is your best friend. A basic olive oil soap, often referred to as a “Bastille” soap when it contains a high percentage of olive oil, is incredibly gentle and perfect for all skin types. This recipe focuses on a high concentration of olive oil to provide a conditioning feel that won’t strip the skin of its natural oils.
- 450g Olive Oil: This provides the moisturizing foundation of the bar.
- 60g Lye: The catalyst for saponification.
- 120g Distilled Water: (Note: While some recipes vary, a 2:1 water-to-lye ratio is a safe starting point for beginners).
To make this, heat your olive oil gently until it reaches about 100 degrees Fahrenheit. Separately, mix your lye into your distilled water and let it cool until it is also around 100 degrees. Pour the lye water into the oil and use a stick blender to reach “trace,” which is the point where the mixture looks like thin pudding. Pour it into your mold, let it sit for 24 to 48 hours, and then slice it into bars. This soap benefits from a longer cure time of about 4 to 6 weeks to reach its full hardness.
Recipe 2: Calming Lavender and Herb Infused Bars
Lavender is perhaps the most iconic scent in the world of wellness, and for good reason. It is soothing, floral, and evokes a sense of peace. This recipe takes the basic olive oil foundation and elevates it with the addition of dried lavender buds for a rustic, botanical aesthetic.
Adding Botanicals for Texture
In this version, we use 450g of olive oil and 60g of lye. To give it that signature spa feel, add 5g of dried lavender flowers at light trace. You can also add lavender essential oil if you want a stronger scent. One pro tip for using dried herbs: if you mix them throughout the soap, they may turn brown over time due to the high pH of the soap. Many makers prefer to sprinkle the dried lavender on the very top of the soap after it has been poured into the mold to preserve that beautiful purple hue.
Recipe 3: Zesty Lemon for a Morning Wake-Up Call
If you prefer a bar of soap that helps you feel energized in the shower, lemon is the way to go. This recipe uses 400g of olive oil as the base. Lemon essential oil is known for its degreasing properties, making this an excellent bar for the kitchen or for those with oily skin types.
To create this citrus delight, incorporate 15g of lemon essential oil at trace. Citrus oils can be “volatile,” meaning their scent can fade during the curing process. To help the scent stick, some soap makers mix the essential oil with a small amount of kaolin clay before adding it to the soap batter. This helps anchor the fragrance so your bars smell fresh for months to come.
The Power of Natural Additives: Honey, Oats, and Shea
Once you have mastered the basics, you can start experimenting with “superfats” and natural additives that provide specific skin benefits. Natural ingredients found in your pantry can transform a simple bar into a luxury treatment.
Honey and Oatmeal for Sensitive Skin
This is a classic combination for anyone dealing with dry or itchy skin. Oatmeal acts as a very gentle exfoliant, sloughing away dead skin cells, while honey is a natural humectant, meaning it helps draw moisture into the skin. For this recipe, use 450g of olive oil, 60g of water, and 60g of lye. Add 60g of honey and 60g of ground oats at trace.
A Note on Temperature: Honey contains natural sugars which can cause the soap to heat up significantly during the saponification process. If you use honey, consider placing your soap mold in the refrigerator for the first 24 hours to prevent the soap from “geling” too hard or scorching in the center.
Coconut and Shea Butter Luxury
If you want a bar with a truly creamy, lotion-like lather, shea butter is an essential ingredient. Shea butter is packed with fatty acids and vitamins that remain in the soap to nourish the skin. Combine 450g of olive oil with 115g of shea butter. You will need to melt the shea butter completely with your olive oil before adding your lye solution. This bar will be harder and more durable than a pure olive oil bar, making it a favorite for gift-giving.
Green Tea and Aloe Vera: The Ultimate Skin Soother
For a refreshing, antioxidant-rich experience, you can swap out your distilled water for chilled green tea. Green tea provides polyphenols that are great for skin health. In this recipe, we also incorporate 60g of Aloe Vera gel (ensure it is pure aloe without added alcohols or colors).
Aloe vera is incredibly cooling and helps with skin repair. When making this bar, add the aloe gel at trace rather than mixing it with the lye. This ensures the delicate properties of the aloe are not damaged by the initial lye reaction. The result is a beautiful, green-tinted bar that feels like a drink of water for your skin.
Troubleshooting Common Soap Making Issues
Even seasoned soap makers run into hiccups. If your soap looks a bit “ashy” on top, don’t worry! This is called “soda ash,” and it is just a harmless reaction between the lye and the air. You can steam it off or simply rinse the bar once it is cured. If you see oily pockets, your emulsion might have broken, or you may have had an issue with your measurements. This is why using a digital scale is non-negotiable in soap making. Always measure by weight (grams), never by volume (cups), to ensure the chemistry is exact.
Curing Your Soap for Longevity
One of the hardest parts of soap making is the wait. Once your soap is cut into bars, it needs to sit in a cool, dry place for 4 to 6 weeks. During this time, the remaining water evaporates, making the bar harder and longer-lasting. It also allows the pH level to stabilize, making the soap gentler on the skin. You can test your bars after a month by using a pH strip or the classic “zap test” to ensure the lye is fully neutralized. A well-cured bar will produce a much better lather and won’t melt away in the soap dish after just a few uses.
Embracing a Sustainable Lifestyle
By making your own soap, you are making a massive impact on the environment. You are eliminating plastic bottles from your bathroom and ensuring that no microplastics or harmful synthetic fragrances are being washed down the drain into our water systems. Plus, handmade soap makes for an incredible, thoughtful gift. You can wrap your bars in simple parchment paper, tie them with a bit of twine, and tuck in a sprig of fresh herbs for a beautiful, zero-waste presentation.
Conclusion: Your Journey Into Handcrafted Wellness
The art of soap making is a journey of constant learning and discovery. Whether you start with a simple olive oil bar or jump straight into the creamy world of shea butter and honey, you are taking a proactive step toward a more natural, intentional lifestyle. These recipes are just the beginning. As you get more comfortable, you can start playing with natural clays for color, different essential oil blends for aromatherapy, and various oils like coconut or avocado for different textures. The possibilities are truly endless. So, grab your goggles, clear off your counter, and start creating something beautiful today. Your skin will thank you, and your home will smell amazing. Don’t forget to keep a notebook of your recipes and observations so you can recreate your favorite successes again and again.
Would you like me to generate a specific ingredient shopping list or a printable step-by-step checklist for your first batch?