7-Day DIY Dark Spot Removal Cream Easy Skincare Beauty Tips with Doll
Welcome to the world of natural skincare where the most effective solutions are often found right in your kitchen cupboard or garden. If you have been struggling with persistent dark spots, hyperpigmentation, or an uneven skin tone, you are certainly not alone. Many of us search for that holy grail product that can restore a youthful glow without the harsh chemicals or the staggering price tags found in high end department stores. Today, we are diving deep into a simple yet transformative 7 day dark spot removal cream that you can whip up at home. This DIY remedy is more than just a quick fix; it is a blend of time tested ingredients designed to nourish, heal, and brighten your complexion naturally.
Understanding the Root Causes of Dark Spots
Before we get into the mixing bowl, it is important to understand why those pesky dark spots appear in the first place. Hyperpigmentation is a common skin condition where certain areas of the skin become darker than the surrounding parts. This happens when an excess of melanin, the pigment that produces normal skin color, forms deposits in the skin.
Several factors can trigger this overproduction. Sun exposure is the primary culprit, as UV rays stimulate melanocytes to protect the skin. Hormonal changes, often referred to as melasma, are another frequent cause, especially during pregnancy. Additionally, post inflammatory hyperpigmentation occurs after an injury or inflammation, such as acne or eczema, leaves a dark mark behind after the initial wound has healed. By using a targeted cream with brightening agents, you can effectively interrupt this process and encourage the skin to regenerate clearer cells.
The Magic Ingredients: Why They Work
The beauty of this homemade cream lies in its simplicity and the specific synergy of its three main components: glycerin, rose water, and aloe vera gel. Let us break down exactly why these ingredients are the dream team for spot removal.
The Hydration Hero: Vegetable Glycerin
Glycerin is a humectant, which means it attracts moisture from the air into the skin’s outer layer. While it is famous for its hydrating properties, it plays a crucial role in skin brightening as well. By keeping the skin deeply hydrated, glycerin helps to maintain a healthy skin barrier. A strong barrier allows the skin to shed dead cells more efficiently, preventing the buildup of pigmented cells that contribute to a dull, spotty appearance.
The Soothing Essence: Rose Water
Rose water has been a staple in beauty rituals for centuries, and for good reason. It acts as a mild astringent that helps to clean pores and tone the skin. More importantly, rose water is packed with antioxidants and has anti inflammatory properties that reduce redness and irritation. When your skin is calm and balanced, it is less likely to produce excess melanin in response to stress or inflammation. Plus, the natural fragrance provides a therapeutic, spa like experience right in your bathroom.
The Healer: Pure Aloe Vera Gel
Aloe vera is the star of the show when it comes to skin repair. It contains a compound called aloesin, which has been scientifically shown to inhibit the tyrosinase enzyme responsible for melanin production. By applying aloe vera regularly, you are essentially telling your skin to slow down the darkening process. It also promotes collagen synthesis and cell turnover, helping the darker, older skin layers to peel away and reveal the fresh, bright skin underneath.
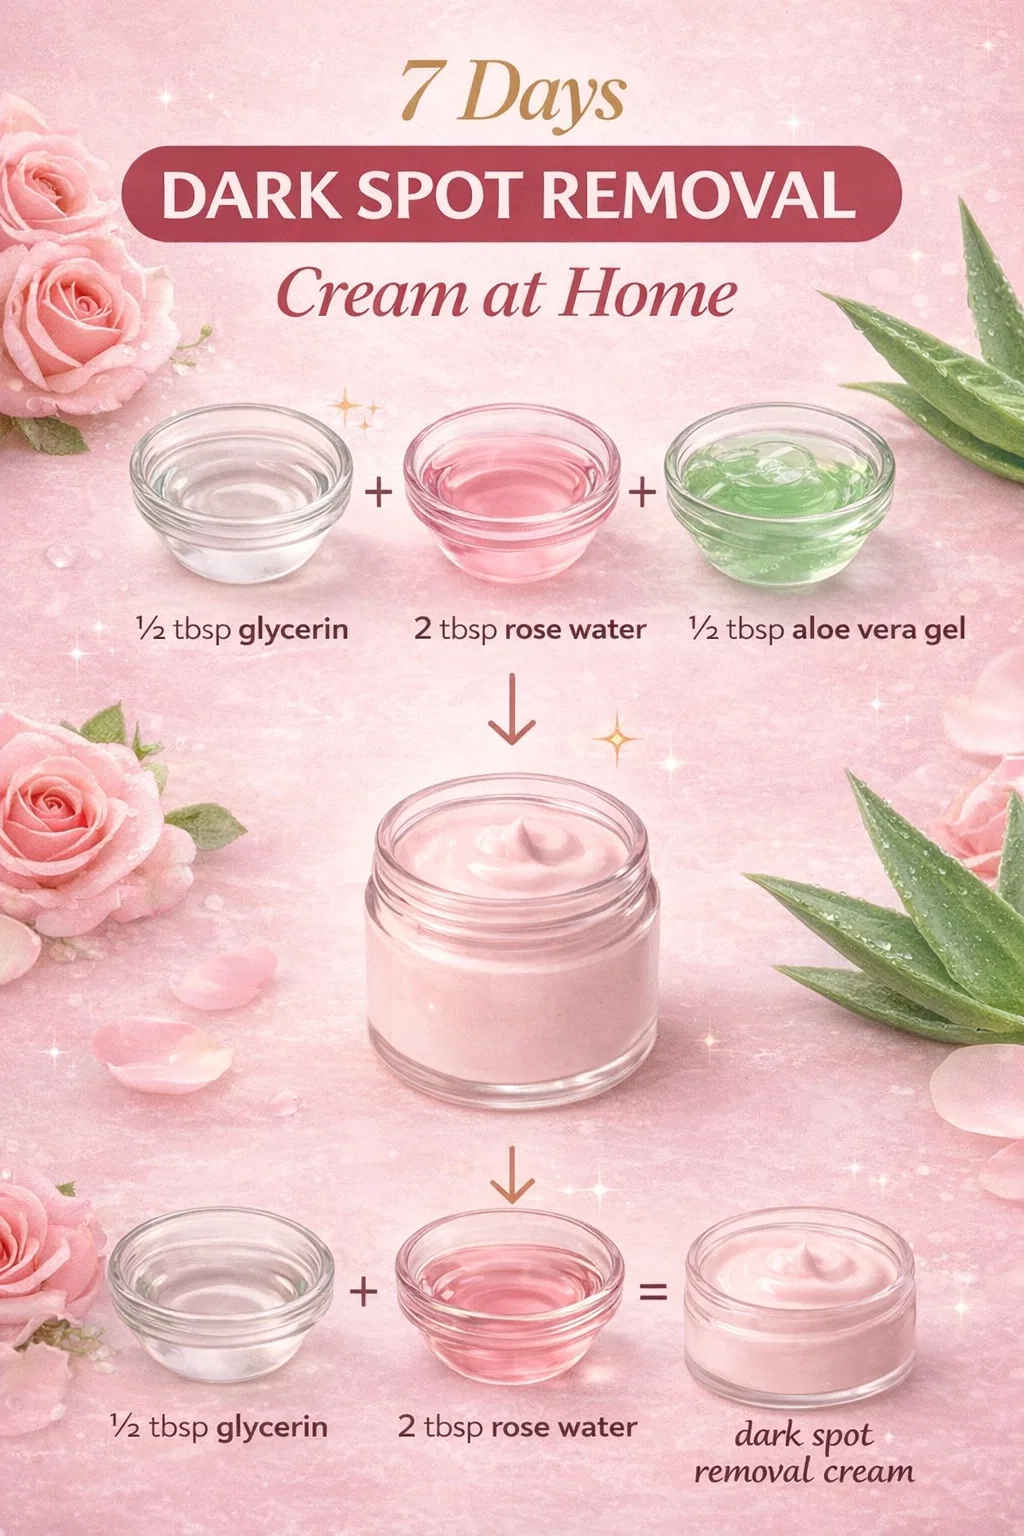
Step by Step Guide to Making Your Dark Spot Removal Cream
Creating this cream is incredibly straightforward and takes less than five minutes. To ensure the best results, try to use high quality, organic ingredients whenever possible.
What You Will Need
- 2 tablespoons of Rose Water: Look for 100 percent pure distilled rose water without added alcohols or synthetic fragrances.
- 1/2 tablespoon of Vegetable Glycerin: Ensure it is food grade or cosmetic grade for safety.
- 1/2 tablespoon of Aloe Vera Gel: You can use fresh gel from a leaf or a high quality bottled version that is clear and free from artificial colors.
- A small glass jar: Sterilize a small container with a tight fitting lid to store your creation.
Mixing Instructions
Start by pouring the rose water into a clean mixing bowl. Slowly add the glycerin, stirring gently to combine the two liquids. Finally, fold in the aloe vera gel. You will notice the mixture start to thicken slightly into a silky, lightweight serum or cream consistency. Continue stirring until the texture is completely smooth and uniform. Transfer the mixture into your glass jar and secure the lid tightly. Because this recipe uses fresh ingredients without heavy preservatives, it is best to store it in the refrigerator to keep it cool and potent.
The 7 Day Protocol: How to Apply for Maximum Results
Consistency is the secret ingredient in any skincare routine. To see a visible difference in just one week, you should follow a dedicated application process.
Morning and Night Application
For the best results, apply this cream twice a day. In the morning, it acts as a hydrating base under your sunscreen. In the evening, it works with your body’s natural repair cycle while you sleep. Always start with a freshly cleansed face to ensure the ingredients can penetrate deeply into the dermis.
The Application Technique
Take a small, pea sized amount of the cream and dot it directly onto the areas with the most prominent dark spots. Use your ring finger to gently massage the cream in circular motions. Once the targeted spots are covered, apply a thin layer over the rest of your face and neck to promote an overall even skin tone. The cooling sensation from the refrigerated aloe will help to depuff your skin and wake up your complexion.
What to Expect During the First Week
When you commit to this 7 day journey, your skin will go through a mini transformation. Here is a typical timeline of what many users experience.
Days 1 to 3: Immediate Hydration
During the first few days, you will primarily notice a change in the texture of your skin. The glycerin and rose water work quickly to plump up the skin cells, making your face feel incredibly soft and smooth. While the dark spots may not have faded yet, your skin will have a healthier, more luminous “dewy” look.
Days 4 to 6: Calming and Evening Out
By the middle of the week, the anti inflammatory properties of the aloe vera and rose water begin to take full effect. Any redness or blotchiness typically starts to subside. You may notice that the edges of your dark spots appear less defined, as the cream begins to break up the concentrated pigment.
Day 7: The Glow Up
By the end of the week, many people report a visible brightening of their skin. While deep seated spots may require a few more weeks of treatment, the overall clarity of the skin is usually much improved. Your complexion should look refreshed, more uniform, and significantly more radiant than when you started.
Pro Tips to Enhance Your Brightening Journey
While this cream is powerful on its own, your lifestyle and additional skincare habits play a huge role in how quickly those spots fade.
The Non Negotiable: Sunscreen
There is no point in using a spot removal cream if you are not protecting your skin from the sun. UV exposure will immediately darken existing spots and create new ones. Apply a broad spectrum SPF 30 or higher every single day, even if it is cloudy or you are staying indoors near windows.
Gentle Exfoliation
Once or twice a week, use a gentle chemical exfoliant like lactic acid or a soft enzyme mask. This helps to remove the dead skin cells that the cream is working to replace. Removing that top layer of “junk” allows the DIY cream to sink in even better.
Stay Hydrated Inside and Out
Drinking plenty of water helps your body flush out toxins and keeps your skin cells functioning at their peak. When you are hydrated from the inside, the glycerin in your cream has more moisture to work with, leading to better results.
Customizing Your Cream for Specific Skin Needs
One of the best things about DIY skincare is that you can tweak the recipe to suit your unique skin type.
For Oily or Acne Prone Skin
If you find the mixture a bit too heavy, you can slightly reduce the amount of glycerin and add a drop of tea tree essential oil. Tea tree oil has antibacterial properties that can help prevent the breakouts that lead to dark spots in the first place.
For Dry or Mature Skin
If your skin needs an extra boost of nourishment, consider adding a few drops of Vitamin E oil or rosehip seed oil to the mix. These oils are rich in fatty acids and antioxidants that help with skin elasticity and deep tissue repair.
Conclusion: Embracing the Power of Natural Care
Taking control of your skincare routine with a DIY dark spot removal cream is an empowering step toward healthier skin. This 7 day remedy proves that you do not need a complicated 12 step routine or expensive luxury products to achieve beautiful results. By harnessing the simple, effective powers of glycerin, rose water, and aloe vera, you are giving your skin exactly what it needs to heal and shine.
Remember that skincare is a marathon, not a sprint. While this 7 day protocol is designed to jumpstart your progress, continuing to use these natural ingredients as part of a long term routine will yield the most dramatic transformations. Be patient with your skin, protect it from the sun, and enjoy the process of nurturing your natural beauty. Your journey to a clearer, brighter complexion starts with these simple steps, and the glow you achieve will be a testament to the care you put into yourself. Give this recipe a try this week and prepare to be amazed at how much your skin can change with just a little bit of nature’s best ingredients.