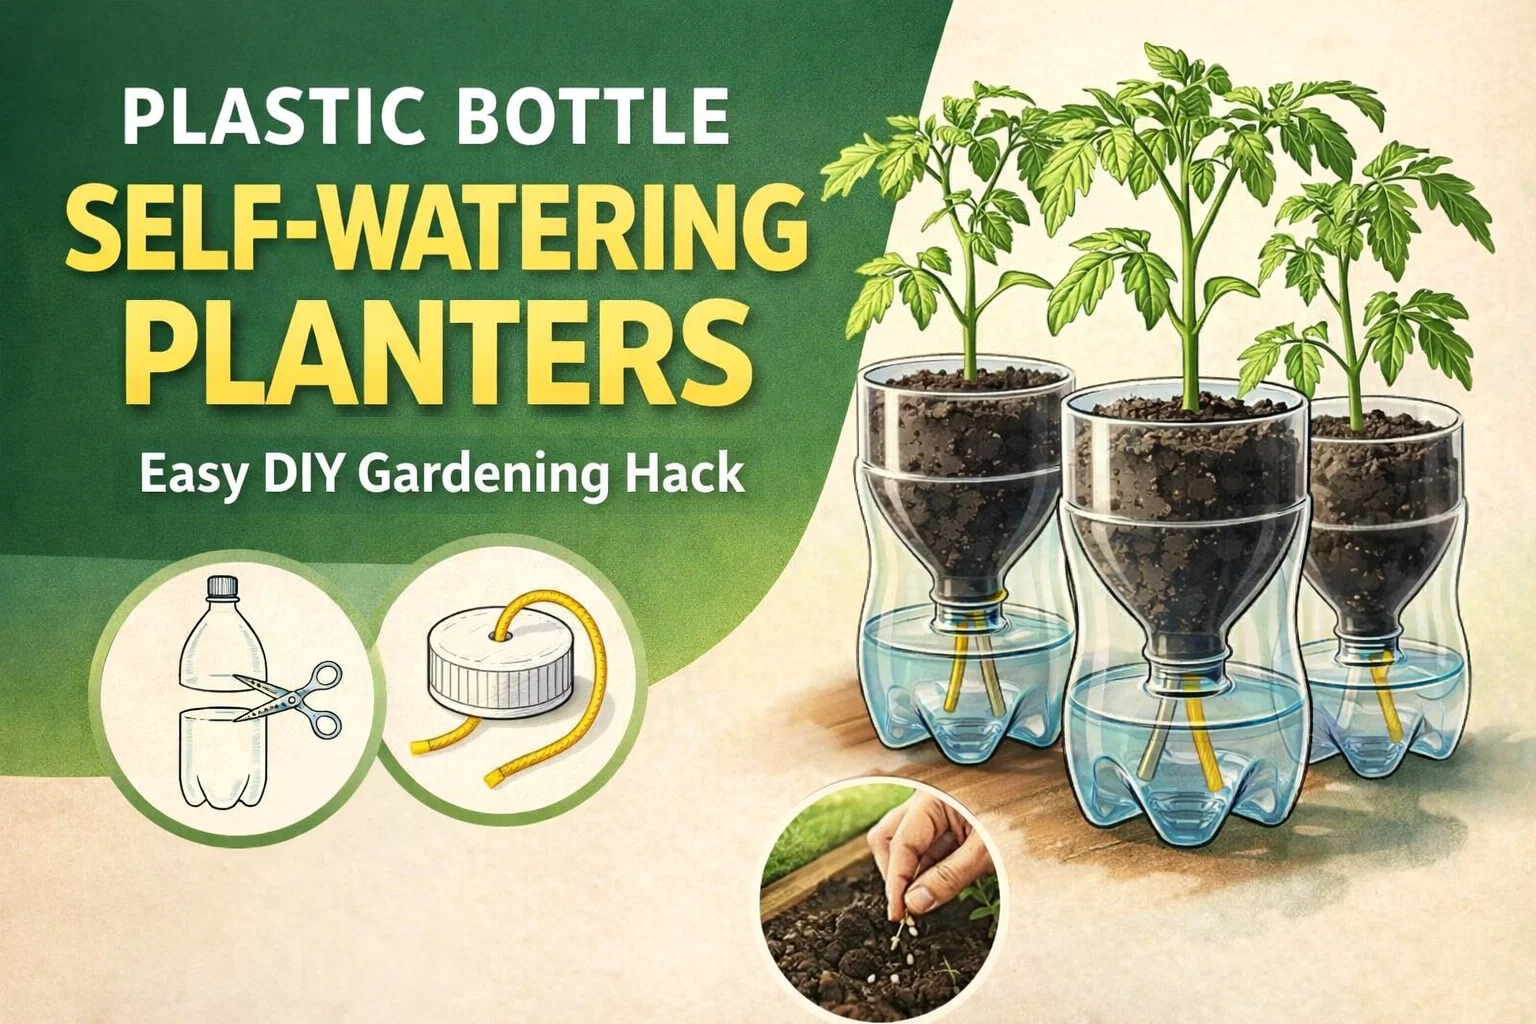
DIY Self-Watering Soda Bottle Planter Easy Upcycled Indoor Herb Vegetable Garden Hack
Turning trash into treasure is one of the most rewarding aspects of sustainable living. If you have ever looked at an empty two liter plastic bottle and wondered if it could be something more than just recycling, you are in the right place. Creating a self watering planter is a brilliant way to repurpose plastic while ensuring your indoor plants stay perfectly hydrated. This project is ideal for beginners, urban gardeners with limited space, or anyone who occasionally forgets to water their green friends. By using basic physics and a bit of creativity, you can build a functional, efficient, and eco friendly garden right on your windowsill.
The Science Behind Self Watering Planters
Before we dive into the construction, it is helpful to understand how these little systems work. The design relies on capillary action, which is the ability of a liquid to flow in narrow spaces without the assistance of, or even in opposition to, external forces like gravity. In this setup, a piece of wicking fabric acts as a bridge between the water reservoir at the bottom and the soil at the top. As the plant consumes moisture or as the water evaporates from the soil surface, the wick draws more water up from the base to maintain a consistent level of dampness. This prevents the common cycle of drought and deluge that often stresses indoor plants.
Why Upcycling Plastic Bottles Matters
Plastic waste is a significant environmental challenge, and finding ways to extend the life of these materials is a small but impactful step. Instead of sending a bottle to a processing plant, you are turning it into a long term tool for food production or home decoration. Beyond the environmental perks, these containers are lightweight, durable, and clear, which allows you to monitor root growth and water levels with ease. It is a practical education in sustainability and botany all rolled into one.
Materials You Will Need
One of the best things about this gardening hack is that you likely already have everything you need in your pantry or craft closet. There is no need for expensive specialized equipment. Here is the checklist to get started:
- A clean 2-liter plastic bottle: Clear bottles work best so you can see the water level.
- Sharp scissors or a utility knife: You will need these to cut through the plastic safely.
- Wicking material: Strips of absorbent fabric like Pellon Thermolam Plus, cotton rope, or even old t-shirt strips work well.
- Potting mix: A soil-less blend of peat and perlite is recommended for better moisture regulation.
- Seeds or seedlings: Tomatoes, herbs, and leafy greens are excellent candidates for this system.
- Organic fertilizer: A small handful mixed into the soil provides the necessary nutrients.
- A drill or a heated metal tool: This is for puncturing drainage and aeration holes.
Step by Step Construction Guide
Follow these steps to ensure your planter is sturdy and functional. Safety is key, so always cut away from your body and supervise children if this is a family project.
Preparing the Bottle
Start by removing any labels from your bottle to give it a clean look. Measure approximately five inches up from the base of the bottle and mark a line around the circumference. Use your scissors or knife to cut the bottle in half along this line. The bottom portion will serve as your water reservoir, while the top portion, when inverted, will become the planting funnel.
Adding Aeration and Drainage
Proper airflow is essential to prevent root rot. Using a small drill bit or a heated nail, puncture 3/8 inch holes approximately one inch apart around the top shoulder of the bottle. These holes allow the roots to breathe and ensure that the soil does not become stagnant. Additionally, ensure the bottle cap is removed, as the neck of the bottle is where the wick and excess water will pass through.
Installing the Wick
Cut two strips of your wicking fabric. Each strip should be about four inches long and one inch wide. Thread these through the neck of the inverted bottle top. You want about half of the fabric to hang down into the reservoir and the other half to sit inside the funnel where the soil will be. This ensures a steady climb for the water from the base to the roots.
Choosing the Right Growing Medium
Standard garden soil is often too heavy and dense for a self watering system. It can become compacted and waterlogged, which suffocates the plant. Instead, use a high quality soil-less potting mix. A blend of peat moss and perlite is perfect because it is lightweight and has excellent capillary properties. Before adding it to your planter, dampen the mix slightly. This “primes” the soil so that the wicking process can begin immediately once the system is assembled.
Mixing in Nutrients
Because the volume of soil in a two liter bottle is relatively small, the nutrients can be depleted quickly as the plant grows. Mixing a small handful of organic, slow release fertilizer into your potting mix before planting gives your seeds a great head start. This ensures that every time the water travels up the wick, it helps distribute those nutrients throughout the root zone.
Planting Your Seeds or Seedlings
Once your soil is prepared and your wick is in place, fill the inverted top section with the potting mix. If you are sowing seeds, follow the depth instructions on the seed packet. For seedlings, gently place the root ball into the soil and firm it down. The first time you plant, it is important to water lightly from the top. This settles the soil around the roots and helps the wick establish its first connection with the moisture.
Best Plants for Bottle Gardens
While you can grow many things in these planters, some species thrive better than others in this specific environment. Consider the following options:
- Herbs: Basil, mint, parsley, and cilantro love the consistent moisture.
- Leafy Greens: Lettuce and spinach grow quickly and stay tender in self watering pots.
- Vegetables: Cherry tomatoes or small pepper varieties can work if provided with enough sunlight.
- Flowers: Pansies and marigolds add a splash of color to your windowsill.
Maintenance and Care Tips
Even though this system is designed to be low maintenance, a little bit of attention goes a long way in keeping your plants healthy. Monitor the water level in the bottom reservoir; you never want it to go completely dry, but you also do not want the soil to be constantly submerged in water. The wick should do the work of lifting the water as needed.
Cleaning and Preventing Algae
Because the lower reservoir is clear and exposed to sunlight, you might eventually notice green algae growing in the water. While usually harmless to the plant, it can look untidy. To prevent this, you can wrap the bottom of the bottle in decorative paper, fabric, or paint it. This blocks the light and keeps the water clear. Every few weeks, it is a good idea to empty the reservoir and rinse it out with fresh water to prevent mineral buildup.
Sunlight Requirements
Most edible plants like herbs and tomatoes need at least six hours of sunlight per day. A south facing windowsill is usually the best spot. If your home does not get much natural light, you can supplement with a small LED grow light. Since these planters are portable, you can easily move them around to follow the sun throughout the seasons.
The Benefits of Consistent Hydration
One of the biggest killers of houseplants is inconsistent watering. We either forget for a week and the plant wilts, or we overcompensate and drown the roots. The self watering bottle planter solves this by providing a “demand based” system. The plant takes exactly what it needs. This leads to faster growth, stronger stems, and more vibrant foliage. For vegetable plants, consistent moisture is especially important to prevent issues like blossom end rot or fruit cracking.
Expanding Your Upcycled Garden
Once you have mastered the single bottle planter, you can scale up. Imagine a whole row of these hanging in a vertical garden or lined up on a dedicated plant shelf. You can experiment with different bottle sizes, like using smaller water bottles for tiny succulents or larger five liter jugs for bigger plants. The possibilities are endless when you start seeing every piece of plastic as a potential home for a plant.
Teaching Sustainability to Others
This project is a fantastic way to teach children about biology and the environment. Seeing the roots grow through the clear plastic and watching the water level drop over time provides a visual lesson in how plants drink and grow. It encourages a sense of responsibility and shows that we can make useful things out of items we would otherwise throw away.
Conclusion: Small Steps to a Greener Home
Building a self watering planter from a soda bottle is a simple project that yields huge rewards. It combines the joy of gardening with the satisfaction of upcycling, resulting in a system that makes plant care easier and more successful. Whether you are looking to grow a kitchen herb garden or just want to add some greenery to your desk, this DIY hack is a proven winner. So, the next time you finish a bottle of soda, do not just toss it in the bin. Grab some scissors, a bit of fabric, and some soil, and start growing something beautiful. Your plants and the planet will thank you for it. Happy gardening!