How to Extract Herb Oil Easy DIY Alcohol Carrier Oil Method Infusion Guide
Harnessing the power of nature often feels like a lost art, but the process of extracting potent oils from herbs is a bridge between ancient wisdom and modern self-sufficiency. If you have ever walked through a garden and wished you could bottle that essence for later use, you are in the right place. Creating your own herbal extracts at home allows you to control the quality of your ingredients and ensures that your topical applications or wellness products are as pure as possible. This specific method, which utilizes an alcohol pre-soak followed by an oil infusion, is widely regarded by enthusiasts for its ability to pull out both alcohol-soluble and oil-soluble constituents, resulting in a truly superior final product.
Understanding the Science of Multi-Solvent Extraction
Most traditional herbal oils are made by simply sitting dried plants in a jar of oil for several weeks. While this works for some plants, many of the most beneficial compounds within a leaf or flower are locked behind tough cellular walls that oil alone cannot penetrate efficiently. This is where the alcohol pre-soak method becomes a game changer for the home herbalist. By using a small amount of high-proof alcohol first, you effectively “unlock” the plant material.
The alcohol acts as a solvent that breaks down the waxy coatings and cell structures of the herb. When you later evaporate that alcohol, you are left with a concentrated resin. By then introducing a carrier oil and applying gentle heat, those newly freed compounds are easily absorbed into the oil. The result is a darker, more aromatic, and significantly more potent infusion than a standard cold-maceration oil. It is a professional-level technique that you can easily replicate in your own kitchen with just a few basic tools.
Step 1: The Essential Pre-Soak Phase
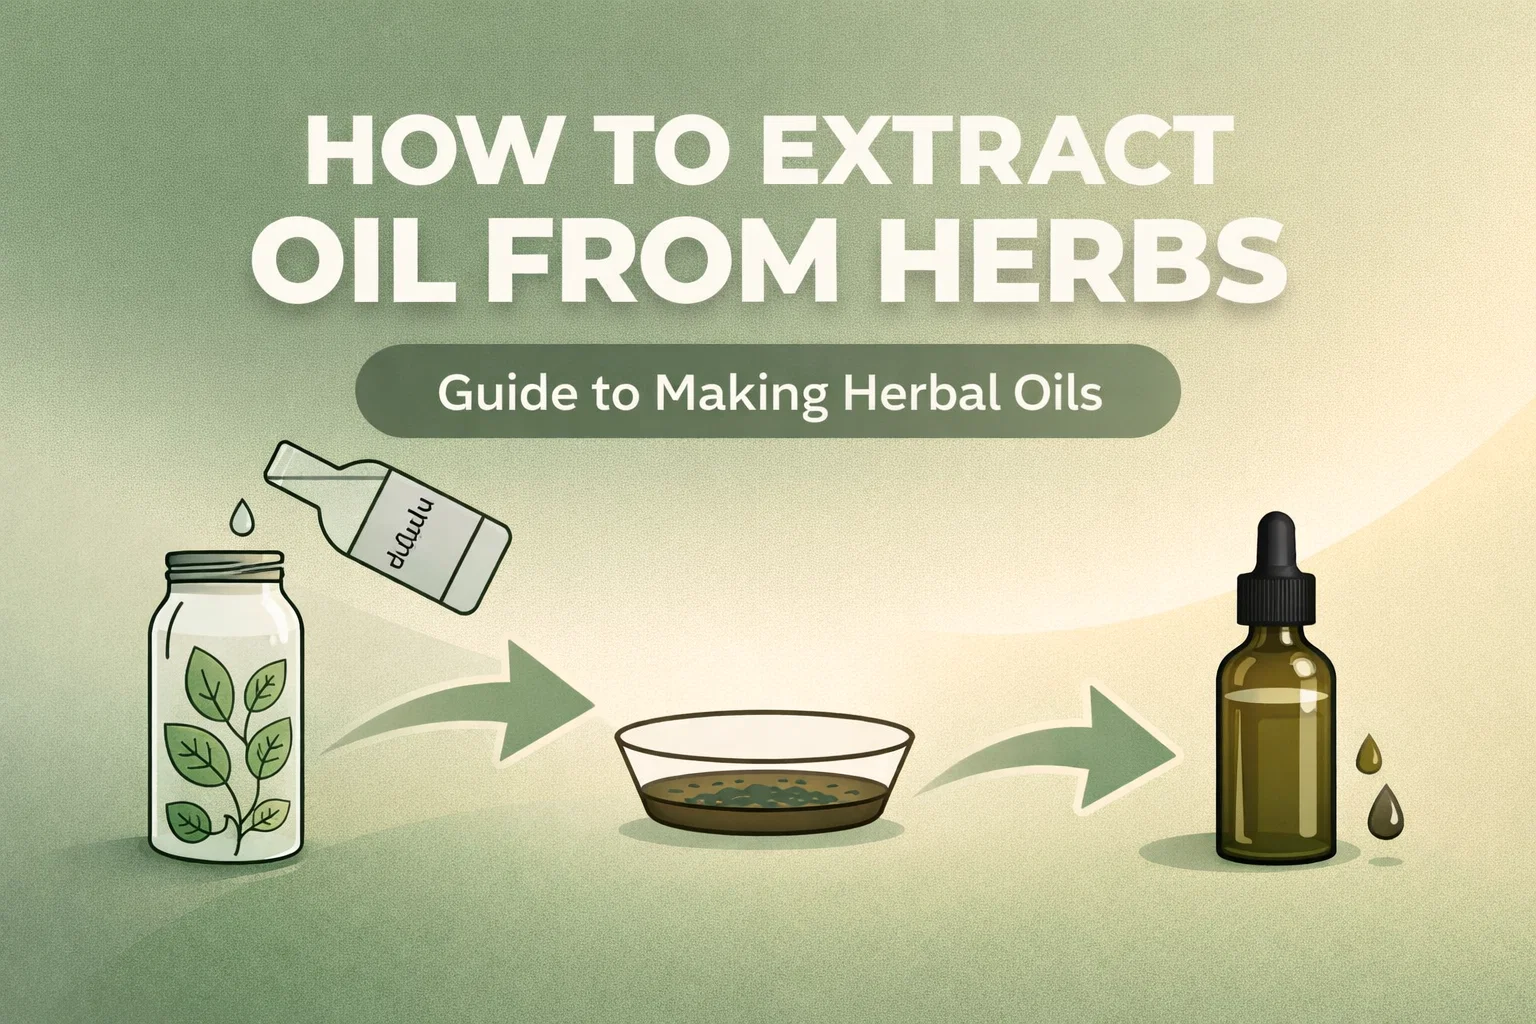
The journey begins with high-quality dried herbs and a bottle of high-proof alcohol. It is important to use dried herbs rather than fresh ones for this process to prevent mold growth and ensure the stability of your oil. Common choices include lavender for its calming properties, rosemary for circulation, or calendula for skin soothing. Place your herbs into a clean glass jar, filling it about halfway, and then pour in enough alcohol to just dampen the material. You are not looking to make a soup; you want the herbs to be saturated but not swimming in liquid.
Choosing the Right Alcohol
For the best results, look for an alcohol that is at least 80 to 100 proof. Vodka is a popular choice because it is odorless and easy to find, but many experienced makers prefer a 190-proof grain alcohol if it is available in their area. The goal is to use the alcohol as a temporary vehicle to extract the resins. Once the jar is sealed, let it sit for 24 to 48 hours. During this window, the alcohol is doing the heavy lifting, pulling the medicinal properties out of the plant fibers and into the liquid.
Step 2: Evaporation and Creating the Resin
After the soaking period is complete, you will notice the liquid has taken on a deep, dark color. Now, it is time to remove the alcohol. Pour the mixture into a shallow glass or ceramic bowl. The increased surface area of a shallow dish allows the alcohol to evaporate much faster than it would in a tall jar. Place the dish in a well-ventilated area, perhaps near a window or under a small fan. Safety is key here, so ensure there are no open flames or heat sources nearby during this stage.
As the hours pass, the liquid will diminish, leaving behind a thick, sticky, and highly concentrated substance known as a resin. This resin contains the “soul” of the plant. You will know it is ready when the sharp scent of alcohol is gone, leaving only the rich, earthy aroma of the herbs. This step requires patience, but it is the secret to why this specific oil extraction method is so much more effective than others.
Step 3: Finding the Perfect Carrier Oil
Once your resin is ready, you need a medium to hold it. This is your carrier oil. The choice of oil depends largely on how you plan to use the finished product. If you are creating a massage oil or a body butter, you want something that absorbs well and has a long shelf life. Some of the most popular options include:
- Olive Oil: A classic choice that is deeply moisturizing and very stable, though it has a distinct scent.
- Jojoba Oil: Technically a liquid wax, it mimics the skins natural oils perfectly and is excellent for facial applications.
- Sweet Almond Oil: A lightweight oil that is great for general skincare and has a very mild aroma.
- Fractionated Coconut Oil: Stays liquid at room temperature and has an almost indefinite shelf life, making it perfect for roller bottles.
Combine your resin with your chosen carrier oil in a heat-safe glass container or the top of a double boiler. The ratio generally follows a standard guideline of one part herb resin to five or ten parts oil, depending on how strong you want the final infusion to be.
Step 4: The Art of Gentle Heating
Heat is the final catalyst in the extraction process, but it must be handled with care. High heat can destroy the delicate volatile oils and therapeutic compounds you just worked so hard to extract. The best way to manage this is with a double boiler. If you do not have one, you can simply place your glass jar inside a pot filled with a few inches of water, creating a makeshift water bath.
Temperature Control and Timing
Keep the heat on the lowest possible setting. You want the water to be warm, perhaps steaming slightly, but never boiling. Ideally, the oil itself should stay between 100 and 110 degrees Fahrenheit. Allow the mixture to warm for several hours. During this time, the carrier oil will bond with the herbal resin. You will see the oil darken and begin to smell like the herb. This slow “cooking” process ensures a thorough infusion without scorching the oil or the plant material.
Filtering and Final Storage
After several hours of gentle heating, turn off the heat and let the oil cool slightly. While it is still warm and fluid, strain the mixture through a fine-mesh sieve lined with cheesecloth or a clean muslin bag. Squeeze the cloth firmly to get every last drop of the potent oil out of the herb remains. This leftover plant material can be composted, as its medicinal work is now done.
Transfer your finished herbal oil into dark glass bottles. Amber or cobalt glass is preferred because it filters out UV light, which can cause oils to go rancid and degrade over time. Label your bottles clearly with the type of herb used and the date of creation. When stored in a cool, dark place, these oils can last for a year or even longer.
Creative Ways to Use Your Infused Oils
Now that you have a bottle of potent, home-extracted herbal oil, the possibilities are endless. These oils serve as a magnificent base for various DIY projects. You can use them directly as a concentrated serum for specific skin concerns, or you can incorporate them into larger recipes. For instance, mixing your oil with melted beeswax creates a soothing salve. Combining it with magnesium flakes and shea butter results in a powerful muscle-relaxing lotion.
Beyond topical use, these oils are wonderful for scalp treatments. A rosemary-infused oil, made using this alcohol-extraction method, is legendary for supporting hair health and shine. By making the oil yourself, you are ensuring that your beauty and wellness routine is free from synthetic fragrances, preservatives, and mystery chemicals often found in store-bought alternatives.
Best Practices for Success
To ensure your herbal oil turns out perfectly every time, keep a few best practices in mind. Always start with sterilized equipment. Any water or bacteria introduced during the process can lead to spoilage. Secondly, do not rush the evaporation stage. If alcohol is left in the resin, it may not mix perfectly with the oil later on. Finally, always trust your nose. A good herbal oil should smell fresh and like the plant it came from. If it smells “off” or like old cooking oil, it is best to discard it and start fresh.
Embracing the Slow Living Movement
There is a profound sense of satisfaction that comes from creating your own natural supplies. In a world of instant gratification, the two or three days it takes to properly extract oil from herbs offers a chance to slow down and connect with the natural world. It turns a simple hobby into a useful skill that promotes self-reliance and a deeper understanding of the plants that grow around us.
Whether you are building an apothecary for your family or simply looking for a more effective way to use the herbs from your garden, the alcohol-to-oil extraction method is a rewarding technique to master. It respects the complexity of the plants and rewards your patience with a product that is far superior to anything you could find on a standard grocery shelf.
Conclusion: Start Your Infusion Journey Today
Mastering the art of herbal extraction is a transformative step for anyone interested in natural living. By following this four-step process of pre-soaking, evaporating, mixing, and gentle heating, you are elevating your DIY game to a professional standard. The resulting oils are rich, potent, and versatile, serving as the foundation for a healthier, more intentional lifestyle. Gather your jars, select your favorite herbs, and begin the process of capturing the magic of the botanical world in a bottle. Your skin, your home, and your spirit will thank you for the effort.
Would you like me to generate a specific recipe for a salve or lotion using this herbal oil as a base?