Professional Soap Finishing How to Plane Bevel Soap Bars
Welcome to the transformative stage of your soap making journey. You have spent weeks perfecting your recipe, blending luxurious oils, and pouring your batter into molds with careful precision. Finally, the initial resting phase has passed, and you unmold your creation. However, as you look at the freshly cut bars, you might notice they look a bit rough. Perhaps there is a powdery layer of soda ash on top, the surface looks dull, or the corners feel incredibly sharp and uncomfortable. This is exactly where the critical art of soap finishing comes into play. By mastering the simple yet highly effective techniques of planing and beveling, you can elevate your handmade soap from a basic DIY craft to a premium, boutique-quality artisanal product that customers will absolutely adore.
The demand for high-quality artisanal goods is growing at an incredible rate, and this trend is projected to dominate the handmade market throughout the coming years. Consumers are no longer just looking for a bar of soap to clean their hands. They are looking for an experience. They want a product that feels luxurious, looks stunning sitting by their sink, and shows true craftsmanship. A professional finish is the key to standing out in this competitive space. Skipping the finishing step leaves bars looking distinctly homemade, which can detract from the perceived value of your hard work. Let us dive into the exact processes, tools, and insider secrets you need to give your soap bars a flawless, glass-like finish.
Understanding the Raw Cut: Why Finishing is Essential
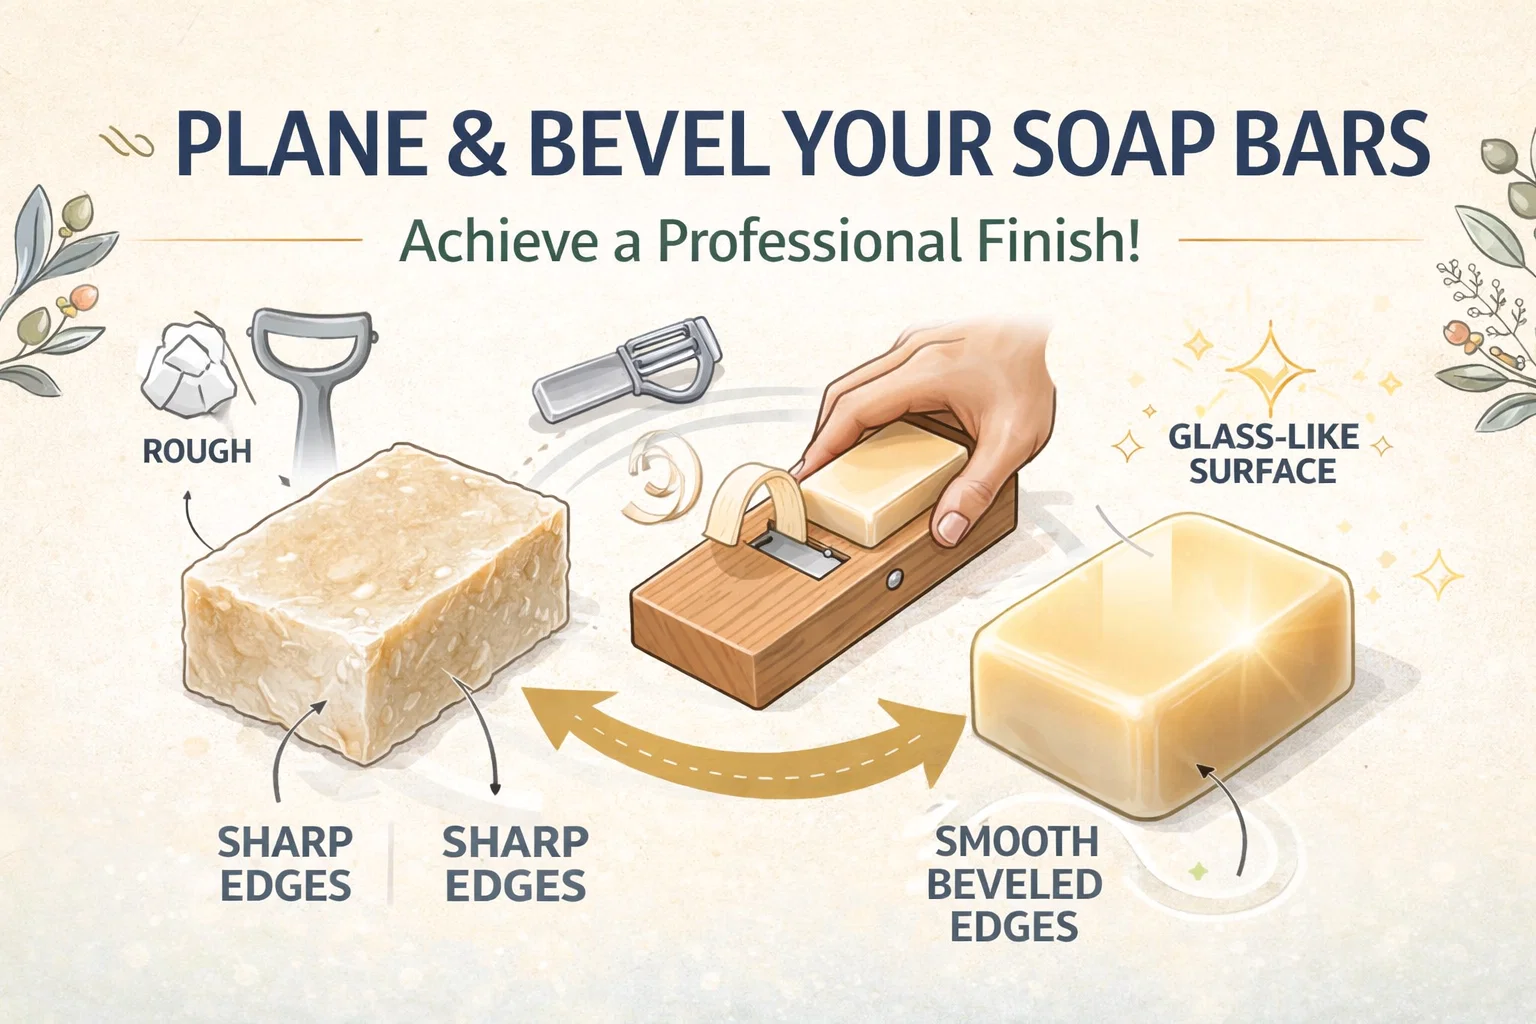
When you first slice your soap loaf into individual bars, you are left with what is known as the raw cut. While there is a certain rustic charm to a freshly cut bar, it often presents a few distinct aesthetic and tactile issues. The most common problem is the presence of sharp edges. When a new bar of soap has hard, ninety-degree corners, it feels uncomfortable and even abrasive when rubbed against the skin in the shower. A bath product should feel soothing and ergonomic from the very first use.
Additionally, the surface of a raw cut bar is frequently dull. Depending on your recipe and the environment where your soap rests, you might also struggle with soda ash. Soda ash is a harmless but visually unappealing white, powdery film that develops on the surface of cold process soap when unsaponified lye reacts with naturally occurring carbon dioxide in the air. While it does not affect the safety or usability of the soap, it hides your beautiful colors and intricate swirl designs. The raw cut simply feels rough and looks unfinished. Transforming this raw block into a polished gem requires two distinct steps: planing the surface and beveling the edges.
The Magic of Planing: Achieving a Glass-Like Surface
Planing is the process of gently shaving off a microscopic layer from the flat surfaces of your soap bar. This technique is the ultimate secret to achieving a professional look. By removing that very top layer of soap, you instantly eliminate any stubborn soda ash, minor bumps, or surface imperfections that occurred during pouring or cutting.
The results of proper planing are truly remarkable. Once that dull outer layer is removed, the true vibrancy of your soap is revealed. The colors suddenly pop with brilliant clarity, and intricate design work like swirls, layers, and embeds become incredibly sharp and defined. More importantly, planing creates a perfectly flat, glass-like finish that catches the light and looks exceptionally premium. It transforms the visual appeal of the bar, making it look sleek and refined.
Choosing the Right Planer
To achieve this flawless finish, you need the right tools. A soap planer is typically a wooden or acrylic block featuring an angled, adjustable blade in the center. The design is very similar to a traditional woodworking block plane. You slide the bar of soap smoothly over the blade, which precisely shaves off a paper-thin ribbon of soap. Having an adjustable blade is crucial for precision. You want to set the blade just high enough to catch the surface imperfections without taking off large chunks of your beautifully crafted product. Taking your time to calibrate your tool will save you from ruining your bars.
Beveling 101: Crafting Smooth and Comfortable Edges
If planing is about visual perfection, beveling is all about tactile luxury. Beveling is the process of shaving down the sharp, ninety-degree corners of your soap bar to create a smooth, angled edge. The industry standard for a beautifully beveled soap is a consistent forty-five-degree angle around all sides.
By rounding out these sharp corners, you ensure that the soap feels smooth and comfortable in the hand from the moment it is picked up. There are no harsh lines to scratch the skin. Instead, the bar feels ergonomic and thoughtfully designed. This small detail heavily influences a customer’s perception of your product. A beveled bar feels like a premium, manufactured luxury item, even though it was lovingly made by hand in small batches.
The Best Tools for Beveling
You do not necessarily need expensive or complicated equipment to achieve a perfect bevel. Many specialized acrylic and wooden soap bevelers exist on the market, featuring a V-shaped groove with a built-in blade perfectly angled at forty-five degrees. You simply glide the edge of your soap down the groove for a uniform cut every time.
However, if you are just starting out and want to keep your tool kit simple, you can achieve fantastic results with items you likely already own. A basic kitchen vegetable peeler is an incredible tool for beveling soap edges. By holding the peeler at a steady angle and pulling it smoothly along the corner of the bar, you can create a beautiful, handcrafted bevel. A simple wire soap cutter can also be used to carefully trim the edges if you possess a steady hand and a good eye for angles.
Mastering the Timing: When to Plane and Bevel
One of the most critical factors in achieving a clean, professional finish is timing. You cannot simply plane and bevel your soap the moment you cut the loaf. The moisture content and firmness of the soap play a massive role in how the blade interacts with the material.
The golden rule for perfect timing is to let your cut bars cure for one to two weeks before attempting to plane or bevel them. During this initial curing window, the outer layers of the soap lose excess water and begin to harden. If you try to plane the soap when it is too fresh and soft, the blade will drag and create a gummy, messy surface. The soap might stick to the planer, ruining your smooth finish. On the other hand, if you wait several months and the soap becomes entirely rock hard, pushing it across a blade becomes incredibly difficult and dangerous. The soap is likely to chip, crack, or splinter rather than shaving off in a smooth ribbon. Finding that sweet spot where the soap is firm to the touch but still slightly pliable yields the cleanest, most satisfying cuts.
Common Mistakes to Avoid in Soap Finishing
As you refine your soap making skills, being aware of common pitfalls will save you time and frustration. The biggest mistake beginners make is skipping the finishing step entirely. It is tempting to finish cutting your loaf and immediately put the bars on the curing rack, but leaving the bars raw drastically reduces their visual appeal and market value. Take the extra time to finish them properly.
Another common error is applying inconsistent pressure when planing. If you press too hard on one side of the bar while sliding it over the planer blade, you will end up with a lopsided, uneven surface. The goal is to apply gentle, even pressure across the entire face of the soap, letting the sharp blade do the actual work. Keep your movements fluid and steady.
Finally, failing to clean your tools between bars can lead to cross-contamination and messy finishes. If you are planing a brightly colored soap and then immediately switch to a pure white bar without wiping down the blade, the colored shavings will inevitably smudge onto the pristine white surface. Keep a clean, dry cloth nearby to carefully wipe your planer and beveler blades between different batches.
Insider Secret: Zero Waste Soap Making
A major concern when planing and beveling soap is the apparent waste of perfectly good product. As you shave away the surfaces and edges, you will accumulate a surprising amount of soap ribbons and curls. Do not throw these away under any circumstances. Embracing a zero-waste philosophy is not only great for the environment but also fantastic for your creativity and your profit margins.
There are countless ways to repurpose your soap shavings. The most popular method is to use them as inclusions for confetti soap. Simply gather your colorful shavings, chop them up slightly if needed, and gently fold them into a fresh batch of uncolored or lightly colored cold process soap batter. When you cut this new loaf, the finished bars will feature a beautiful, playful confetti pattern that customers love. It is a fantastic way to create a completely new product line from your scraps.
If you do not want to make confetti soap, you can gather the shavings and place them inside exfoliating sisal wash bags. These pouches can be sold as travel-friendly body scrubbers or given away as generous free samples with larger customer orders. You can also rebatch the shavings by melting them down with a tiny amount of water in a slow cooker to create rustic, hand-formed soap balls. Every single curl of soap has value, so save your shavings in a dedicated airtight container until you are ready to use them.
Elevating Your Craft for the Modern Market
The journey from a raw, unfinished block of soap to a premium, glass-like bar is a rewarding process that showcases your dedication to your craft. By taking the time to carefully plane away imperfections and bevel sharp edges into comfortable curves, you drastically enhance the user experience. Your customers will feel the difference the moment they pick up a bar, and they will see the difference in how beautifully the colors and designs shine through.
Remember that patience is just as important as your tools. Allow your soap to reach that perfect one to two-week curing window before making your cuts, and always approach the planer with steady, even pressure. Do not forget to collect your colorful scraps to create sustainable, zero-waste products that add even more value to your brand. With these professional techniques in your repertoire, your handmade soap will easily stand out in the bustling artisanal market, radiating quality, luxury, and unmatched craftsmanship.