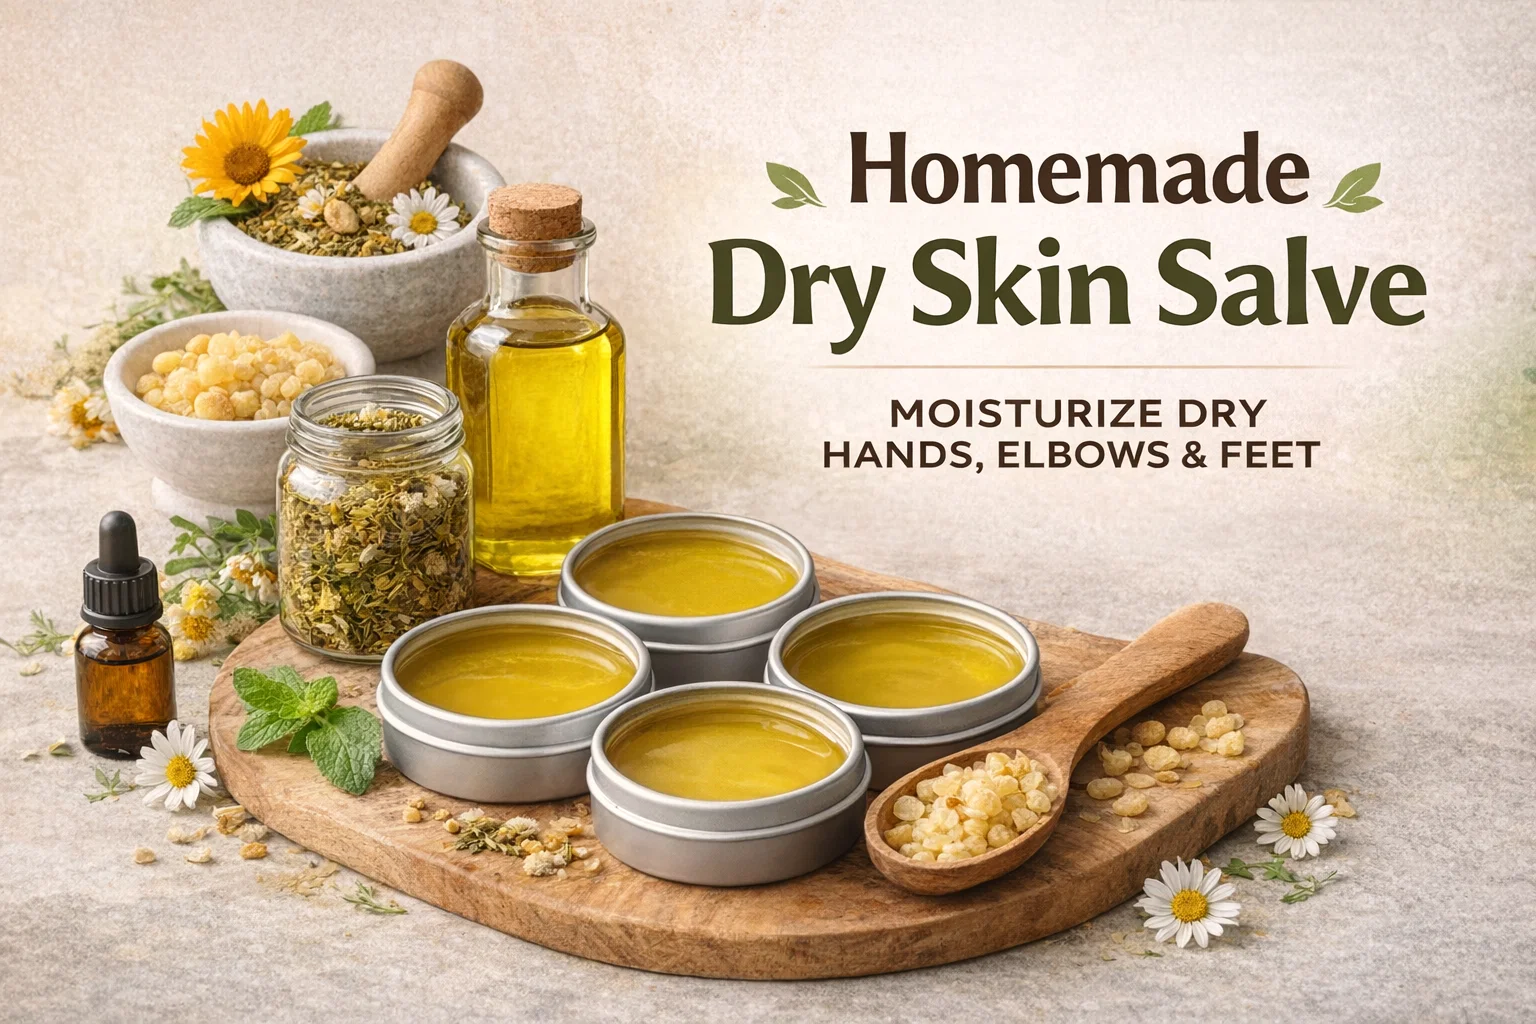
DIY Homemade Dry Skin Salve Recipe
If you have ever struggled with rough, parched, or cracked skin, you know how frustrating it can be to find a product that actually works. Store bought lotions often sit on the surface of the skin, providing temporary relief before leaving your hands or heels feeling drier than before. The secret to long lasting moisture does not lie in a complex chemical formula but rather in the natural, healing power of botanicals. Creating your own homemade dry skin salve is a beautifully simple, rewarding process that bridges the gap between basic skincare and traditional herbalism. By harnessing the soothing properties of calendula, plantain leaf, and chamomile, you can craft a deeply nourishing balm right in your own kitchen.
Whether you are dealing with harsh winter weather, spending hours working in the garden, or simply prone to dry patches on your elbows and knees, this DIY herbal salve provides a protective, moisturizing barrier. It is completely natural, highly effective, and incredibly easy to make. Let us explore exactly how to create this skin loving remedy from scratch, understand the science behind its ingredients, and master the art of herbal oil infusions.
Why Choose a Homemade Herbal Salve Over Commercial Lotions?
When you walk down the skincare aisle at your local pharmacy, you are greeted by rows of brightly colored bottles promising instant hydration. However, a quick glance at the ingredient list often reveals a cocktail of synthetic fragrances, artificial preservatives, and petroleum based derivatives. While these ingredients might mimic the feeling of moisture, they do not actively nourish your skin on a cellular level. Furthermore, lotions are primarily composed of water. Once that water evaporates, your skin is left craving more hydration.
A handmade salve is fundamentally different. Salves are anhydrous, meaning they contain absolutely zero water. They are composed entirely of nutrient rich carrier oils and natural waxes. This structural difference means that a little goes a very long way. When you apply a botanical salve, the oils sink deeply into the epidermis to deliver vitamins and antioxidants, while the wax forms a breathable, protective seal over the skin. This barrier locks in your body’s natural moisture and shields your skin from environmental stressors like cold wind and dry indoor heating.
Deep Dive: The Botanical Powerhouses in Your Salve
The true magic of this recipe lies in the synergistic blend of three incredibly powerful herbs. Each plant brings its own unique profile of healing benefits to the formula.
Dried Calendula
Calendula, often known as pot marigold, is one of the most beloved herbs in natural skincare. Its bright orange and yellow petals are packed with flavonoids and saponins, which boast strong anti-inflammatory and tissue healing properties. Calendula promotes cellular repair, making it exceptionally effective for soothing chapped skin, minor scrapes, and rough patches. When infused into oil, it imparts a beautiful golden hue and a wealth of regenerative benefits.
Dried Plantain Leaf
Do not confuse this herb with the banana like fruit. Plantain leaf is a common backyard herb that many people mistake for a weed. In the world of herbalism, it is highly prized for its remarkable drawing and soothing capabilities. Plantain contains allantoin, a natural compound that promotes healthy skin growth and rapid tissue recovery. It is excellent for calming irritated, red, or inflamed skin, making it a perfect companion to calendula in any healing balm.
Dried Chamomile
Most of us associate chamomile with a relaxing cup of bedtime tea, but its calming effects extend directly to your skin. Chamomile flowers are rich in a compound called bisabolol, which helps to visibly reduce redness and soothe deeply irritated skin. It is exceptionally gentle, which is why it is frequently used in formulations for sensitive skin types. Adding chamomile to your salve ensures a mild, comforting touch that is safe for the whole family.
Olive Oil: The Perfect Carrier
To extract the benefits of these dried herbs, we need a carrier oil. Extra virgin olive oil is an outstanding choice for dry skin formulations. It is a heavier oil that is incredibly rich in squalene and oleic acid, both of which mimic your skin’s natural sebum. Olive oil penetrates deeply to provide intense hydration. Because it is highly stable, it holds up perfectly to the low heat required for herbal infusions.
Beeswax: The Protective Seal
Beeswax is what transforms our liquid herbal oil into a solid, scoopable salve. Beyond its structural role, beeswax is a humectant. This means it actively attracts water molecules from the air and draws them to your skin. It also possesses mild antibacterial properties and creates a defensive layer on your skin without clogging pores.
Peppermint Essential Oil (Optional but Recommended)
While the infused herbs provide a subtle, earthy scent, adding a few drops of peppermint essential oil elevates the sensory experience. Peppermint contains menthol, which provides a gentle cooling sensation upon application. This cooling effect can temporarily relieve the itchy, uncomfortable feeling often associated with severely dry, cracked skin. It also leaves your salve smelling incredibly fresh and clean.
Essential Equipment for Your Home Apothecary
You do not need a professional laboratory to craft high quality skincare. You likely have most of the necessary tools in your kitchen right now. Before you begin, gather the following items:
- A heat safe glass jar: A standard mason jar works perfectly for the herbal infusion.
- A medium saucepan: You will use this to create a makeshift double boiler.
- A fine mesh strainer or cheesecloth: Essential for separating the plant matter from the finished oil.
- A second clean glass jar or glass measuring cup: To catch the strained oil.
- A stirring utensil: A wooden chopstick, a stainless steel spoon, or a glass stirring rod will do.
- Salve tins or small glass jars: For storing the finished product. Two ounce or four ounce metal tins are ideal.
Step-by-Step Instructions: Crafting Your Dry Skin Salve
Making a botanical salve is a two part process. First, we must extract the beneficial compounds from the plant material into our olive oil. This is known as an herbal oil infusion. Second, we will thicken that infused oil with beeswax to create the final balm.
Step 1: Preparing the Herbal Infusion
Begin by measuring out your dried herbs. You will need one tablespoon of dried calendula, one tablespoon of dried plantain leaf, and one tablespoon of dried chamomile. Place all three herbs into your clean, heat safe glass jar. Next, pour four ounces of olive oil over the herbs. Ensure that the plant material is completely submerged. If any herbs are poking above the surface of the oil, they could potentially mold, though this is less of a risk with fully dried herbs.
Secure the lid on your jar. Now, place a small cloth or a metal canning ring at the bottom of your saucepan. Set your glass jar on top of the cloth. This prevents the glass from resting directly against the hot metal bottom of the pan, reducing the risk of the glass cracking. Fill the saucepan with water until it reaches about halfway up the sides of the jar. Place the pan on your stove and turn the heat to the lowest possible setting.
Allow the water to gently warm. You do not want the water to boil. The goal is to apply low, steady heat to coax the medicinal properties out of the herbs and into the oil. Let the jar sit in this warm water bath for one to two hours. You can also use a crock pot set to the warm setting for this step. As the time passes, you will notice the oil taking on a richer, more vibrant color and a deeply herbal aroma.
Step 2: Straining the Botanical Oil
Once your infusion time is complete, carefully remove the jar from the water bath using an oven mitt. The jar will be quite hot. Allow it to cool for a few minutes until it is safe to handle. Place your fine mesh strainer or a piece of folded cheesecloth over your second clean glass jar or a glass measuring cup with a pour spout. Carefully pour the oil and herb mixture through the strainer. Use the back of a spoon to press down firmly on the herbs, squeezing out every last drop of that precious, golden oil. You can now compost the spent plant material.
Step 3: Creating the Salve Base with Beeswax
Take your newly infused, strained botanical oil and prepare for the final phase. Add one tablespoon of beeswax pellets to the warm oil. If the oil has cooled down too much to melt the wax, you will need to apply a little more heat. Place the jar containing the oil and beeswax back into your warm water bath on the stove. Stir gently and continuously until the beeswax is completely melted and incorporated into the oil. The mixture should look clear and uniform.
Step 4: Customizing and Pouring
Remove the mixture from the heat. If you are choosing to use peppermint essential oil, now is the time to add it. Wait a minute or two for the mixture to cool slightly but do not let it solidify. Stir in five to ten drops of the peppermint oil. If you add essential oils while the base is boiling hot, the volatile compounds will evaporate immediately.
Carefully pour the liquid gold into your clean salve tins. Leave the tins sitting undisturbed on your counter. As the mixture cools to room temperature, it will slowly transition from a clear liquid to an opaque, solid balm. This cooling process usually takes about thirty to sixty minutes depending on the temperature of your kitchen. Once fully solid, place the lids securely onto your tins.
Expert Tips for Perfect Salve Consistency
The beauty of DIY skincare is that you can easily adjust the recipe to suit your personal preferences. The ratio of four ounces of oil to one tablespoon of beeswax creates a medium soft salve that is easy to scoop out with your fingers. However, temperatures affect the final product. In the heat of summer, your salve might feel a bit too soft. In the dead of winter, it might feel quite hard.
You can perform a quick test before pouring your entire batch into tins. Dip a metal spoon into the melted oil and wax mixture, then place the spoon in your freezer for two minutes. Pull it out and check the consistency. If it is too soft for your liking, return the jar to the heat and add a little more beeswax. If it is too hard, add a splash more olive oil. Once you achieve your desired texture, proceed with pouring it into the tins.
How to Incorporate the Salve into Your Routine
This herbal dry skin salve is incredibly versatile. Because it is highly concentrated, start with a pea sized amount. Rub it between your fingers to gently warm it up, then massage it directly into the skin. It is perfect for applying to parched hands after washing dishes or working outside. Massage it into rough elbows and scaly knees after a warm shower when your pores are open and ready to absorb the moisture.
For an intensive overnight foot treatment, massage a generous layer of the salve onto your cracked heels right before bed. Immediately put on a pair of thick, clean cotton socks. The socks will trap the heat and the moisture, allowing the botanicals to work their magic all night long. You will wake up to incredibly soft, rejuvenated feet.
Proper Storage and Shelf Life
Since this homemade salve contains no water, it has a naturally long shelf life. The primary factor that dictates how long it will last is the expiration date of your olive oil. Generally, a properly stored botanical salve will stay fresh for six to twelve months. To maximize its lifespan, store your tins in a cool, dry place away from direct sunlight. Excessive heat can cause the salve to melt and reform, which might slightly alter its texture. Most importantly, always make sure your hands are completely dry before dipping your fingers into the tin. Introducing water into the salve can encourage mold growth.
Conclusion
Taking control of your skincare routine by crafting your own products is a wonderfully empowering experience. This homemade dry skin salve proves that you do not need complicated, synthetic ingredients to achieve profound, lasting hydration. By relying on the time tested benefits of calendula, plantain leaf, and chamomile, you are providing your skin with true botanical nourishment. Whether you keep a tin on your nightstand, toss one in your gardening tote, or give them away as thoughtful, handmade gifts to friends and family, this herbal recipe is sure to become a staple in your natural living toolkit. Gather your ingredients, enjoy the relaxing process of herbal infusion, and say goodbye to dry, cracked skin for good.