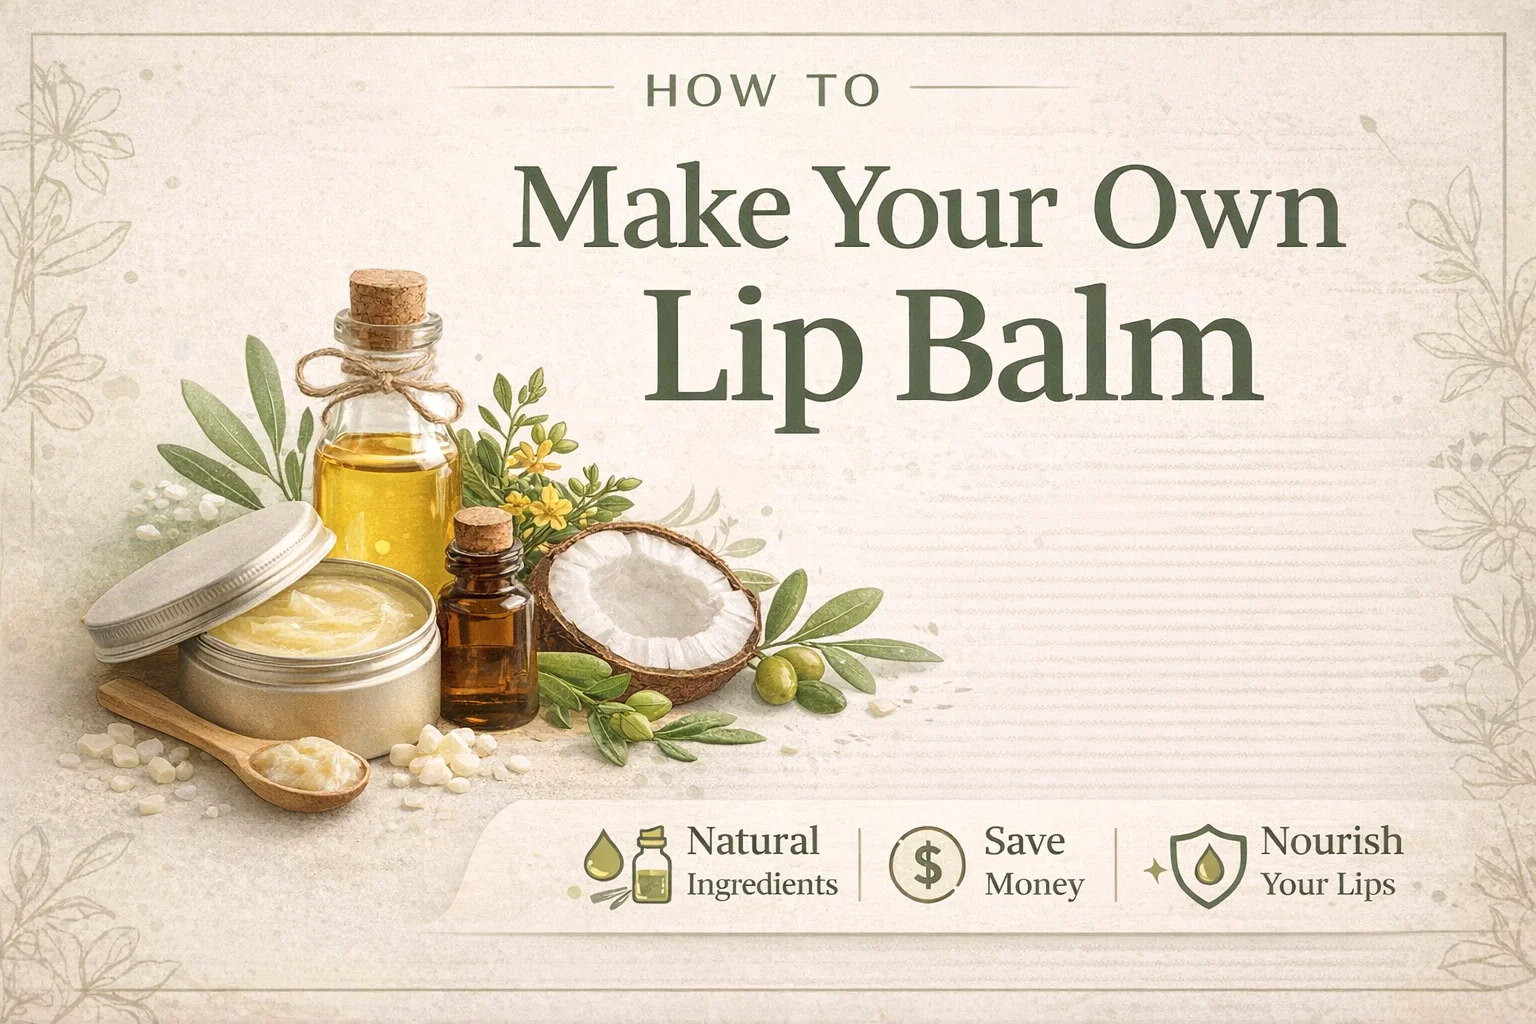
DIY Natural Lip Balm Recipe How to Make Homemade Lip Balm with Essential Oils
Stepping into the world of natural beauty is like opening a door to a cleaner, more sustainable lifestyle. If you have ever flipped over a tube of commercial lip balm and found yourself squinting at a list of ingredients that sound more like a chemistry experiment than skincare, you are not alone. There is a growing movement toward DIY apothecary, and for good reason. Making your own lip balm is one of the easiest, most rewarding projects you can start with. It requires minimal equipment, takes less than thirty minutes, and results in a product that is often superior to anything you can find on a drugstore shelf.
The beauty of the recipe shown in the guide is its simplicity and versatility. By combining the structural integrity of beeswax with the deep hydration of coconut, olive, and jojoba oils, you create a barrier that locks in moisture while allowing your skin to breathe. This post will walk you through every nuance of the process, from choosing the right ingredients to mastering the perfect pour, ensuring your homemade lip balm is smooth, effective, and perfectly scented.
The Essential Ingredients for Perfect Lip Care
To create a high-quality lip balm, you need a balance of hard waxes and liquid oils. The recipe in our visual guide uses a specific ratio designed to stay firm in your pocket but melt instantly upon contact with your skin. Let us break down why these specific ingredients are the gold standard for lip health.
Beeswax Pellets
Beeswax is the backbone of any solid lip balm. It acts as a natural emulsifier and provides the structural base. More importantly, beeswax is a humectant, meaning it attracts water to the skin. It also forms a light, protective barrier on the lips that shields them from harsh winds and dry air without clogging pores. Using pellets or pearls is highly recommended because they melt much faster and more evenly than large blocks of wax.
Coconut Oil
Coconut oil is a superstar in the DIY beauty world. It is packed with medium-chain fatty acids that possess antimicrobial properties. In a lip balm, coconut oil provides that initial slickness and immediate hit of hydration. Because it is solid at room temperature but melts at body temperature, it contributes to the luxurious texture of the final product.
Olive Oil and Jojoba Oil
While coconut oil sits near the surface, olive and jojoba oils dive deeper. Olive oil is rich in vitamins A, D, E, and K, providing intense nourishment for damaged skin. Jojoba oil is technically a liquid wax ester that closely mimics the natural sebum produced by human skin. This makes it incredibly compatible with your body, allowing the balm to absorb quickly rather than just sitting on top of your lips.
Essential Oils
This is where you get to be the artist. Essential oils provide the scent and therapeutic benefits. Peppermint is a classic choice for a refreshing tingle, while lavender offers a calming, floral note. If you prefer something bright and summery, sweet orange or grapefruit oils are fantastic options. Just ensure you are using high-quality, therapeutic-grade oils that are safe for topical application.
Step-by-Step Guide to Crafting Your Balm
The process of making lip balm is essentially a lesson in heat management. You want enough heat to melt the solids but not so much that you degrade the beneficial properties of the oils. Follow these refined steps to ensure a professional result every time.
1. The Melting Phase
Start by combining your 2 tablespoons of beeswax pellets and 1/4 cup of coconut oil in a double boiler. If you do not have a double boiler, you can easily create one by placing a glass measuring cup or a small stainless steel bowl over a pot of simmering water. This indirect heat method is crucial. Never put your ingredients directly over a flame, as beeswax is flammable and oils can scorch quickly. Stir gently until the mixture is a clear, golden liquid.
2. Incorporating the Liquid Oils
Once the wax and coconut oil are fully liquefied, remove the container from the heat. Now is the time to stir in your 5 tablespoons of olive oil and 2 tablespoons of jojoba oil. Because these oils are likely at room temperature, the mixture might cloud up slightly. Continue to stir until everything is clear and well-incorporated. Work efficiently during this stage, as the wax will begin to harden as the temperature drops.
3. Adding the Scent
Wait about thirty seconds after removing the mixture from the heat before adding your 20 drops of essential oil. If the mixture is too hot, the volatile compounds in the essential oils can evaporate, leaving you with a balm that has very little scent. Stir well to ensure the scent is distributed evenly throughout the entire batch.
4. The Final Pour
Carefully pour the liquid into your empty lip balm tubes or small tin containers. Pro tip: place your tubes close together and use a rubber band to hold them in a bunch. This makes it much easier to pour quickly without knocking them over. Fill them slightly above the rim, as the mixture will contract and dip slightly in the middle as it cools. Let them sit undisturbed on the counter for a few minutes before moving them to the refrigerator to finish hardening.
The Science of Benefits: Why Homemade Wins
When you use the recipe from the image, you are providing your lips with a multi-layered defense system. Understanding these benefits will help you appreciate why this DIY version is a staple for self-care.
- Intense Hydration: Unlike petroleum-based products that can actually dry out your lips over time, these natural oils penetrate the skin to provide lasting moisture.
- Environmental Protection: The beeswax creates a physical shield against pollutants, cold weather, and sun exposure.
- Prevention of Cracking: By keeping the skin elastic with fatty acids, you significantly reduce the chance of painful vertical cracks or “chapped” lips.
- Gentle Exfoliation: Natural oils help soften dead skin cells, making it easier for them to slough off naturally, leaving behind a smooth surface.
Customizing Your Recipe for Different Seasons
One of the best things about making your own skincare is that you can adjust the “formula” based on your environment. The recipe provided is a great all-rounder, but you might want to tweak it depending on the time of year.
Winter Shield Blend
In the winter, the air is much drier. You might want to increase the beeswax by a half-teaspoon to create a thicker, more protective barrier. You could also swap the olive oil for shea butter to give the balm a creamier, more heavy-duty feel that stands up to freezing temperatures.
Summer Gloss Blend
During the warmer months, you might prefer a balm that feels lighter and has a bit more shine. Adding an extra tablespoon of jojoba oil and slightly reducing the beeswax will result in a softer balm with a glossy finish. Just be careful not to leave this version in a hot car, as it will melt more easily than the standard recipe.
Equipment Tips for a Stress-Free Experience
While you do not need a professional laboratory, having the right tools makes the process much cleaner and more enjoyable. Here are a few recommendations for your DIY setup.
Use a Glass Pouring Pitcher
A small heat-resistant glass measuring cup with a good spout is your best friend. It allows for precision pouring, which is vital when you are trying to fill small lip balm tubes without making a massive mess.
Cleaning Up the Wax
Beeswax can be notoriously difficult to clean off of dishes. The secret is to wipe out your containers with a paper towel while they are still warm. Once the wax hardens, it becomes a much bigger chore. After wiping, wash with very hot, soapy water to remove the remaining oil residue.
Labeling Your Creations
If you are giving these away as gifts, do not forget the labels! You can buy printable sticker sheets or use a simple piece of washi tape and a permanent marker. Include the date you made them, as natural balms without preservatives usually stay fresh for about twelve to eighteen months.
Common Troubleshooting Questions
What if my balm is too soft?
If your finished balm feels more like a gloss and melts too quickly, you likely need a bit more beeswax. You can simply melt the batch back down, add another teaspoon of beeswax pellets, and re-pour.
Why is my balm grainy?
Graininess usually happens if the mixture cools too slowly or if you used shea butter and it was not tempered correctly. For this specific recipe, cooling it in the refrigerator immediately after pouring usually prevents any crystallization, resulting in a perfectly smooth texture.
Can I use food coloring?
Standard liquid food coloring does not mix well with oils and waxes. If you want to add a tint to your lip balm, it is better to use a tiny pinch of mica powder or a small sliver of your favorite lipstick melted into the mix.
Conclusion: The Joy of Handmade Beauty
Creating your own lip balm is more than just a craft project; it is an act of self-reliance and a commitment to your health. There is a distinct sense of pride that comes from pulling a tube of balm out of your pocket and knowing exactly what went into it. By following the proportions of beeswax, coconut oil, and nourishing liquid oils outlined in the guide, you have created a product that is pure, effective, and tailored to your preferences.
Whether you are making a single batch for yourself or dozens of tubes to share with friends and family, the process is a soothing ritual. It encourages us to slow down, work with our hands, and appreciate the simple power of natural ingredients. So, gather your oils, melt down that wax, and enjoy the feeling of soft, healthy lips all year long. Once you have mastered this basic recipe, the possibilities for customization are endless. Happy crafting!