DIY Natural Cleansing Cream Recipe Homemade Face Cleanser for Soft Skin
Finding the perfect balance for your skincare routine can often feel like an expensive game of trial and error. We have all been there, standing in the beauty aisle staring at long ingredient lists filled with words that are impossible to pronounce. If you are tired of harsh chemicals stripping your skin of its natural oils, it is time to look toward the power of nature. This DIY Natural Cleansing Cream is a game changer for anyone seeking a soft, glowing complexion without the synthetic additives. By combining the soothing properties of aloe vera with the deep hydration of plant based oils, you can create a luxurious cleanser right in your own kitchen that rivals high end boutique brands.
The Magic of Switching to a Natural Cleanser
Most commercial cleansers rely on surfactants and alcohols to remove dirt and oil. While these ingredients are effective at cleaning, they often do their job a little too well, stripping away the acid mantle that protects your skin from bacteria and environmental damage. When your skin feels tight or “squeaky clean” after washing, it is actually a sign of distress. Switching to a cream based natural cleanser allows you to lift away impurities while simultaneously depositing moisture back into the dermis.
This homemade recipe focuses on nourishment. Instead of a chemical foam, it uses a rich, emollient texture to dissolve makeup and daily grime. Because it is made with food grade ingredients, you know exactly what is soaking into your pores. It is beauty in its purest form, designed to respect your skin’s natural rhythm and pH balance.
Understanding Your Skin Barrier
Your skin barrier is the outermost layer of your skin, and its primary job is to keep moisture in and irritants out. When we use harsh soaps, we create tiny cracks in this barrier. This leads to redness, sensitivity, and even premature aging. A cleansing cream works differently by using the principle of “oil dissolves oil.” The healthy fats in this recipe bind to the oxidized oils on your face, allowing them to be wiped away without damaging the delicate structure of your skin cells.
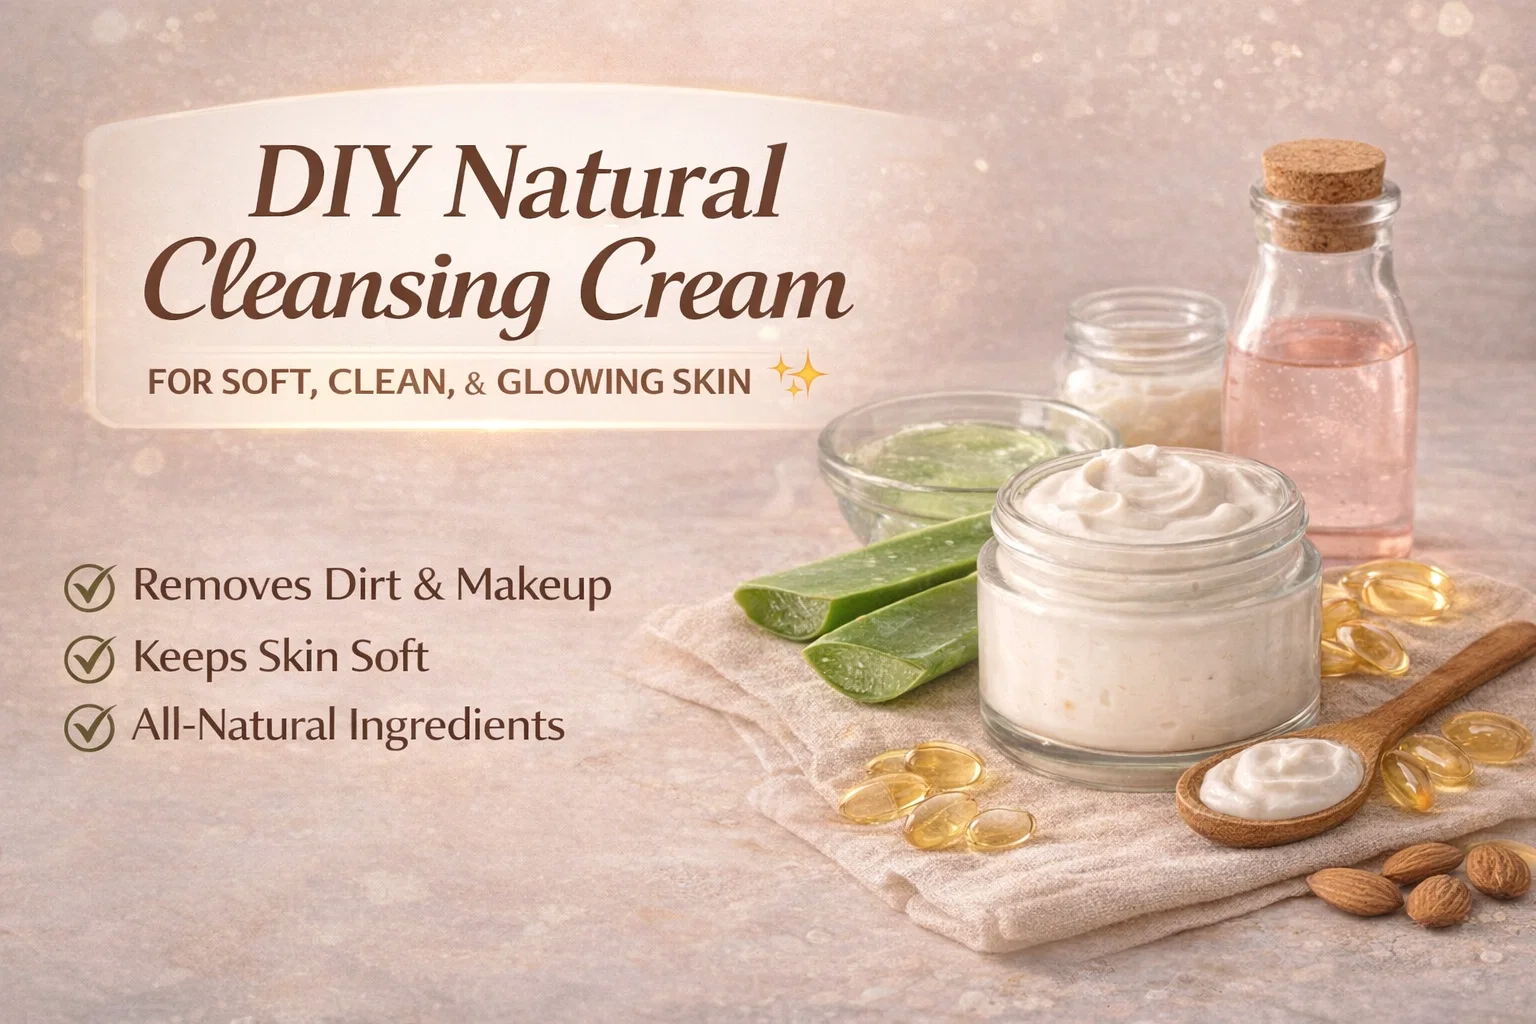
Deconstructing the Ingredients: Nature’s Powerhouses
Every ingredient in this DIY Natural Cleansing Cream has been carefully selected for its specific dermatological benefits. Unlike store bought products that use fillers to increase volume, every drop of this mixture serves a purpose for your skin health.
The Soothing Base: Aloe Vera Gel
Aloe vera is often called the plant of immortality, and for good reason. It is packed with vitamins A, C, and E, which are antioxidants that neutralize free radicals. In this cleansing cream, aloe vera acts as a lightweight hydrator. It provides a cooling sensation that reduces inflammation, making it perfect for those with sensitive or acne prone skin. Its natural enzymes also help to gently exfoliate dead skin cells, revealing a brighter tone beneath.
The Moisture Anchor: Coconut or Almond Oil
You have a choice here based on your specific skin type. Coconut oil is highly antimicrobial and contains lauric acid, which is fantastic for killing bacteria. It has a thicker consistency that feels incredibly indulgent. However, if you have skin that is prone to clogged pores, sweet almond oil is a wonderful alternative. Almond oil is non comedogenic and rich in Vitamin D, making it an excellent emollient that improves both complexion and skin tone.
The Rejuvenator: Rose Water
Rose water is a timeless beauty secret that has been used for centuries. It acts as a natural toner, helping to maintain the skin’s pH balance and control excess oil. Beyond its heavenly scent, rose water has anti inflammatory properties that can help reduce the redness of irritated skin and get rid of acne. It adds a sophisticated, spa like quality to your homemade cream that makes your morning routine feel like a ritual rather than a chore.
The Preservative Boost: Vitamin E
While optional, adding a Vitamin E capsule is highly recommended. Vitamin E is a powerful antioxidant that helps repair damaged skin and reduce the appearance of scars. In the context of a DIY recipe, it also acts as a natural stabilizer, helping to prevent the oils from going rancid too quickly. It provides an extra layer of protection against UV damage and environmental pollutants.
Step by Step Guide to Making Your Cleansing Cream
One of the best parts about this recipe is how quickly it comes together. You do not need any fancy laboratory equipment to achieve professional results. Follow these simple steps to whip up your own batch of botanical goodness.
Step 1: Prep Your Workspace
Ensure that all your mixing bowls and storage jars are completely clean and dry. Since this recipe does not contain heavy synthetic preservatives, hygiene is key to ensuring a long shelf life for your product.
Step 2: Combine the Aloe and Oil
In a small glass bowl, take 2 tablespoons of pure aloe vera gel. Add 1 tablespoon of your chosen carrier oil (coconut or almond). If you are using coconut oil and it is in a solid state, you may want to gently warm it until it is liquid before mixing.
Step 3: Add the Floral Element
Slowly stir in 1 tablespoon of rose water. You will notice the mixture starts to take on a cloudy, milky appearance. This is the beginning of your emulsion.
Step 4: The Vitamin Boost
If you are using Vitamin E, pierce one capsule with a clean pin and squeeze the oil into your mixture. This is also the time to add a drop of lavender or frankincense essential oil if you desire extra therapeutic benefits.
Step 5: Emulsify Until Creamy
Using a small whisk or a spoon, mix the ingredients vigorously. You want to see the oil and water based ingredients fully integrated into a smooth, consistent cream. Once it reaches a silky texture, transfer it into a clean glass jar with a tight fitting lid.
How to Incorporate the Cream into Your Routine
To get the most out of your DIY Natural Cleansing Cream, you should treat the application process as a mini facial massage. This not only cleanses the skin but also stimulates lymphatic drainage and increases blood flow to the face.
- Apply to Dry Skin: Start with a dry face. Scoop out a small amount of the cream and dot it onto your forehead, cheeks, nose, and chin.
- The Massage Technique: Using your fingertips, massage the cream in upward, circular motions for at least one to two minutes. Pay special attention to areas where you apply heavy makeup or where you tend to get oily, such as the sides of the nose.
- The Warm Reveal: Take a soft washcloth and soak it in warm water. Wring it out and lay it over your face for a few seconds to let the steam open your pores. Gently wipe away the cream, taking the dirt and impurities with it.
- Rinse and Protect: Finish with a splash of cool water to close the pores and pat your skin dry with a clean towel. Follow up with your favorite natural moisturizer or serum.
Storage Tips for Maximum Freshness
Because this is a fresh, natural product, it requires a little more care than a bottle of soap from the supermarket. Store your jar in a cool, dark place. The bathroom cabinet is usually fine, but if you live in a very warm climate, keeping it in the refrigerator can provide an extra refreshing, depuffing sensation when you apply it.
Try to use a clean spoon or a spatula to scoop the product out rather than your fingers. This prevents bacteria from your hands from entering the jar. Generally, a fresh batch will last for about two to three weeks. Since the recipe is so simple, it is better to make small, frequent batches rather than one large one that might lose its potency over time.
Customizing for Your Unique Needs
Skincare is not one size fits all. You can easily tweak this recipe to better suit your skin’s changing needs throughout the seasons. During the dry winter months, increase the amount of almond oil for extra protection. In the humid summer, you might prefer a bit more aloe vera for a lighter, more breathable finish. You can also experiment with different floral waters, such as lavender water for relaxation or witch hazel for more oily complexions.
The Environmental Impact of DIY Beauty
By making your own cleansing cream, you are doing more than just helping your skin; you are helping the planet. Think about the amount of plastic packaging that goes into the trash every time you finish a bottle of commercial face wash. By reusing glass jars and buying ingredients in bulk, you significantly reduce your carbon footprint.
Furthermore, you are preventing harmful chemicals from entering our waterways. Many commercial exfoliants contain microbeads or synthetic chemicals that cannot be filtered out by water treatment plants, eventually ending up in our oceans. Your natural cream is completely biodegradable and safe for the environment. It is a beautiful way to align your self care routine with your values of sustainability and conscious living.
Final Thoughts on Natural Radiance
Embracing a natural skincare routine is a journey toward self love and mindfulness. When you take the time to craft your own products, you develop a deeper connection with the ingredients you put on your body. This DIY Natural Cleansing Cream is a testament to the fact that you do not need a complicated lab report to achieve beautiful results. Nature has already provided everything we need to keep our skin soft, clean, and vibrant.
Give this recipe a try and notice how your skin transformed over the next few weeks. You might find that the redness fades, the dry patches disappear, and a natural glow begins to emerge from within. Skincare should feel like a gift you give yourself every day, and there is no better gift than the pure, healing touch of botanical ingredients. Your journey to healthier, happier skin starts right in your kitchen, one creamy batch at a time.