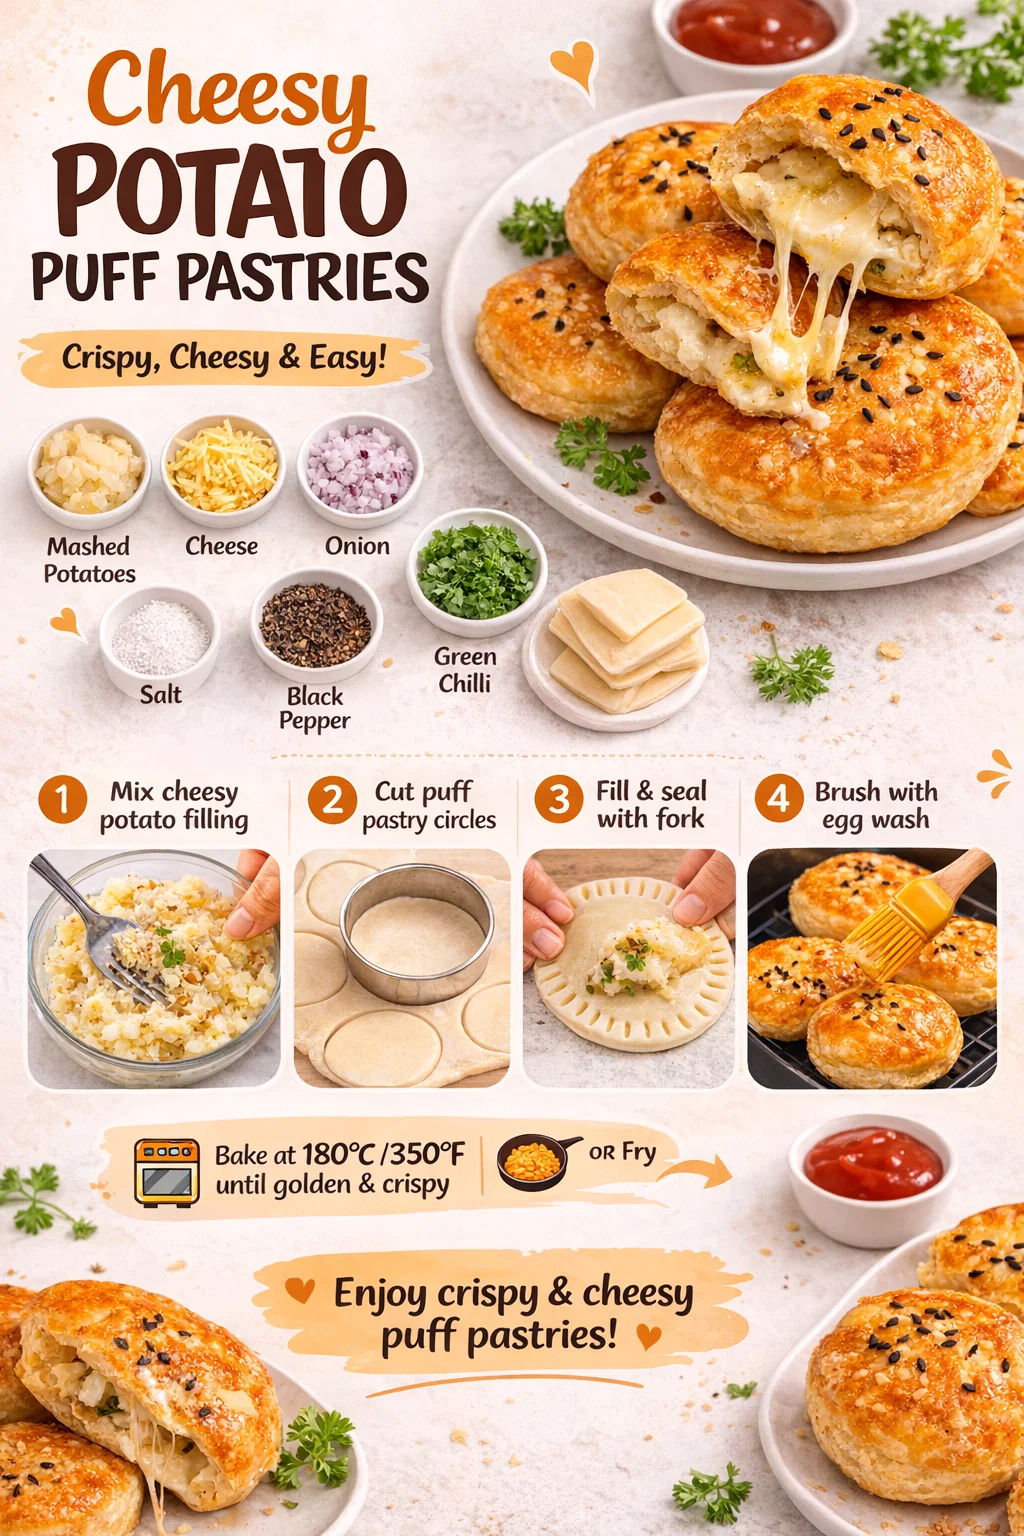
Alu Cheesy Puff Patiz Recipe Crispy Cheesy Potato Puff Pastry Bakery Style Veg Patties
Imagine biting into a golden, flaky crust that shatters with a satisfying crunch, only to reveal a heart of creamy mashed potatoes and gooey, melted cheese. This is the magic of the Alu Cheesy Puff Patiz. Whether you call them patties, puffs, or hand pies, these savory delights are a staple of bakery culture across South Asia and beyond. They are the ultimate comfort food, perfectly bridging the gap between a light snack and a filling meal. In this guide, we are diving deep into how you can recreate that professional bakery-style texture right in your own kitchen with minimal effort.
The Anatomy of a Perfect Potato Puff
What makes a puff pastry truly stand out? It is all about the contrast. You need a shell that is light and airy, layered with buttery goodness, paired with a filling that is robust and seasoned to perfection. The addition of cheese takes the traditional aloo patty to a whole new level, adding a silky texture that complements the earthiness of the boiled potatoes. Using puff pastry sheets is the ultimate “cheat code” for home bakers, allowing you to achieve those dozens of thin, crispy layers without spending hours laminating dough by hand.
Why You Will Love This Recipe
- Texture Overload: You get the crunch from the pastry and the stretch from the cheese.
- Versatility: You can bake them for a healthier option or fry them for that classic, indulgent street-food vibe.
- Kid-Friendly: The mild heat and cheesy center make these a massive hit with younger eaters.
- Make-Ahead Magic: You can prep these, freeze them, and pop them in the oven whenever unexpected guests arrive.
Gathering Your Ingredients
Before you start mashing and folding, let’s look at the simple pantry staples required for this recipe. High-quality ingredients lead to high-quality results.
The Filling Base
The star of the show is the Boiled Potato. You want to boil them until they are fork-tender but not waterlogged. Starchy potatoes work best here as they provide a fluffy interior. To this, we add finely chopped Onions for a bit of sweetness and crunch, and Green Chillies for a subtle kick. If you prefer a milder puff, you can deseed the chillies or swap them for bell peppers.
The Seasoning Trio
To bring the potatoes to life, we use a classic combination of Salt, Black Pepper, and Chilli Flakes. The black pepper adds a woody warmth, while the flakes provide bursts of heat. Fresh Coriander (cilantro) is non-negotiable here; it adds a floral freshness that cuts through the richness of the butter and cheese.
The Pastry and Fats
Store-bought Puff Pastry Sheets are the foundation. Keep them chilled until the very last moment to ensure the butter inside the dough doesn’t melt before hitting the oven. Butter is used within the filling to add creaminess, and an Egg Wash (or milk wash for vegetarians) is essential for achieving that deep mahogany glow on the crust.
Step-by-Step Guide to Making Alu Cheesy Puff Patiz
Follow these steps closely to ensure your patties don’t leak and stay crispy for hours.
Step 1: Preparing the Potato Mash
Start by peeling your boiled potatoes. Use a fork or a potato masher to crush them while they are still slightly warm. You want a relatively smooth consistency, but a few small chunks are fine for texture. Avoid over-processing them in a blender, or they will become gummy.
Step 2: Building the Flavor Profile
Into your mashed potatoes, fold in the chopped onions, green chillies, and fresh coriander. Sprinkle in your salt, black pepper, and chilli flakes. This is the stage where you should taste your filling. Remember, the pastry is relatively neutral, so the filling needs to be well-seasoned and bold.
Step 3: The Cheesy Core
Once your potato mix is seasoned, add a generous helping of shredded cheese. Mozzarella is great for the “pull,” while Cheddar adds a sharp, salty punch. Mix it well so that every bite of the patty contains a bit of cheesy goodness. Add a small knob of softened butter at this stage to make the filling extra decadent.
Step 4: Cutting the Pastry
Lightly flour your work surface and lay out the puff pastry sheet. Use a circular cookie cutter or a large glass to cut out even circles. For a standard patty, a 3 or 4-inch diameter is ideal. Work quickly so the dough stays cold; if it gets too soft, it becomes sticky and difficult to manage.
Step 5: Assembly and Sealing
Place a spoonful of the potato and cheese mixture right in the center of a pastry circle. Be careful not to overfill, or the edges won’t seal properly. Place a second pastry circle on top. Use the tines of a fork to press down firmly along the edges. This creates a beautiful decorative border and, more importantly, prevents the cheese from leaking out during baking.
Cooking Methods: Bake vs. Fry
One of the best things about this recipe is that it adapts to your preference and equipment. Both methods yield delicious results, but the textures vary slightly.
Baking for Professional Results
Preheat your oven to 180 degrees Celsius. Arrange the patties on a baking sheet lined with parchment paper. Brush the tops with a beaten egg for a glossy finish. You can also sprinkle some nigella seeds or sesame seeds on top for an authentic bakery look. Bake for 20 to 25 minutes until the pastry has puffed up significantly and turned a beautiful golden brown.
Frying for Maximum Indulgence
If you don’t have an oven, or if you just love the taste of fried dough, you can deep fry or shallow fry these patties. Heat oil in a pan over medium heat. Carefully slide the patties in and fry until golden on both sides. The result is a slightly denser but incredibly crispy exterior that shatters beautifully.
Pro Tips for Success
Even though this recipe is “easy,” a few professional secrets can help you reach perfection on your first try.
Keep it Cold
The secret to puff pastry is the cold layers of fat between the dough. If your kitchen is hot, put your assembled patties in the fridge for 15 minutes before putting them in the oven. This “thermal shock” causes the water in the butter to turn to steam instantly, pushing the layers apart and creating maximum loft.
Avoid the Soggy Bottom
To prevent the bottom of your patties from getting soggy, make sure your potato filling has cooled down to room temperature before placing it on the raw dough. If the filling is hot, it will melt the fat in the pastry prematurely and result in a greasy, flat base.
The Fork Seal
When sealing with a fork, dip the fork in a little bit of flour between presses. This prevents the metal from sticking to the dough and ensures a clean, sharp pattern that holds up under the heat of the oven.
Serving Suggestions and Pairings
These Alu Cheesy Puff Patiz are best enjoyed hot, right out of the oven or fryer. Here is how to serve them like a pro:
- The Classic Way: Serve with a side of sweet and tangy tomato ketchup. The acidity of the tomatoes cuts through the richness of the pastry.
- The Spicy Way: Pair with a fresh mint and coriander chutney. This adds a herbal, spicy note that complements the potato filling perfectly.
- The Afternoon Tea Style: Serve alongside a steaming cup of Masala Chai. The spices in the tea and the savory notes of the patty are a match made in heaven.
You can also turn these into a fuller meal by serving them with a light side salad of cucumbers, tomatoes, and a lemon vinaigrette. This adds a refreshing crunch to the plate.
Conclusion
Mastering the Alu Cheesy Puff Patiz is a journey into the heart of savory baking. It is a recipe that proves you don’t need complicated techniques or expensive equipment to create something truly spectacular. By combining the convenience of puff pastry with a classic, well-seasoned potato and cheese filling, you can bring the joy of a professional bakery right into your home. Whether you are prepping for a party, looking for a new school lunch idea, or simply craving a warm, comforting snack, these patties are sure to satisfy. So, grab your rolling pin, heat up your oven, and get ready to enjoy the most delicious, crispy, and cheesy treat you have ever made. Happy baking!