Bridal Pedicure at Home DIY Foot Care Routine for Soft Wedding Feet
Preparing for your wedding day involves a million tiny details, from the perfect floral arrangements to the seating chart. However, one of the most overlooked aspects of bridal beauty is foot care. Your feet will carry you down the aisle, through hours of photos, and across the dance floor until the early morning hours. They deserve a little extra love and attention before they step into those stunning bridal heels. This DIY bridal footcare routine is designed to give you salon-quality results from the comfort of your own home, ensuring your feet are soft, glowing, and ready for their close-up.
Taking the time for a home pedicure is not just about aesthetics; it is a vital moment of self-care during a busy planning season. By following a structured routine, you can prevent discomfort, heal dry skin, and arrive at your wedding feeling pampered from head to toe. Let us dive into the ultimate six-step guide to achieving picture-perfect wedding feet.
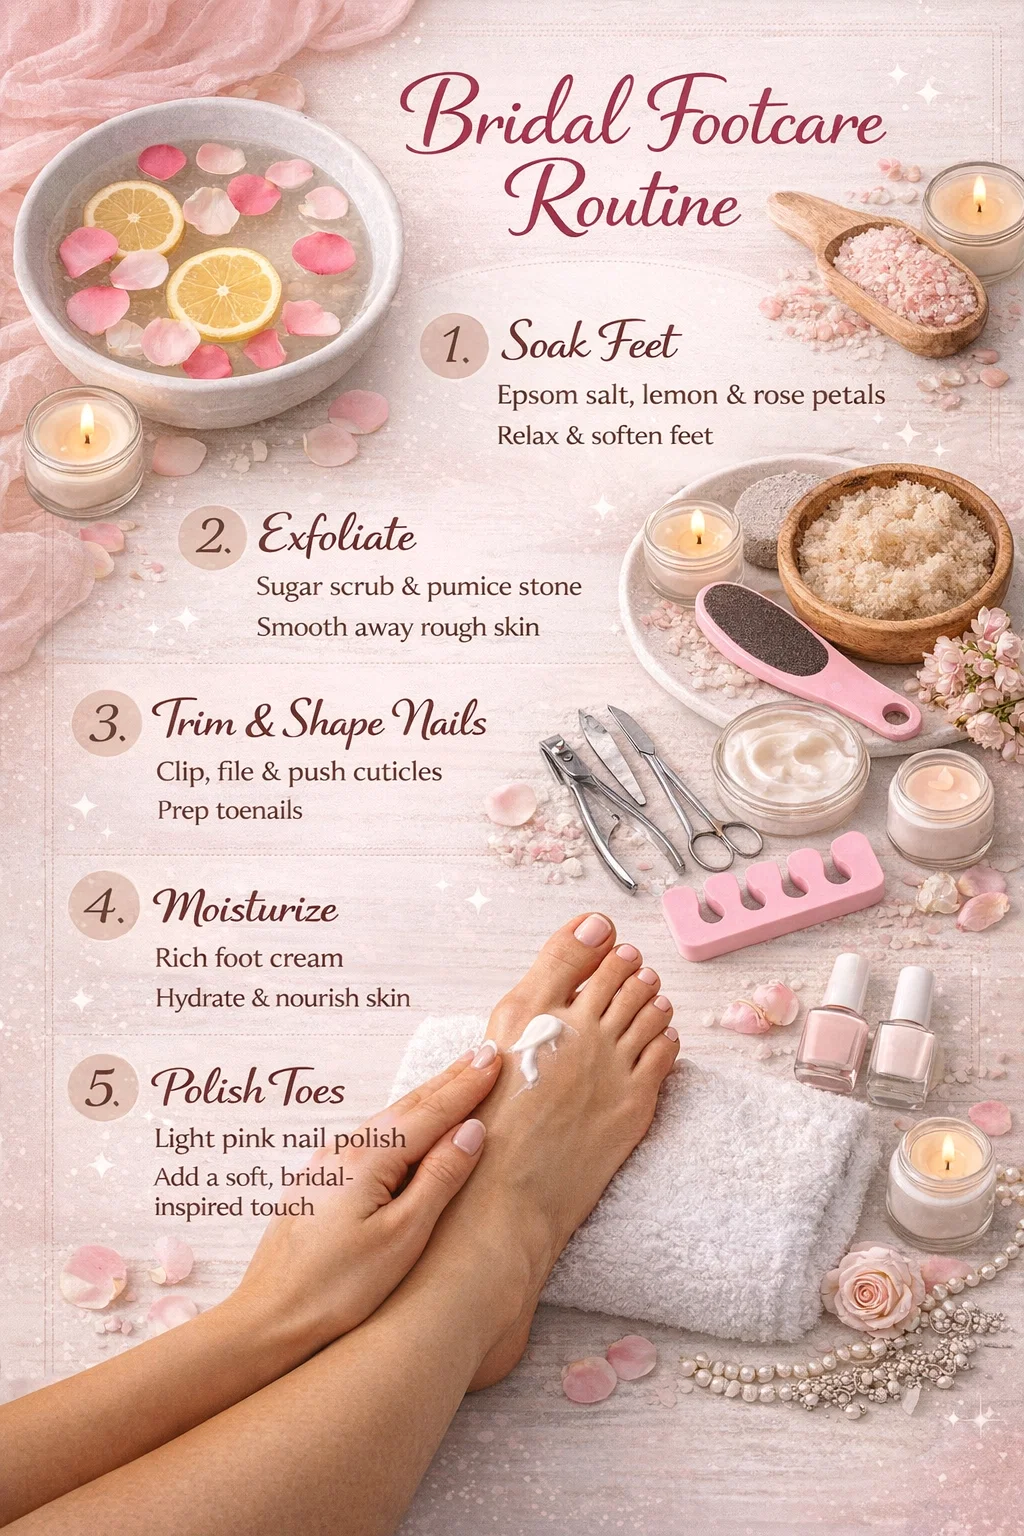
Step 1: The Ultimate Soothing Foot Soak
The foundation of any great pedicure is a high-quality soak. This step is essential because it softens the skin and prepares your nails for grooming. To create a bridal-worthy experience, fill a basin with warm water and add a generous scoop of Epsom salts. Epsom salts are known for their ability to soothe tired muscles and reduce swelling, which is perfect if you have been running errands all week.
Enhancing Your Soak with Natural Ingredients
To take your soak to the next level, add fresh lemon slices and dried rose petals. The acidity in the lemon helps to brighten the skin and kill bacteria, while the rose petals provide a luxurious, calming aroma. Spend at least 15 to 20 minutes with your feet submerged. This is your time to disconnect, put away the wedding spreadsheets, and simply breathe. The goal here is to soften the calluses and cuticles so that the subsequent steps are more effective and gentle on your skin.
Step 2: Effective Exfoliation for Silky Skin
Once your skin is soft and hydrated, it is time to remove the dead skin cells that cause roughness. Exfoliation is the secret to that “bridal glow” for your feet. Start by using a high-quality sugar scrub. Massage the scrub in circular motions over your heels, the balls of your feet, and around your ankles. Sugar is a natural humectant, meaning it helps pull moisture into the skin while physically buffing away dry patches.
Using a Pumice Stone Safely
For tougher areas like the heels, a pumice stone or foot file is your best friend. After rinsing off the scrub, gently glide the stone over thickened skin. Be careful not to over-scrub, as you want to remove the dead layers without causing irritation. Consistently exfoliating once or twice a week leading up to the wedding will ensure your feet stay smooth and prevent the buildup of painful cracks or calluses.
Step 3: Trimming and Shaping Your Nails
Now that your feet are prepped, it is time to focus on the nails. Proper nail maintenance prevents ingrown toenails and ensures your polish looks professional. Start by using sharp nail clippers to trim your nails straight across. Avoid rounding the corners too deeply, as this can lead to painful growth issues. Once trimmed, use a fine-grit nail file to smooth the edges and create a clean shape.
Perfecting the Cuticles
A true bridal pedicure requires neat cuticles. Use a cuticle pusher to gently move the skin back from the nail plate. If you have any hangnails or overgrown skin, use specialized cuticle scissors to carefully trim them. Avoid cutting the actual cuticle, as it serves as a protective barrier against infection. Clean, well-shaped nails provide the perfect canvas for your bridal polish.
Step 4: Deep Moisture and Nourishment
Hydration is the most important part of maintaining your results. After exfoliating and trimming, your skin is ready to soak up all the nutrients from a thick foot cream. Look for ingredients like shea butter, cocoa butter, or urea, which are specifically formulated to penetrate the thicker skin on the soles of the feet.
Apply a generous amount of cream and massage it thoroughly into your heels and arches. If you are doing this routine at night, a great tip is to put on a pair of clean cotton socks immediately after moisturizing. This locks the cream in and allows it to sink in deeply while you sleep, leaving you with incredibly soft skin the next morning.
Step 5: The Relaxation Massage
Your wedding prep should include moments of genuine relaxation, and a foot massage is the perfect way to achieve that. Use a dedicated massage oil or a carrier oil like sweet almond or jojoba mixed with a few drops of essential oils. Lavender is excellent for stress relief, while peppermint can help invigorate tired feet and improve circulation.
Improving Circulation for the Big Day
Use your thumbs to apply pressure to the arches of your feet and move in upward strokes toward your ankles. This helps reduce any fluid retention and ensures your feet feel light and refreshed. Improving circulation is key for brides who plan on wearing heels for several hours. This step turns a simple beauty task into a therapeutic experience that calms the pre-wedding jitters.
Step 6: Polishing for the Bridal Aesthetic
The final touch is the polish. For a classic bridal look, light pinks, soft nudes, or a clean French manicure are the most popular choices. These shades are timeless and won’t clash with your dress or floral arrangements. Use toe separators to keep your digits apart and prevent smudging during the application process.
A Professional Finish at Home
Start with a clear base coat to protect your nails from staining. Apply two thin layers of your chosen pink polish, allowing each layer to dry for a few minutes. Finish with a high-shine top coat to seal in the color and add a chip-resistant layer. If you want a bit of extra flair, a subtle shimmer or a tiny pearl accent can add a unique bridal touch to your toes.
Why a Consistent Routine Matters
While a one-time pedicure is great, starting this routine several weeks before your wedding will yield the best results. Consistent care allows you to tackle long-term dryness and ensures your nails are in peak health. Think of it as a training program for your feet. By the time your wedding day arrives, you won’t have to worry about rough skin or messy cuticles; you will be ready to step into your shoes with total confidence.
Building Your Bridal Beauty Kit
To make this routine easier, keep a dedicated “Bridal Footcare Kit” in your bathroom. Include your favorite salts, a reliable pumice stone, high-quality clippers, and that perfect shade of wedding polish. Having everything in one place makes it more likely that you will stick to your routine even when the wedding planning gets hectic.
Conclusion: Step into Your New Life with Confidence
Your wedding day is a celebration of love, and every part of you should feel beautiful and cared for. By following this six-step bridal footcare routine, you are doing more than just painting your nails; you are taking the time to nurture yourself. From the refreshing lemon soak to the final stroke of pink polish, these steps ensure that your feet are as radiant as your smile when you walk down the aisle.
Remember that the best beauty treatments are the ones that make you feel relaxed and confident. So, grab your basin, put on some calming music, and give your feet the royal treatment they deserve. You have a long journey ahead of you, and it starts with a beautiful, soft step forward.