Complete Skincare Layering Guide Morning and Night Routine Steps
Stepping into the world of skincare can feel a lot like walking into a high end ice cream parlor. There are endless flavors, colorful toppings, and a deep desire to try a little bit of everything. But just like you wouldn’t put the hot fudge on the bottom of the cone where it turns into a sticky mess, you shouldn’t just slap your skincare products on your face in a random order. To get that glowing, clear complexion we all dream of, the secret lies in the sequence. Layering is an art form that ensures every drop of your expensive serum actually reaches its destination instead of just sitting on top of a thick cream.
The Science of the Skincare Sandwich
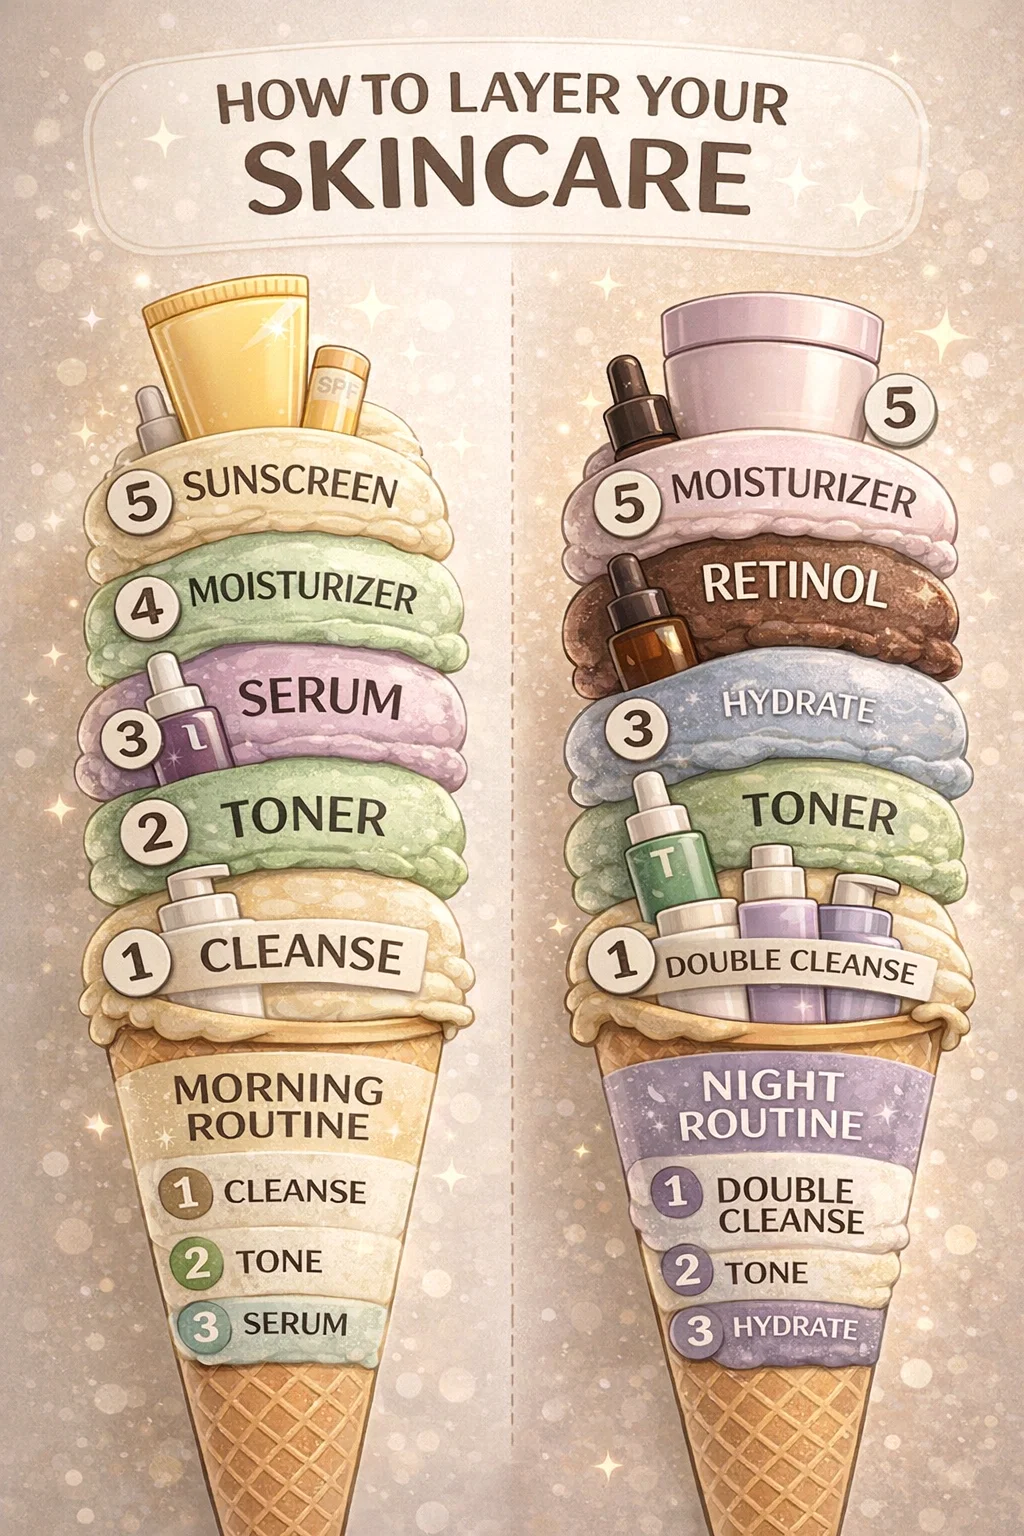
Why does the order even matter? Think of your skin as a sponge. If you pour a thick oil on a dry sponge, the water you try to add later will just bead up and roll off. Skincare follows the rule of consistency: you always go from thinnest to thickest. This allows the lightweight, water based formulas to penetrate deeply into the pores before the heavier, occlusive creams seal everything in. When you follow a structured routine like the one visualized in our ice cream scoop guide, you are essentially building a barrier that protects your skin while feeding it the nutrients it needs to repair itself.
Morning Routine: Protection and Preparation
Your morning skincare routine is all about defense. Throughout the day, your skin is under constant attack from UV rays, pollution, and blue light from screens. Your goal in the AM is to hydrate and shield. Following the steps in the morning scoop ensures your face is ready to face the world without feeling greasy or weighed down.
Step 1: The Gentle Cleanser
Start your day with a clean slate. While you slept, your skin produced oils and rubbed against your pillowcase. A gentle, water based cleanser removes these impurities without stripping your natural moisture. It preps the skin to soak up the goodness that follows.
Step 2: The Refreshing Toner
Toners have come a long way from the alcohol heavy formulas of the nineties. Today, they serve as a primer. A quick swipe or pat of toner balances your pH levels and provides a base layer of hydration. It acts like a damp cloth that helps the next steps glide on more smoothly.
Step 3: The Target Serum
Serums are the heavy lifters of your routine. Because they are thin and highly concentrated, they need to go on early. In the morning, look for Vitamin C or antioxidants. These ingredients fight off free radicals and brighten your complexion, giving you that sought after morning glow.
Step 4: The Lightweight Moisturizer
Even if you have oily skin, moisturizer is non negotiable. It locks in your serum and keeps your skin barrier healthy. In the morning, a gel or lightweight cream is usually best so that it doesn’t interfere with your makeup or feel heavy under the sun.
Step 5: The Essential Sunscreen
If you only do one thing, make it this. Sunscreen is the final scoop on your morning cone. It sits on top to reflect or absorb UV rays. Without this step, the rest of your routine is essentially wasted because sun damage is the leading cause of premature aging and skin issues. Always apply SPF 30 or higher as your final layer before makeup.
Night Routine: Repair and Recovery
While you sleep, your skin goes into overtime to repair the damage done during the day. This is the time to bring out the big guns like retinoids and rich oils. The night routine is slightly more complex because it focuses on deep cleaning and intensive nourishment.
Step 1: The Power of the Double Cleanse
One wash is rarely enough to remove a full day of sunscreen, makeup, and sweat. The double cleanse involves using an oil based cleanser or micellar water first to break down stubborn products, followed by your regular water based cleanser to actually clean the skin. This ensures your pores are completely clear and ready for treatment.
Step 2: Toning and Prepping
Just like in the morning, a toner at night helps reset the skin. You might choose a slightly more exfoliating toner in the evening to help slough off dead skin cells, but ensure it doesn’t clash with your active treatments.
Step 3: The Hydrating Serum
Nighttime is perfect for hyaluronic acid or soothing peptides. These ingredients draw moisture into the skin while you rest. By applying a hydrating serum before your actives, you create a buffer that can help prevent irritation from stronger products.
Step 4: The Game Changer Retinol
Retinol is the gold standard for anti aging and acne prevention, but it can be finicky. Because it increases cell turnover, it should only be used at night. Applying it after your hydrating serum can help mitigate the dryness sometimes associated with it. Remember to start slow and let your skin build up a tolerance to this powerful ingredient.
Step 5: The Rich Night Moisturizer
Your nighttime moisturizer can be much thicker than your daytime version. Think of it as a cozy blanket for your face. It provides the lipids and ceramides necessary to repair the skin barrier. If you have particularly dry skin, you can even add a drop of face oil on top of your moisturizer to seal the deal.
Common Mistakes to Avoid
Even with a guide, it is easy to make mistakes that hinder your progress. One of the most common errors is rushing. You need to give each layer a moment to sink in. If you apply moisturizer immediately after a serum, you might end up pilling, where the products ball up and roll off your face. Give it about thirty to sixty seconds between steps.
Another mistake is using too many active ingredients at once. Mixing high percentages of Vitamin C, Retinol, and AHAs all in one go is a recipe for a chemical burn or a compromised skin barrier. Consistency is more important than intensity. Stick to the basic scoops and only add “toppings” like chemical exfoliants once or twice a week.
Customizing Your Skincare Scoop
Every person has a unique skin type, which means your routine might need a little tweaking. If you have oily skin, you might skip the rich moisturizer at night and stick to a hydrating serum. If you have sensitive skin, you might swap a harsh retinol for a gentler alternative like Bakuchiol. The beauty of the ice cream cone analogy is that while the structure remains the same, the flavors are entirely up to you.
- For Dry Skin: Look for ingredients like ceramides, shea butter, and squalane.
- For Oily Skin: Focus on niacinamide, salicylic acid, and hyaluronic acid.
- For Sensitive Skin: Prioritize fragrance free formulas and soothing oatmeal or aloe.
The Importance of Patience
Skincare is not an overnight miracle. It takes about twenty eight days for your skin cells to turn over, which means you won’t see the full effects of a new routine for at least a month. Be patient with the process. If you follow the layering guide consistently, you will start to notice a smoother texture, a more even skin tone, and fewer breakouts. Think of it as an investment in your future self.
Conclusion: Serving Up Your Best Skin
Mastering the art of layering doesn’t require a degree in chemistry. By following the simple principle of going from the thinnest consistency to the thickest, you ensure that your skin absorbs every ounce of nourishment you provide. Whether you are prepping for a busy day or winding down for a restful night, treat your skincare routine as a moment of self care. With the right order of operations, you are well on your way to achieving a complexion that is as smooth and radiant as a fresh scoop of vanilla bean. So, grab your cleansers and serums, and start building your perfect skincare cone today!