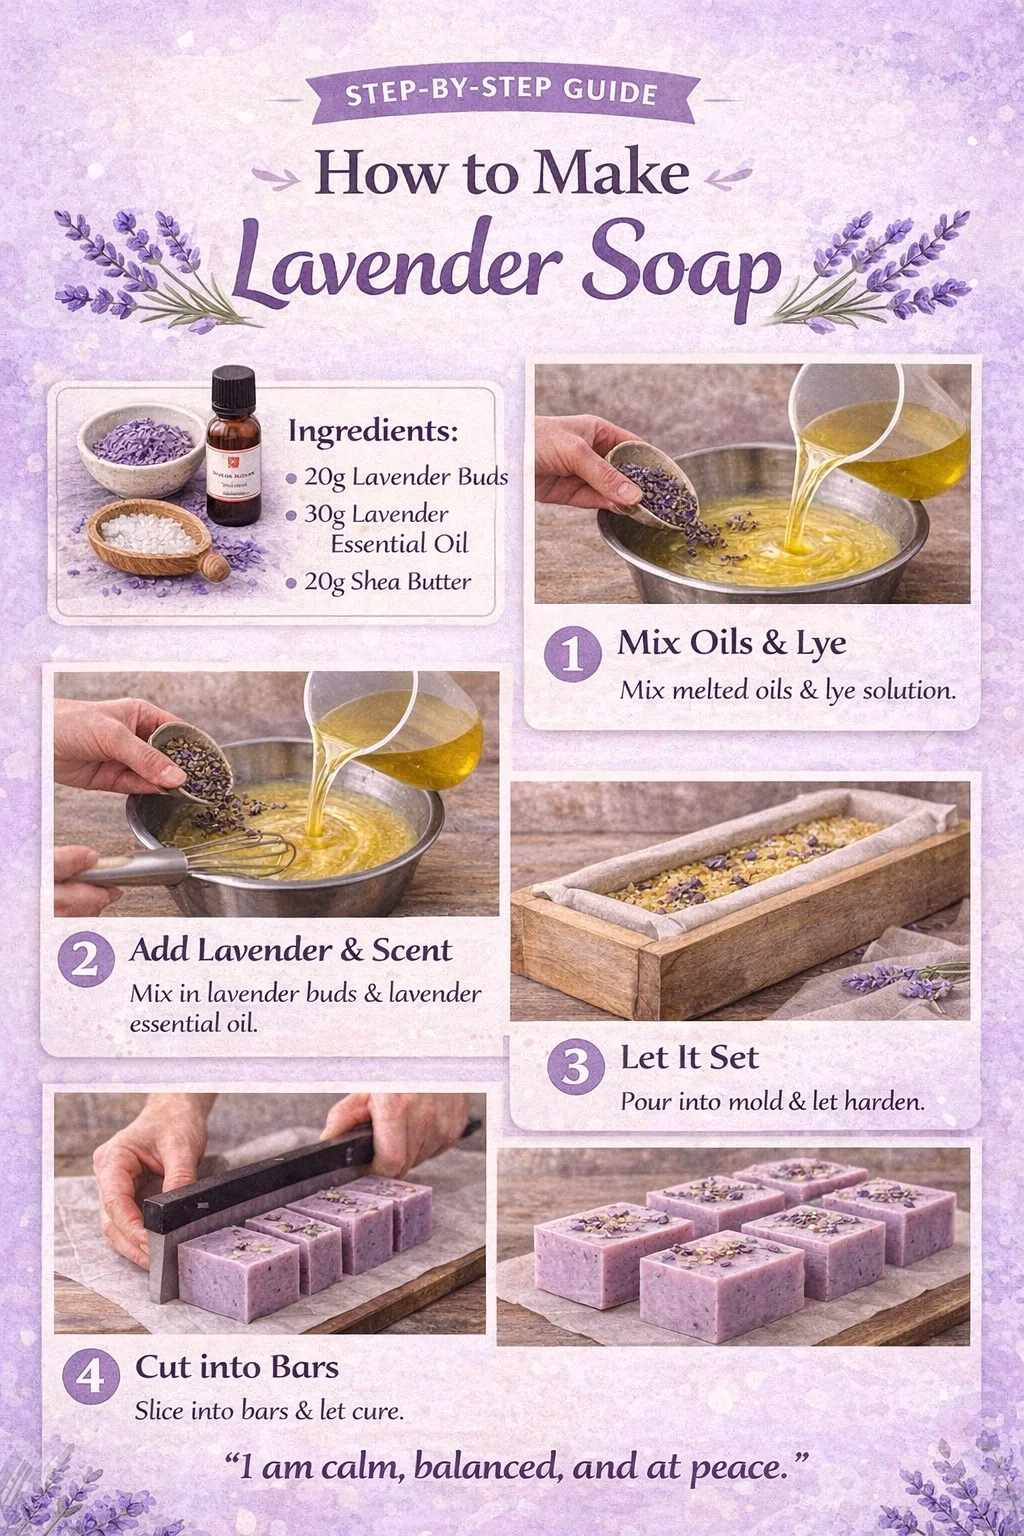
DIY Calm Lavender Soap Recipe Easy Step-by-Step Homemade Soap Making Guide
Embracing the world of handmade skincare is a journey toward wellness, mindfulness, and creative expression. There is something profoundly satisfying about crafting a product with your own hands, especially one that promotes relaxation and skin health. Lavender soap has long been a staple in the world of natural beauty, prized for its signature floral scent and its ability to turn a simple shower into a therapeutic spa experience. If you have ever wanted to dive into the art of cold process soap making, this calm lavender soap recipe is the perfect place to start. It combines the deep moisturizing properties of shea butter with the soothing essence of pure lavender to create a bar that looks as beautiful as it feels.
The Magic of Lavender in Skincare
Lavender is much more than just a pretty purple flower. For centuries, it has been used in herbal medicine and aromatherapy to treat everything from skin irritations to sleeplessness. When infused into a soap bar, lavender acts as a gentle antiseptic and anti-inflammatory agent. This makes it an excellent choice for those with sensitive skin or individuals prone to occasional breakouts. Beyond the physical benefits, the scent of lavender is scientifically proven to reduce cortisol levels, helping to melt away the stress of a long day.
By making your own soap, you ensure that these botanical benefits remain intact. Commercial soaps often strip away natural glycerin and replace it with synthetic detergents that can leave the skin feeling tight and dry. In contrast, a handmade bar is a powerhouse of hydration. This specific recipe focuses on “Calm,” utilizing a high percentage of lavender essential oil and real botanical buds to provide a sensory experience that grounds the spirit and softens the skin.
Understanding the Ingredients: A Balanced Formula
To create a high quality bar of soap, you need a balanced blend of fats and oils. Each ingredient in this recipe serves a specific purpose, contributing to the hardness, lather, and conditioning properties of the final product. Here is a closer look at what makes this lavender soap so special.
The Power of Shea Butter
Shea butter is the star of this recipe when it comes to luxury. Derived from the nuts of the shea tree, this butter is incredibly rich in vitamins A and E. In soap making, shea butter contributes to a stable, creamy lather and provides a hard consistency to the bar. Because it contains unsaponifiables, parts of the butter remain as pure oil within the soap, offering a protective barrier on the skin long after you have rinsed off the bubbles.
Olive Oil for Conditioning
Olive oil is a classic soap making ingredient for a reason. It creates a very gentle, conditioning bar that is suitable for all skin types, including babies. In this formula, olive oil makes up a significant portion of the base, ensuring that the soap feels silky and smooth. While olive oil soaps take a little longer to cure, the wait is well worth the mildness they provide.
Coconut Oil for Cleansing
Coconut oil is what gives this soap its big, fluffy bubbles. It is a powerful cleanser that effectively removes dirt and excess oils from the skin. However, because coconut oil can be drying if used in too high a concentration, we have balanced it carefully with the fats from the shea butter and olive oil to ensure the skin remains hydrated.
The Chemistry of Soap: Working with Lye
For many beginners, the idea of working with sodium hydroxide, also known as lye, can be intimidating. However, lye is a necessary component of the chemical reaction called saponification. This is the process where the lye molecules react with the oil molecules to create soap and glycerin. Once the reaction is complete and the soap has cured, there is no lye left in the final product.
Safety is paramount when handling lye. Always work in a well ventilated area and wear protective gear, including gloves and safety goggles. When mixing your lye solution, always add the lye to the water, never the other way around. This prevents a “lye volcano” and ensures the heat is distributed safely. Patience is key during this phase, as the solution needs to cool down to a specific temperature range before being combined with your melted oils.
Step-by-Step Guide to Crafting Calm Lavender Soap
Following a structured process is the best way to ensure your soap turns out perfectly every time. This recipe is designed to be manageable for those new to the craft while providing professional results.
Step 1: Preparation and Mixing the Base
Start by weighing all your ingredients precisely using a digital scale. Precision is vital in soap making because even a few grams off can change the chemistry of the bar. Melt your solid fats, the coconut oil and shea butter, over low heat until they are completely liquid. Once melted, combine them with your liquid olive oil in a large stainless steel or heat safe plastic bowl.
In a separate container, carefully mix your lye into the distilled water. Stir until the powder is completely dissolved. Allow both the oil mixture and the lye solution to cool until they are within 10 to 15 degrees of each other, typically between 100 and 110 degrees Fahrenheit. This temperature range helps prevent the soap from accelerating or seizing, giving you more time to work.
Step 2: Reaching Trace
Slowly pour the lye solution into the oils. Use a stick blender to pulse the mixture. You are looking for a state called “trace,” which is when the mixture reaches the consistency of a thin pudding. If you lift the blender and the soap batter leaves a visible trail or “trace” on the surface, you are ready for the next step. This indicates that the emulsification process is well underway.
Step 3: Scent and Botanicals
Once you have reached a light trace, it is time to add the soul of the soap. Pour in your lavender essential oil and stir by hand. Using a spatula instead of the blender at this stage prevents the soap from becoming too thick too quickly. Next, fold in your lavender buds. These buds provide a beautiful rustic aesthetic and offer a very light exfoliation when the soap is used.
Step 4: Molding and Setting
Pour the soap batter into a silicone or wood lined mold. Smooth the top with a spatula or create decorative peaks for a textured look. Tap the mold firmly on the counter to release any trapped air bubbles. Cover the mold and let it sit in a cool, dry place for 24 to 48 hours. During this time, the soap will undergo the bulk of its saponification and begin to harden.
Curing: The Secret to a Long Lasting Bar
After the initial 48 hours, you can unmold your soap and cut it into individual bars. While it might be tempting to use a bar immediately, the curing process is essential. Curing allows the remaining water in the soap to evaporate, resulting in a harder bar that lasts much longer in the shower. It also allows the pH level to stabilize, making the soap even milder on the skin.
Place your bars on a drying rack in a spot with good airflow, away from direct sunlight. Let them cure for four to six weeks. You will notice that the lather becomes creamier and the scent settles into a beautiful, lingering aroma. This patience pays off when you finally get to use a bar that produces a rich, stable lather and leaves your skin feeling incredible.
Customizing Your Lavender Bars
While this recipe is wonderful on its own, you can eventually experiment with variations. For a more vibrant look, you can add natural purple clays or micas. Some makers like to add a touch of orange peel or lemon zest to create a brighter, citrusy lavender scent. Others might swap a portion of the water for goat milk to create an even creamier, more nourishing bar. The possibilities are endless once you master the basic technique.
Integrating Mindfulness into Your Routine
The “Calm” aspect of this soap is not just about the ingredients, it is also about the ritual. Using a handmade product allows you to slow down and appreciate the craftsmanship involved. The affirmation included with this recipe, “I am calm, balanced, and at peace,” is a wonderful mantra to repeat during your morning or evening routine. Taking a moment to breathe in the lavender scent and focus on the sensation of the creamy lather can be a form of daily meditation.
Handmade soap also makes a thoughtful gift. In a world of mass produced items, giving someone a bar of soap that you spent weeks preparing is a true gesture of care. You can wrap these bars in simple parchment paper, tie them with twine, and tuck a sprig of dried lavender into the knot for a beautiful, eco friendly presentation.
Bringing the Spa Home
Creating your own skincare products is an empowering way to take control of what goes on your body. When you look at your finished bars of lavender soap, you can take pride in knowing every single ingredient inside. You have turned simple oils and botanicals into a functional piece of art that promotes health and tranquility. Whether you are making this for yourself or to share with loved ones, the process of soap making is a rewarding hobby that pays dividends in relaxation and soft skin. So, clear off your counter, put on your safety gear, and start your journey toward a calmer, more beautiful routine today.