DIY Coffee Facial at Home for Glowing Skin Natural Skincare Routine
Stepping into a high-end spa can feel like a dream, but the price tag often brings us back to reality quite quickly. What if you could capture that same revitalizing experience using ingredients already sitting in your kitchen pantry? The humble coffee bean is more than just a morning pick-me-up; it is a powerhouse for your skin. This DIY coffee facial routine is designed to cleanse, exfoliate, and deeply nourish your face, leaving you with a radiant glow that looks like you just walked out of a professional aesthetician’s office.
Coffee is packed with antioxidants and caffeine, which work together to reduce puffiness, improve blood circulation, and brighten dull complexions. When paired with natural healers like honey, milk, and aloe vera, you create a synergistic treatment that addresses multiple skin concerns at once. Let’s break down this four-step ritual so you can master the art of the at-home facial this weekend.
The Science Behind the Coffee Glow
Before we dive into the steps, it is essential to understand why coffee is such a beloved ingredient in the beauty world. Caffeine is a vasoconstrictor, meaning it helps to tighten the skin and reduce the appearance of redness or inflammation. This makes it an incredible tool for those mornings when your skin looks a little tired or puffy.
Furthermore, coffee grounds serve as a mechanical exfoliant. Unlike harsh synthetic beads found in some commercial scrubs, coffee grounds have a unique texture that buffs away dead skin cells without causing micro-tears, provided you use a gentle touch. The natural oils found within the bean also provide a light layer of protection, ensuring your skin does not feel stripped or dry after the process.
Antioxidant Protection for Aging Skin
Free radicals from pollution and UV exposure are the primary culprits behind premature aging. Coffee is loaded with phenols, which are powerful antioxidants that help neutralize these free radicals. By incorporating a coffee facial into your weekly routine, you are essentially giving your skin a shield against environmental stressors, helping to maintain elasticity and a youthful appearance over time.
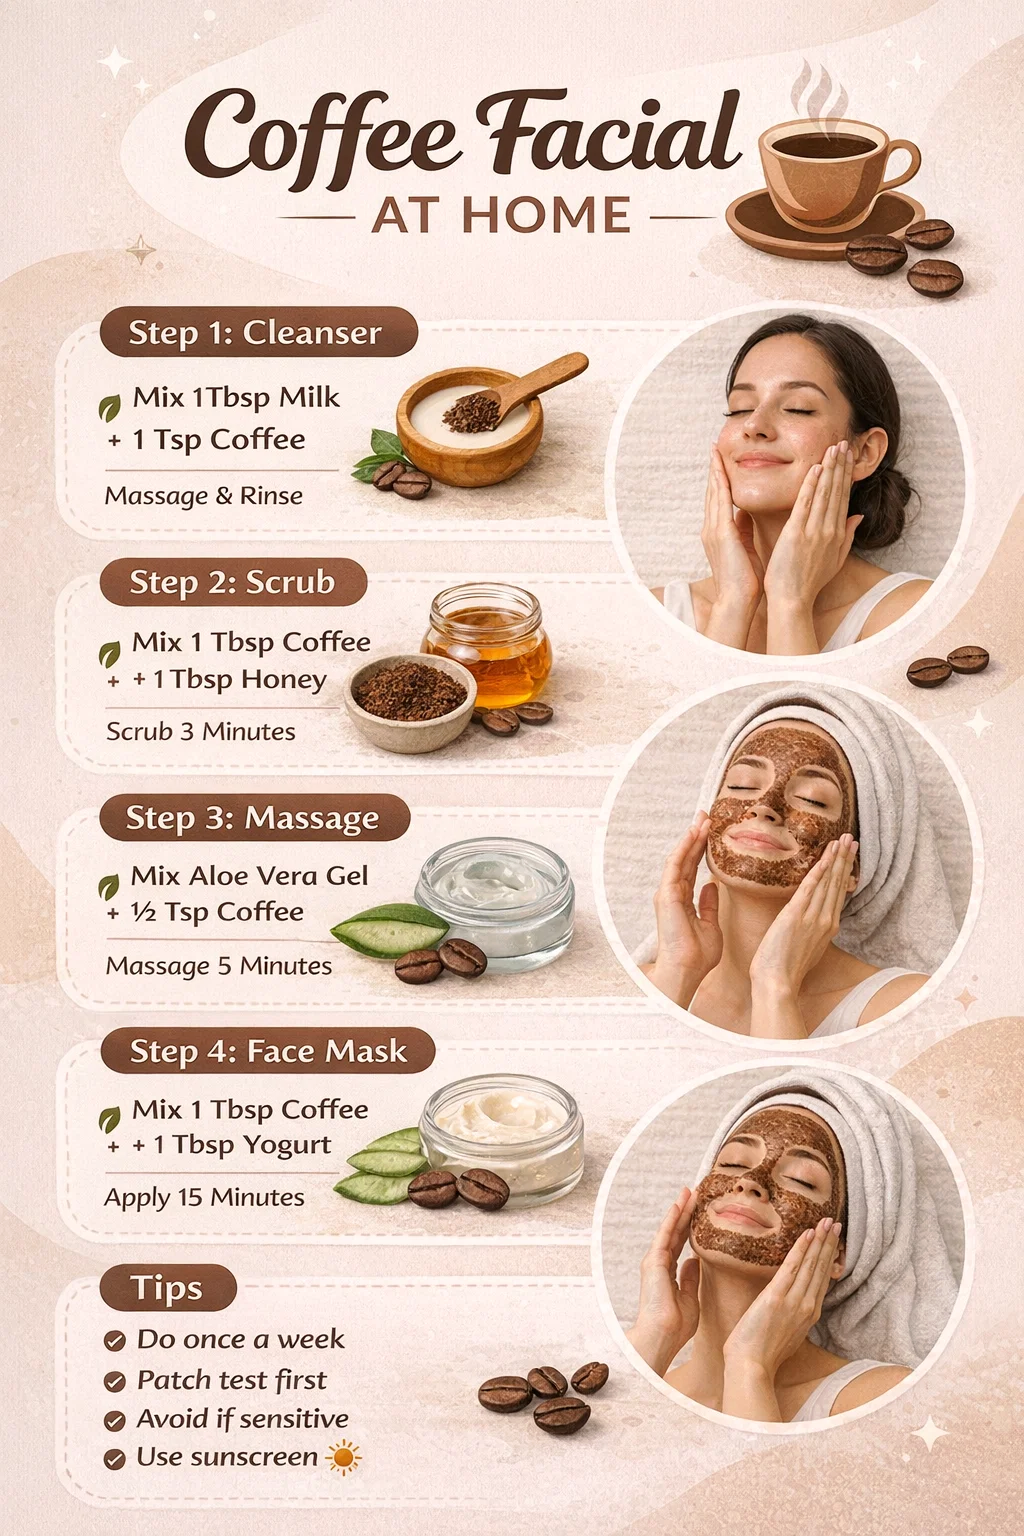
Step 1: The Gentle Coffee Cleanser
Every great facial begins with a clean slate. Instead of reaching for a soapy, chemical-heavy face wash, we start with a simple mixture of one tablespoon of milk and one teaspoon of coffee. This combination is surprisingly effective at lifting surface impurities while keeping the skin hydrated.
Milk contains lactic acid, a mild alpha-hydroxy acid (AHA) that helps to dissolve dead skin cells and deep-clean pores. When mixed with coffee, it creates a soothing liquid that wakes up the skin. Apply this mixture to your face using circular motions, massaging it in for about a minute. This stimulates blood flow to the surface. Rinse with lukewarm water and pat dry with a soft towel. You will notice an immediate softness that sets the stage for the next steps.
Step 2: Exfoliating with the Coffee and Honey Scrub
Once your skin is clean, it is time to tackle the deeper buildup. For this step, mix one tablespoon of coffee grounds with one tablespoon of raw honey. Honey is a natural humectant, meaning it draws moisture from the air into your skin. It also possesses antibacterial properties, making it excellent for preventing breakouts.
Apply the scrub to damp skin and move your fingertips in small, light circles. Focus on areas that tend to get congested, such as the nose and chin. Scrub for exactly two minutes. The goal is to stimulate the skin, not irritate it. The honey provides a “slip” that allows the coffee grounds to glide over the surface, removing the layer of dull, dry cells that prevent your skin from reflecting light. Once finished, rinse thoroughly. Your face should feel incredibly smooth and refreshed.
Step 3: Revitalizing Massage with Aloe Vera
Many people skip the massage phase of a facial, but it is actually one of the most important parts for achieving a lasting glow. For this step, combine pure aloe vera gel with half a teaspoon of coffee. Aloe vera is famous for its cooling and anti-inflammatory properties, making it the perfect follow-up to exfoliation.
Massage this blend into your skin for five minutes. Use upward strokes to help “lift” the facial muscles and encourage lymphatic drainage. This process helps to flush out toxins and reduces any lingering puffiness under the eyes or along the jawline. The small amount of coffee in this step provides a concentrated dose of caffeine that stays in contact with the skin long enough to really tighten and tone the surface. By the time you finish, your face will feel energized and firm.
Step 4: The Deep Conditioning Face Pack
The final treatment step is the face pack, which locks in all the benefits of the previous stages. Mix one tablespoon of coffee with one tablespoon of fresh curd or plain yogurt. Curd is rich in fats and proteins that nourish the skin deeply, while the zinc found in yogurt can help soothe any minor irritations.
Apply a thick, even layer of this mask over your face and neck. Sit back, relax, and let it sit for fifteen minutes. This is your time to disconnect and breathe. As the mask sets, the nutrients penetrate the deeper layers of the epidermis. The curd works to brighten the skin tone and provide an intense moisture boost. When the time is up, wash it off with cool water to close the pores and lock in the hydration.
Essential Tips for the Best Results
To get the most out of your DIY coffee facial, consistency and safety are key. While these ingredients are natural, everyone’s skin reacts differently. Follow these professional tips to ensure your experience is nothing but positive.
- Frequency: Perform this full facial once a week. Over-exfoliating can damage the skin barrier, so give your face time to recover and regenerate between sessions.
- The Patch Test: Always test a small amount of the mixture on your inner arm or behind your ear before applying it to your entire face. This ensures you do not have a sensitivity to the caffeine or the lactic acid in the dairy products.
- Avoid Sensitive Skin: If you have active cystic acne, sunburn, or extremely sensitive skin, skip the scrub step. The mechanical friction might be too intense. You can still enjoy the cleanser and the mask!
- Sun Protection: Freshly exfoliated skin is more vulnerable to UV rays. Always apply a broad-spectrum sunscreen after your facial if you plan on heading outside.
Customizing Your Facial for Your Skin Type
The beauty of a DIY routine is that you can tweak the ingredients to suit your specific needs. If you have very dry skin, consider adding a few drops of almond oil or vitamin E oil to the face pack. If your skin is oily, a squeeze of lemon juice in the scrub can help balance sebum production and further brighten the complexion. Listen to your skin and adjust the ratios until you find your perfect blend.
Why Natural Skincare Matters
In an era where ingredient labels are becoming increasingly long and difficult to pronounce, returning to basics is refreshing. Using whole ingredients like coffee, honey, and curd ensures that you know exactly what is going onto your body. There are no hidden fragrances, parabens, or synthetic preservatives to worry about. You are feeding your skin the same way you would feed your body, with high-quality, nutrient-dense ingredients that provide real, visible results.
Beyond the physical benefits, the act of preparing and applying these treatments is a form of mindfulness. It encourages you to slow down and prioritize your well-being. This ritualistic approach to beauty can reduce stress and improve your overall mood, making you glow from the inside out.
Wrapping Up Your Spa Day
You do not need an expensive vanity full of luxury products to achieve beautiful skin. The coffee facial at home is a testament to the power of nature and the effectiveness of simple, time-tested remedies. By following these four steps, you are treating yourself to a comprehensive skincare experience that cleanses, renews, and protects.
Give this routine a try this weekend and see the difference for yourself. Your skin will feel softer, look brighter, and carry a healthy radiance that lasts for days. Remember to keep your ingredients fresh and your movements gentle. Happy pampering, and here is to your most glowing skin yet!