DIY Hibiscus Almond Soap Recipe Easy Step-by-Step Natural Homemade Soap Making Guide
There is something truly magical about the month of May. It is a time when the world feels like it is finally exhaling, trading the brittle chill of winter for the soft, fragrant bloom of spring. It is the perfect season to bring that natural beauty into your home, not just with a vase of fresh flowers, but through the tactile, rewarding art of cold process soap making. If you have been looking for a way to capture the essence of a spring garden in a functional, skin loving bar, our May Bloom Hibiscus Almond Soap is your next must try project. This recipe is more than just a cleansing product; it is a sensory experience that combines the deep, botanical power of hibiscus with the silky richness of sweet almond oil.
The Magic of Hibiscus in Skincare
Often referred to as the nature’s botox plant, hibiscus is a powerhouse ingredient that has been used for centuries in traditional beauty rituals. When infused into soap, hibiscus powder does more than just provide a stunning, earthy pink hue. It is naturally rich in antioxidants called anthocyanocides, which help to fight off free radicals and keep your skin looking youthful and vibrant. For those with sensitive or maturing skin, hibiscus is a gentle way to encourage natural exfoliation without the harshness of chemical scrubs. It contains mild acids that have a slight exfoliating effect, helping to speed up cell turnover and resulting in a more even skin tone.
Why Sweet Almond Oil is a Soap Maker’s Best Friend
While the hibiscus brings the visual and antioxidant flair, the sweet almond oil acts as the backbone of the moisture profile in this recipe. Unlike some oils that can feel heavy or greasy, sweet almond oil is lightweight and deeply penetrative. It is packed with Vitamin E, potassium, and zinc, making it an incredible emollient. In the world of soap making, almond oil is prized for creating a stable, conditioning lather. It ensures that while the soap cleanses your skin, it does not strip away the natural oils that keep your barrier healthy. When you use a bar enriched with 60g of this liquid gold, you will notice a distinct difference in how your skin feels post shower. No more tight, itchy sensations, just soft, hydrated radiance.
Essential Ingredients for the May Bloom Recipe
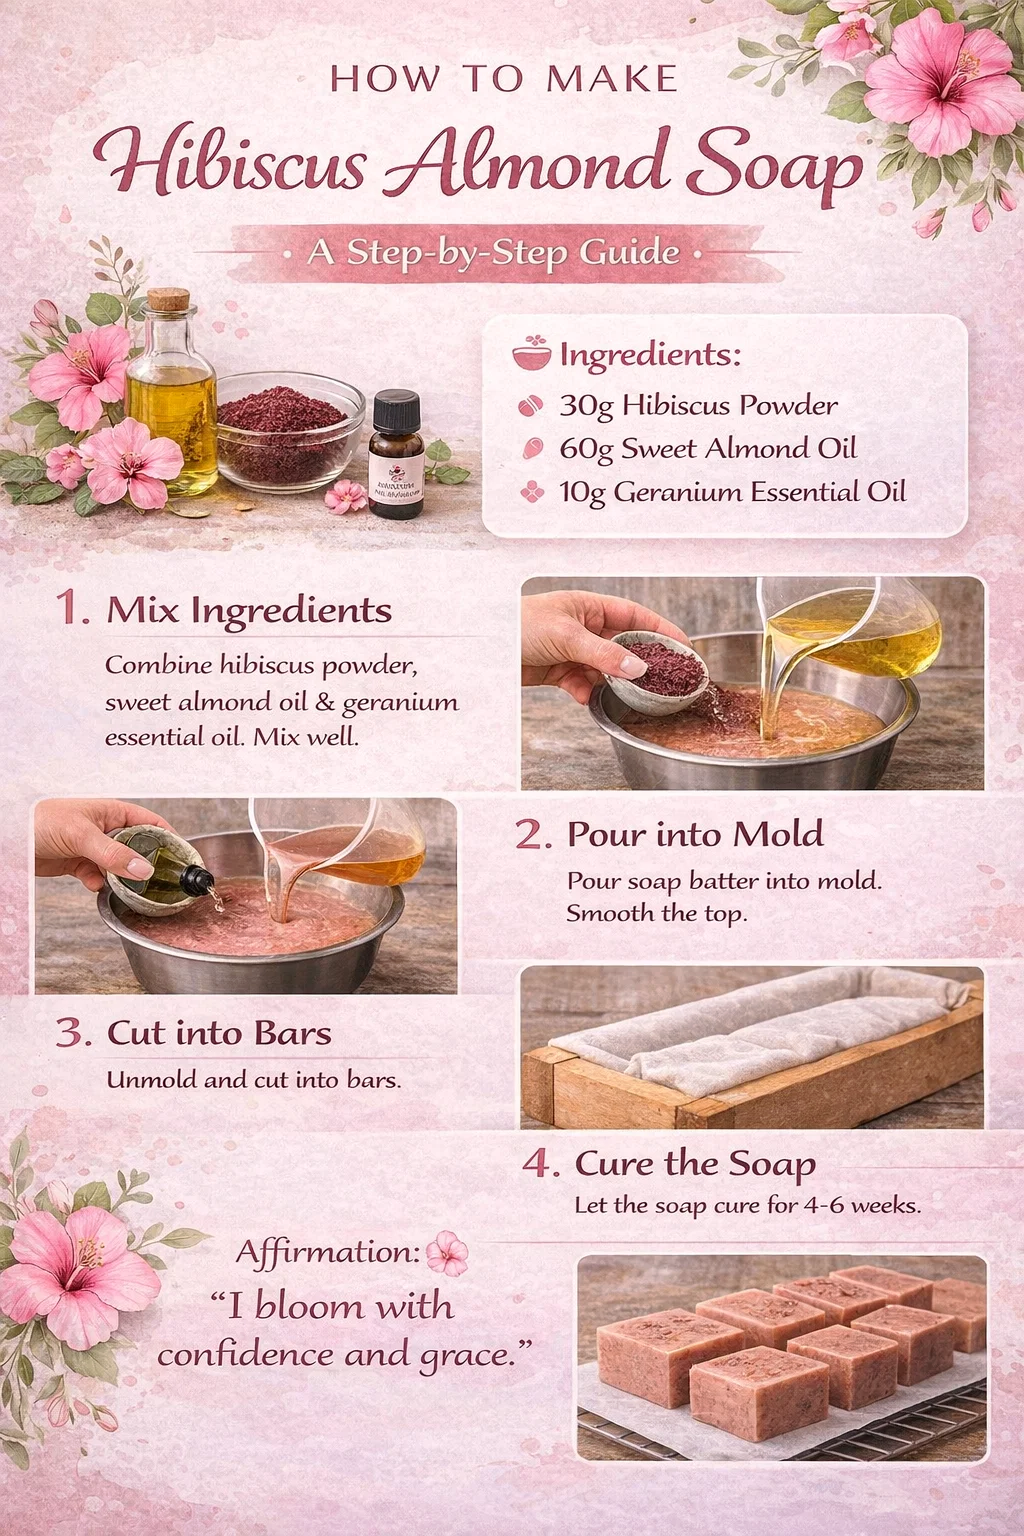
To create this specific batch of May Bloom soap, you will need a few key ingredients that balance color, scent, and texture. This recipe is designed to be accessible for those who have a basic soap base ready and want to customize it into something artisanal and high end. Here is the breakdown of what makes this soap so special:
- 30g Hibiscus Powder: This provides the natural pigment and the antioxidant properties. Depending on the pH of your soap base, the color can range from a deep mauve to a soft rose.
- 60g Sweet Almond Oil: This is our primary conditioning agent. It adds a luxurious “slip” to the soap and ensures a creamy lather.
- 10g Geranium Essential Oil: For the scent, we have chosen geranium. It has a beautifully complex floral aroma that mimics rose but with a slightly herbaceous undertone. It is also known for its ability to balance sebum production in the skin.
Step by Step Guide to Crafting Your Hibiscus Almond Soap
Creating your own soap at home can feel intimidating at first, but once you break it down into these simple steps, it becomes a meditative and rewarding process. Follow along as we transform these raw botanicals into a beautiful set of bars.
Step 1: Preparing and Mixing the Ingredients
Before you begin, ensure your workspace is clean and that you have all your safety gear in place if you are working with lye. Start with your melted soap base at a manageable temperature. In a small bowl, you may want to whisk your hibiscus powder with a tiny bit of the almond oil first to prevent clumping. Once smooth, combine the base ingredients. Add the 30g of hibiscus powder, the 60g of sweet almond oil, and the 10g of geranium essential oil. Stir slowly and consistently. You want the powder to be evenly distributed so that every bar has that consistent, beautiful bloom color.
Step 2: The First Pour
Once your mixture is well combined and the scent of geranium is filling the room, it is time to pour. Using a steady hand, pour the soap batter into your chosen mold. For this recipe, a wooden loaf mold lined with parchment paper or a silicone mold works best. The goal here is a smooth, even pour. If you notice any small air bubbles rising to the top, a quick spray of rubbing alcohol will pop them instantly, leaving you with a professional finish.
Step 3: Smoothing and Perfecting
After the initial pour, give the mold a few gentle taps on your counter to ensure the batter has settled into every corner. Use a spatula to smooth the top. If you like a more rustic look, you can use the back of a spoon to create “waves” or texture on the surface of the soap. This is the moment where the soap begins its transition from a liquid mixture to a solid bar of art.
Step 4: Molding and Cutting into Bars
Patience is key here. You need to let the soap sit undisturbed until it is completely firm. Once it has hardened, carefully unmold the loaf. If you used a wooden mold, the parchment paper should make this a breeze. Using a sharp soap cutter or a non serrated knife, cut the loaf into individual bars. You can choose the thickness based on your preference, but standard one inch bars are usually the most comfortable for daily use. You will see the beautiful interior texture of the hibiscus powder as you slice through.
The Importance of the Curing Process
One of the most common mistakes new soap makers make is using their bars too soon. For a high quality bar of soap, the curing process is non negotiable. You should place your cut bars on a drying rack in a cool, ventilated area away from direct sunlight.
Why wait 4 to 6 weeks?
During the 4 to 6 week curing period, the remaining water in the soap evaporates. This does two important things. First, it makes the bar harder, which means it will last much longer in your shower and won’t turn into a mushy mess after the first use. Second, the curing process allows the pH level of the soap to mellow out, making it much gentler on your skin. A well cured bar of May Bloom soap provides a much richer, creamier lather than a “fresh” bar ever could.
A Daily Ritual: The Power of Affirmations
At the heart of DIY beauty is the idea of self care. When we make our own products, we put our energy and intentions into them. We recommend incorporating a small ritual into your morning or evening routine when using this soap. As you lather up and enjoy the floral scent of geranium, take a moment to center yourself. A beautiful affirmation to pair with this specific soap is: I bloom with confidence and grace. Just as the hibiscus flower opens up to the sun, let your skincare routine be a reminder to open yourself up to the possibilities of the day, feeling confident in your own skin and moving through your tasks with grace.
Customizing Your Batch
Once you have mastered this basic May Bloom recipe, do not be afraid to experiment! You could add dried hibiscus petals to the top of the bars during Step 3 for an extra botanical touch. If you prefer a more exfoliating bar, you could stir in a tablespoon of poppy seeds or fine sea salt. The combination of almond oil and geranium is a versatile base that plays well with many other natural additives. Some soap makers like to add a touch of white kaolin clay to this recipe to give the soap a silkier feel and to help the essential oil scent last even longer.
Conclusion: Bringing the Bloom Indoors
Making your own May Bloom Hibiscus Almond Soap is a wonderful way to celebrate the changing seasons and prioritize your well being. By choosing high quality, natural ingredients like hibiscus powder and sweet almond oil, you are giving your skin the nutrients it craves without the synthetic additives found in commercial brands. The process of mixing, pouring, and even the long wait of the curing stage connects you to the craft of traditional soap making in a way that is deeply satisfying. Whether you keep these bars for your own bathroom or wrap them in twine to give as thoughtful, handmade gifts, they are sure to bring a sense of joy and natural beauty to whoever uses them. So, gather your ingredients, set your intentions, and let your creativity bloom this season. You deserve a skincare ritual that is as vibrant and resilient as the flowers in May.