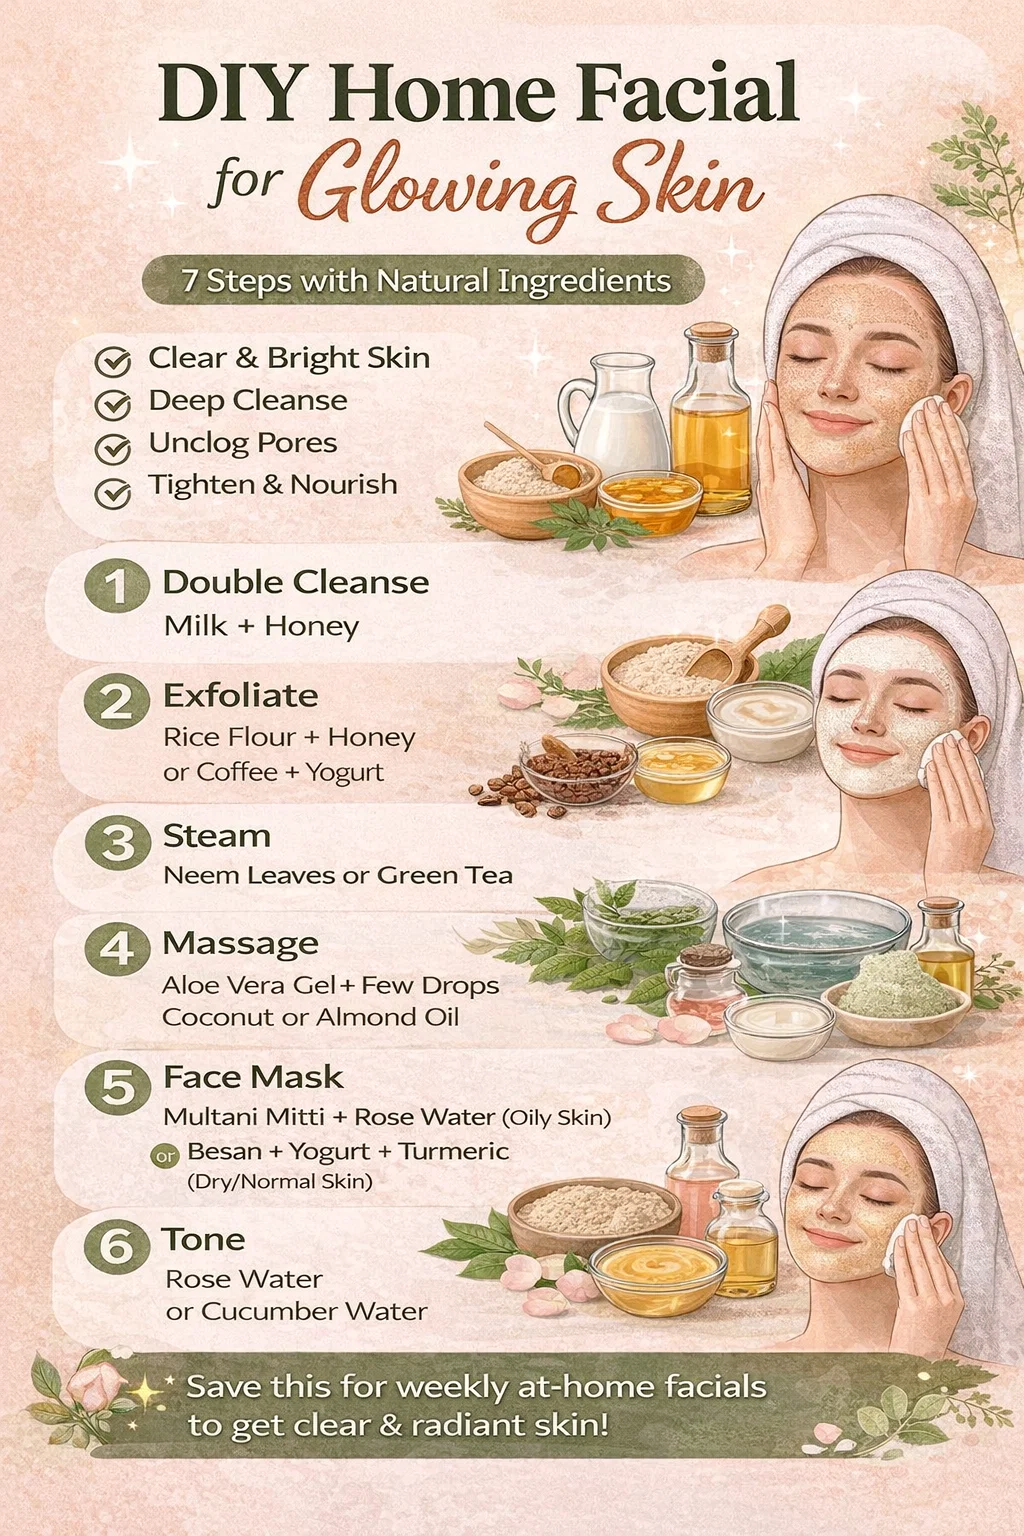
DIY Home Facial for Glowing Skin 7 Steps with Natural Ingredients
Transforming your bathroom into a private sanctuary is one of the most rewarding self-care investments you can make. You do not need expensive spa memberships or high-end chemical peels to achieve a radiant, lit-from-within glow. In fact, some of the most potent skincare secrets are likely sitting in your kitchen pantry right now. This comprehensive guide walks you through a professional-grade seven-step DIY home facial using entirely natural ingredients to help you achieve clear, bright, and healthy skin.
The Magic of Natural Ingredients for Your Face
The philosophy behind a natural home facial is simple: if you wouldn’t put it in your body, why put it on your skin? Natural ingredients like raw honey, rice flour, and rose water are packed with enzymes, antioxidants, and vitamins that work in harmony with your skin’s biology. Unlike many store-bought products that contain synthetic fragrances or harsh preservatives, these kitchen staples provide a gentle yet effective way to deep cleanse, hydrate, and nourish your complexion.
When you commit to a weekly facial ritual, you are doing more than just cleaning your surface skin. You are encouraging lymphatic drainage, boosting blood circulation, and allowing your mind to decompress. This holistic approach ensures that your outer glow is a true reflection of your inner health.
Step 1: The Art of the Double Cleanse
The foundation of any successful facial is a perfectly clean canvas. A single wash is often not enough to remove the layers of sunscreen, pollutants, and sebum that accumulate throughout the day. This is where the double cleanse method becomes a game-changer.
Milk and Honey Cleansing
For a natural approach, start with a mixture of raw milk and honey. Milk contains lactic acid, a mild alpha-hydroxy acid that gently dissolves dead skin cells, while honey acts as a natural humectant to draw moisture into the skin. If you prefer a more traditional route, use a gentle, sulfate-free cleanser. Massage the mixture into your skin using upward circular motions for at least sixty seconds. This process breaks down oil-based impurities and prepares the pores for the deeper steps to come. Rinse with lukewarm water and pat dry with a soft, clean towel.
Step 2: Exfoliate to Reveal Fresh Skin
Exfoliation is the process of removing the dull, dead layer of skin cells that sit on the surface. Without regular exfoliation, your pores can become clogged, leading to breakouts and a lackluster appearance. The goal here is to be gentle. You want to polish the skin, not scrub it raw.
Customizing Your Scrub
Depending on your skin type, you can choose between two powerful natural combinations. For those looking for brightening and smoothing, rice flour mixed with honey is an excellent choice. Rice flour has been used for centuries in Asian beauty rituals to even out skin tone. If you need a more invigorating experience, try coffee grounds mixed with curd. The caffeine in the coffee helps to tighten the skin and reduce puffiness, while the curd provides a soothing, creamy base that prevents irritation. Apply your chosen scrub and massage very lightly, focusing on areas prone to congestion like the nose and chin.
Step 3: Steam to Open and Purify Pores
Steaming is the step that truly bridges the gap between a basic wash and a professional facial. The warm vapor softens the hardened oil inside your pores, making it much easier for toxins to be released. It also increases perspiration, which helps to flush out impurities.
Infusing Your Steam with Herbs
To elevate the experience, add neem leaves or green tea to a bowl of hot water. Neem is legendary for its antibacterial properties, making it ideal for those prone to acne. Green tea is loaded with polyphenols that protect the skin from environmental damage. Drape a towel over your head and the bowl, creating a mini sauna. Keep your face about ten inches away from the water to avoid heat damage and breathe deeply for five to ten minutes. This step leaves your skin soft, supple, and ready to absorb the nutrients from the upcoming massage and mask.
Step 4: The Relaxing Facial Massage
A facial massage is often the most underrated part of a skincare routine. By applying physical pressure to the face, you stimulate the facial muscles and encourage the flow of oxygen-rich blood to the surface. This creates an immediate lifting effect and a natural flush.
Choosing the Right Facial Oil
For the perfect slip, mix pure aloe vera gel with a few drops of coconut oil or almond oil. Aloe vera provides a cooling, hydrating base, while the oils offer essential fatty acids. If you have oily skin, almond oil is a lighter choice that won’t clog pores. Use your fingertips to perform gentle strokes starting from the center of your face and moving outward toward your ears. Work along the jawline, the cheekbones, and the forehead. This five-minute massage not only tones the skin but also melts away the tension held in the facial muscles.
Step 5: The Power of the Natural Face Mask
Now that your pores are open and your circulation is buzzing, it is time to apply a nutrient-dense mask. This is the “treatment” phase of the facial where you target specific skin concerns.
For Oily and Acne-Prone Skin
Multani Mitti, also known as Fuller’s Earth, combined with rose water is the gold standard for oily skin. This clay is incredibly effective at pulling out excess oil and tightening the pores. Rose water adds a balancing effect, ensuring the skin doesn’t feel overly stripped after the clay dries.
For Dry and Normal Skin
If your skin needs moisture and a boost of radiance, mix Besan (gram flour) with curd and a pinch of turmeric. Besan gently cleanses, curd provides deep hydration and healthy fats, and turmeric offers anti-inflammatory benefits that leave the skin looking vibrant. Apply an even layer over your face and neck, avoiding the delicate eye area. Relax for fifteen minutes or until the mask is semi-dry, then rinse thoroughly with cool water.
Step 6: Tone to Balance and Tighten
After rinsing off your mask, it is crucial to bring your skin’s pH levels back into balance. A toner acts as a secondary cleanser to remove any lingering mask residue while also tightening the appearance of pores.
Natural Hydrosols
Rose water is a classic natural toner that suits almost every skin type. It is anti-inflammatory and smells divine. Alternatively, cucumber water is incredibly refreshing and helps to reduce any redness or heat left over from the steaming process. You can apply these using a cotton pad or simply spritz them directly onto your face. Allow the toner to air dry slightly so your skin remains damp before moving to the final stage of protection.
Maintaining Your Results
While a DIY home facial provides immediate gratification, the long-term health of your skin depends on consistency. To maintain that “just-had-a-facial” look, ensure you are drinking plenty of water throughout the day to hydrate from the inside out. Additionally, never skip your daily SPF, as freshly exfoliated skin can be more sensitive to sun damage.
Integrating this seven-step process into your weekly routine will yield significant improvements in skin texture and clarity over time. It allows you to take control of what goes onto your body while providing a necessary pause in a busy schedule. Skincare is a form of self-respect, and taking the time to care for your complexion naturally is a powerful way to honor yourself.
Conclusion: Your Journey to Radiant Skin
Achieving glowing skin does not require a complicated cabinet full of expensive chemicals. By following these seven steps, double cleansing, exfoliating, steaming, massaging, masking, and toning, you utilize the pure power of nature to revitalize your appearance. This DIY home facial is a versatile ritual that can be adapted to your specific needs, whether you are battling seasonal dryness or looking to control midday shine. Grab your ingredients, set the mood with some calming music, and enjoy the process of revealing your most radiant self. Save this routine for your next self-care Sunday and watch as your skin transforms into a clearer, healthier version of itself.