DIY Homemade Lip Balm Recipe Natural Beeswax Essential Oil Tutorial
Finding the perfect lip balm often feels like an endless quest. Many store-bought versions are packed with synthetic waxes, artificial fragrances, and petrolatum that might feel good for a second but leave your lips even drier than before. If you have been looking for a way to take control of your skincare routine while embracing a more natural, holistic lifestyle, making your own lip balm is the ultimate gateway project. It is surprisingly simple, incredibly cost-effective, and allows you to customize every single ingredient to suit your personal needs. Whether you are dealing with harsh winter winds or just want a subtle, healthy glow, this DIY beeswax and jojoba lip balm recipe is a game-changer for your daily self-care ritual.
The Magic of Natural Ingredients for Lip Care
When you look at the back of a standard lip balm tube, you might see a long list of chemical names that are hard to pronounce. By shifting to a homemade formula, you are prioritizing the health of your skin. The lips are one of the most sensitive parts of the body, and because the skin there is so thin, it absorbs products much faster than the rest of your face. Using food-grade, organic ingredients ensures that you are providing deep nourishment without any hidden toxins. Let’s break down why the specific ingredients in this recipe work so well together to create a protective, hydrating barrier.
Beeswax Pellets: The Natural Protector
Beeswax is the backbone of any solid lip balm. It acts as a natural emulsifier, helping to bind the oils together into a smooth, spreadable consistency. More importantly, beeswax is a humectant, meaning it draws moisture into the skin. It also creates a breathable protective layer on the surface of the lips, shielding them from environmental stressors like cold air, UV rays, and pollution. Unlike paraffin wax, which is derived from petroleum, beeswax allows the skin to breathe while still locking in essential hydration.
The Triple Threat of Nourishing Oils
While the beeswax provides the structure, the oils provide the deep-conditioning power. This recipe uses a strategic blend of three different oils to cover all aspects of lip health:
- Coconut Oil: Known for its antimicrobial properties, coconut oil is a staple in natural beauty. It sinks in quickly to provide immediate relief to dry or chapped skin.
- Olive Oil: A powerhouse of antioxidants and Vitamin E, olive oil helps to repair damaged skin cells and provides a smooth, glossy finish that makes your lips look healthy and full.
- Jojoba Oil: Technically a liquid wax, jojoba oil closely mimics the natural sebum produced by human skin. This makes it incredibly effective at balancing moisture levels without feeling greasy or heavy.
How to Make Your Own Lip Balm: A Step-by-Step Guide
Creating your own beauty products does not require a laboratory or expensive equipment. Most of these items are likely already in your kitchen pantry or craft closet. The process is quick, taking less than twenty minutes from start to finish, excluding the cooling time. This recipe is designed to be fool proof, making it an excellent activity for a weekend DIY session or even a fun project to do with friends and family.
Gathering Your Supplies
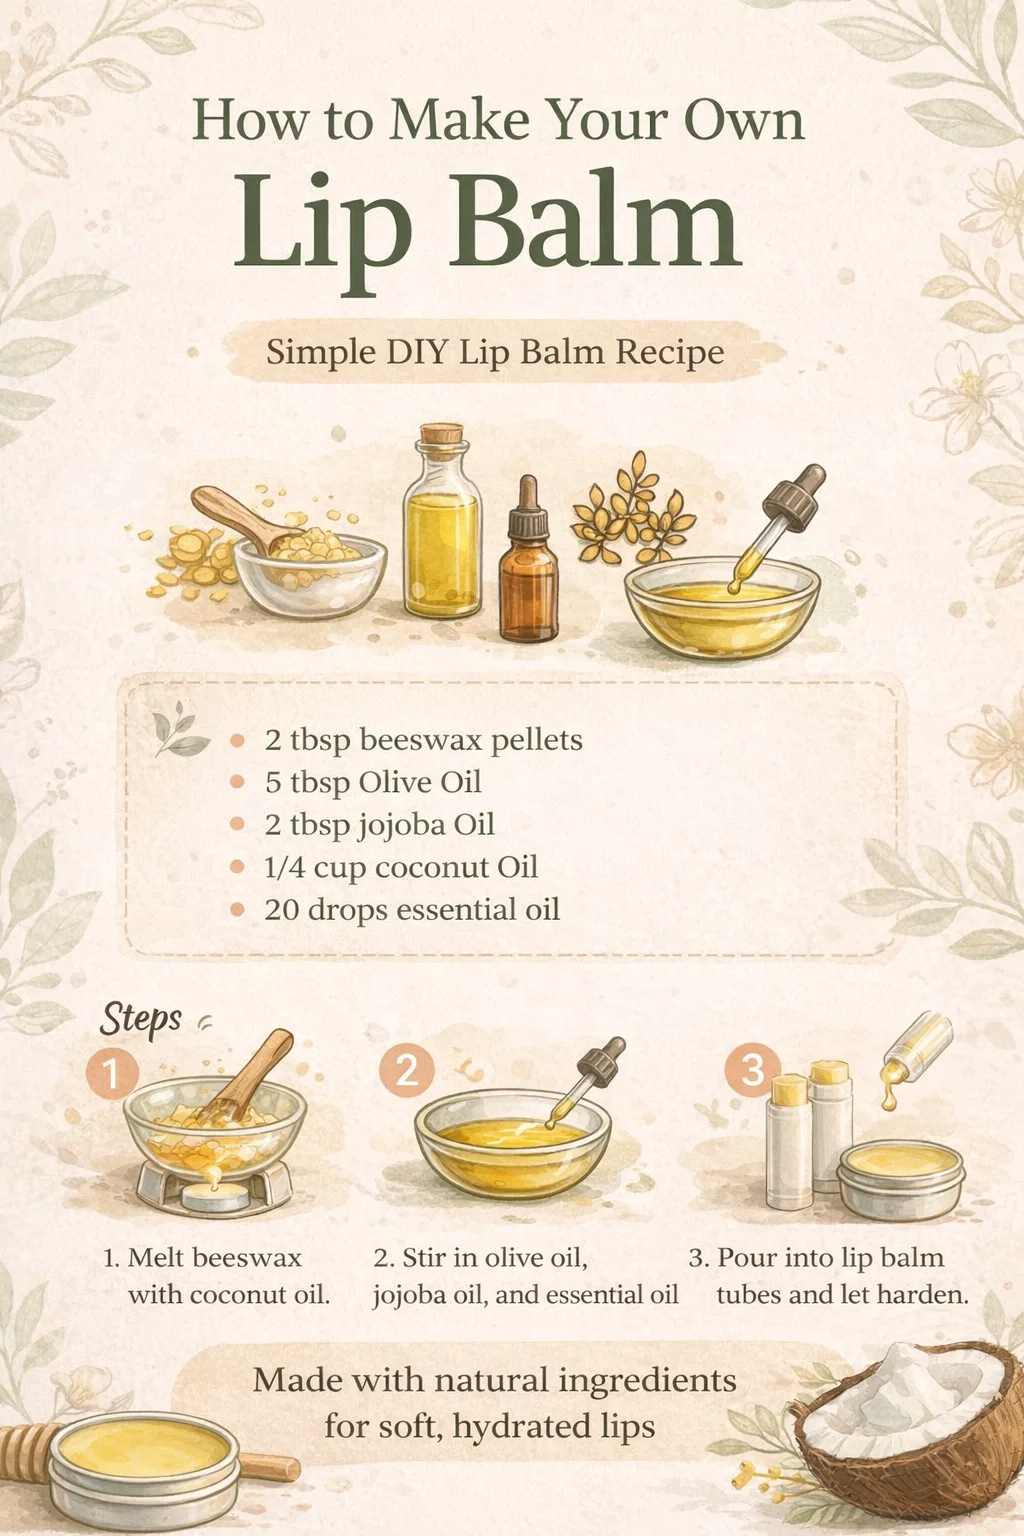
Before you begin the melting process, ensure you have everything laid out and ready to go. Once the wax begins to cool, it hardens quickly, so being organized is key. You will need:
- 2 tablespoons of beeswax pellets (yellow or white pellets both work beautifully).
- 5 tablespoons of high-quality Olive Oil.
- 2 tablespoons of Jojoba Oil.
- 1/4 cup of solid Coconut Oil.
- 20 drops of your favorite therapeutic-grade essential oil (peppermint, sweet orange, or lavender are popular choices).
- A small glass measuring cup or a heat-safe bowl.
- A small saucepan to create a double boiler.
- Empty lip balm tubes or small metal tins.
The Melting and Mixing Process
To start, create a simple double boiler by placing your glass measuring cup inside a saucepan filled with about an inch of water. Turn the heat to medium-low. Add your beeswax pellets and the coconut oil to the glass cup. It is important to melt these slowly to preserve the beneficial properties of the oils. Use a small whisk or a wooden stir stick to gently move the pellets around until they are completely liquid.
Once the beeswax and coconut oil have merged into a clear, golden liquid, it is time to add the remaining ingredients. Carefully stir in the olive oil and the jojoba oil. You may notice the mixture clouding up slightly as the cooler oils hit the warm wax, but keep stirring until everything is uniform and transparent again. Take the mixture off the heat before adding your essential oils. Adding scents at a lower temperature helps prevent the delicate oils from evaporating, ensuring your lip balm smells wonderful for a long time.
Pouring and Setting Your Balms
This is the part where you need a steady hand. Carefully pour the liquid mixture into your empty tubes or tins. If you are using tubes, fill them almost to the very top, as the mixture will shrink slightly as it cools. If you find the mixture starts to harden in the pouring container, simply place it back in the warm water bath for a minute to re-melt. Once filled, move the containers to the refrigerator. Letting them set in a cool environment for about thirty minutes ensures a smooth, professional texture without any graininess.
Customizing Your Recipe for Different Needs
One of the best things about DIY skincare is that you can tweak the formula to suit your preferences. If you live in an exceptionally hot climate, you might want to add an extra teaspoon of beeswax to ensure the balm stays solid in your pocket. Conversely, if you prefer a softer, glossier balm, you can increase the amount of jojoba or olive oil slightly. The possibilities for customization are truly endless when you understand the basic ratios.
Choosing the Right Essential Oils
The scent of your lip balm can have a significant impact on your mood. For a refreshing, tingly sensation, peppermint essential oil is a classic choice that also helps stimulate blood flow to the lips. If you are looking for something calming before bed, lavender or chamomile oils are perfect. For those who want a bit of a citrus kick, sweet orange or grapefruit oils are bright and uplifting. Just remember to use high-quality, pure oils and avoid synthetic fragrance oils which can be irritating to the skin.
Adding Natural Color and Tint
If you want your homemade balm to double as a sheer lipstick, you can easily add a natural tint. A tiny pinch of beetroot powder or a small piece of an old natural lipstick melted into the batch can provide a beautiful rosy glow. For a more earthy, nude tone, a bit of cocoa powder adds both color and a delicious chocolatey scent. Always start with a very small amount of pigment and test a drop on the back of your hand to check the color intensity before pouring the whole batch.
The Benefits of Regular Lip Care
We often forget that our lips need just as much attention as the rest of our skin. Developing a habit of applying your homemade balm multiple times a day can prevent many common issues. Beyond just feeling soft, well-hydrated lips are more resilient and age more gracefully. This simple DIY recipe provides several key benefits that keep your smile looking its best.
Protection and Prevention
Cracked and peeling lips are not just unsightly; they can be quite painful. By applying a beeswax-based balm, you are creating a physical barrier that prevents moisture from escaping. This is particularly important during the winter months or if you spend a lot of time in air-conditioned environments. Regular use helps prevent the painful fissures that can lead to irritation or even infection.
Exfoliation and Smoothness
While this recipe is primarily focused on hydration, the act of applying it and the natural fats within the oils help to gently soften dead skin cells. For an extra smooth finish, you can use a damp washcloth to gently rub your lips once the balm has softened the surface. This removes dull skin and reveals the fresh, vibrant layer underneath. Following up with a fresh layer of your jojoba balm will lock in that smoothness for hours.
Sustainable and Budget-Friendly Beauty
In addition to the physical benefits, making your own lip balm is a win for the planet and your wallet. Most of the ingredients can be bought in bulk, and a single purchase of beeswax and oils can produce dozens of tubes of balm. This drastically reduces the amount of plastic waste generated by constantly buying new, single-use products from the store. You can even wash and reuse your lip balm tins once they are empty, creating a truly circular beauty routine.
Furthermore, these handmade balms make incredible gifts. Whether it is for a birthday, a holiday stocking stuffer, or a bridesmaid proposal, people always appreciate the effort and care that goes into a handmade product. You can create custom labels and choose scents that match the personality of your friends and family, making it a thoughtful and practical gesture that everyone can use.
Conclusion
Stepping into the world of DIY skincare does not have to be intimidating. This homemade lip balm recipe is the perfect starting point for anyone looking to simplify their routine and embrace the power of nature. By combining the protective strength of beeswax with the deep nourishment of olive, coconut, and jojoba oils, you are creating a product that is superior to many commercial alternatives. It is an act of self-care that rewards you every time you feel that smooth, hydrating glide across your lips. So, clear off a spot on your kitchen counter, gather your ingredients, and enjoy the process of crafting something beautiful and beneficial with your own two hands. Your lips will certainly thank you for it.