DIY Lip Sleeping Mask Recipe Overnight Lip Treatment with Shea Butter Rosehip Oil
Finding the perfect lip care routine can feel like an endless quest. We have all been there: scrolling through endless aisles of beauty products, searching for that one holy grail treatment that will finally banish dry, flaky lips for good. While there are plenty of luxury options on the market, there is something incredibly satisfying about creating your own high performance skincare at home. This DIY Lip Sleeping Mask is a game changer for anyone looking to achieve a soft, plump pout without the synthetic fragrances or heavy price tags of high end brands. By blending natural waxes, rich butters, and potent botanical oils, you can craft a professional grade overnight treatment that works while you dream.
The Magic of an Overnight Lip Treatment
Why do we need a specific mask for nighttime? During the day, our lips are constantly exposed to environmental stressors like wind, sun, and dry indoor air. We are also talking, eating, and drinking, which means any balm we apply tends to wear off quickly. At night, your body goes into repair mode. This is the optimal time to apply a thick, occlusive, and nutrient dense formula that can sit undisturbed for hours. A sleeping mask acts as a protective barrier, locking in moisture and allowing healing ingredients to penetrate deeply into the delicate skin of the lips, which is much thinner than the skin on the rest of your face.
Breaking Down the Ingredients: Why This Recipe Works
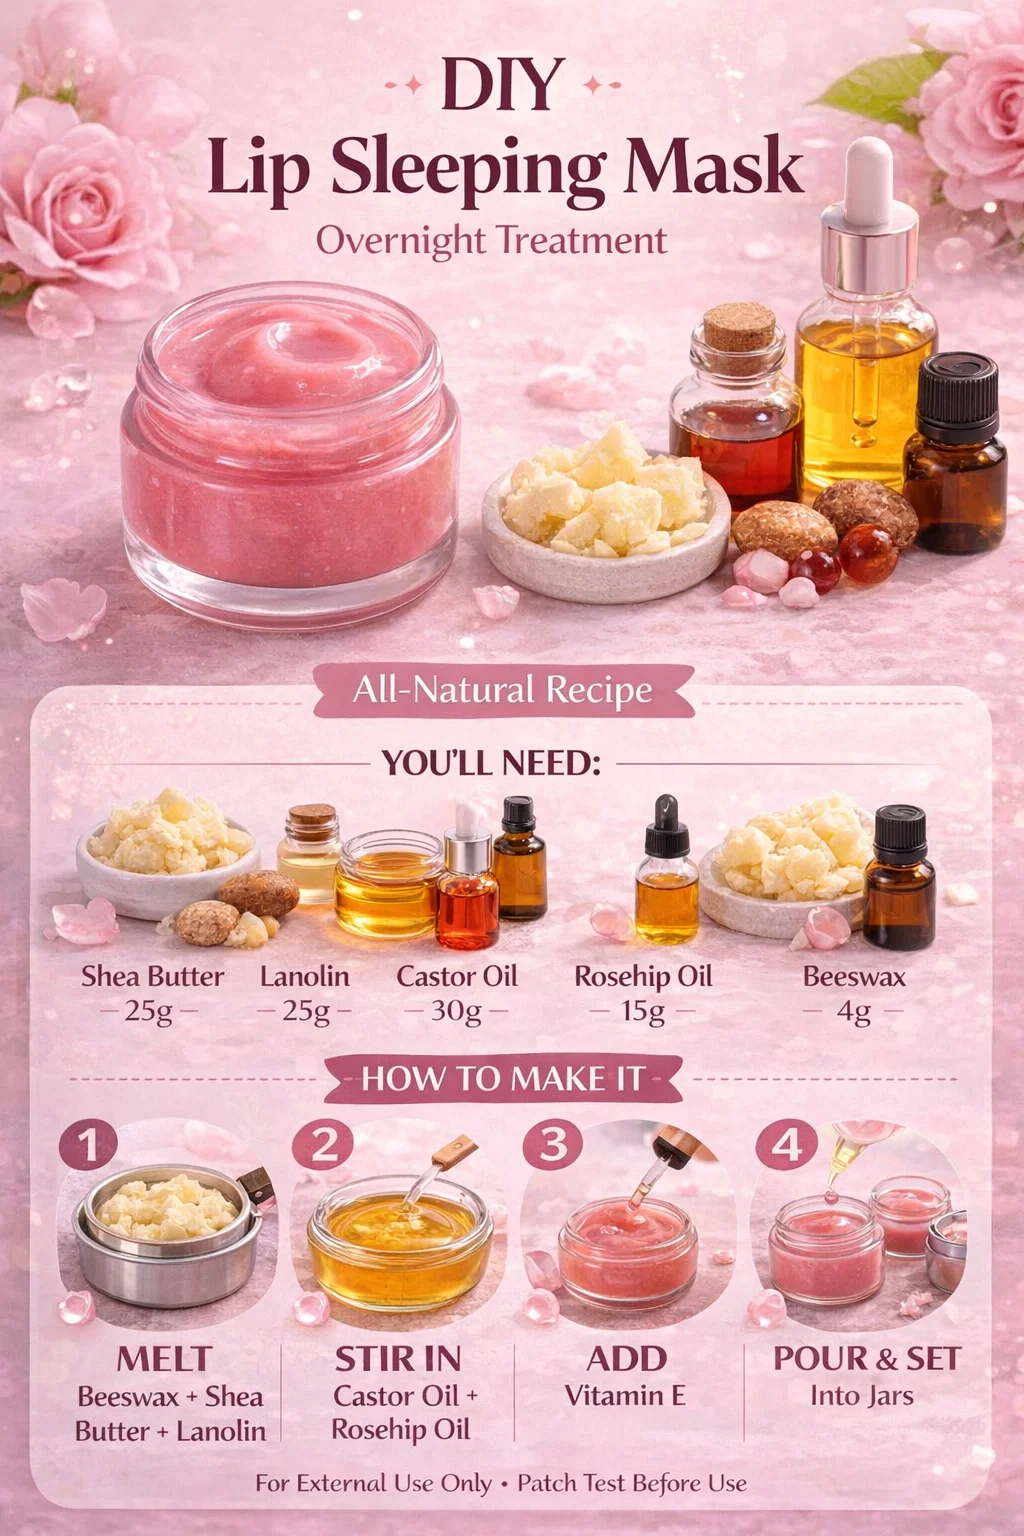
The secret to a successful DIY beauty product lies in the synergy of its ingredients. This particular recipe focuses on a 100g batch, which is perfect for filling several small jars to keep for yourself or share with friends. Let’s take a closer look at what makes these components so effective.
Shea Butter: The Ultimate Emollient
Shea butter is the heart of this recipe. Extracted from the nuts of the shea tree, it is naturally rich in vitamins A, E, and F. It provides a creamy consistency that melts upon contact with the skin. Beyond just moisturizing, shea butter offers fatty acids that help support the skin’s natural barrier, making it an essential base for any intensive lip treatment.
Lanolin: The Secret to Long Lasting Moisture
If you have ever wondered how professional lip masks get that slightly tacky, ultra staying power, the answer is usually lanolin. Lanolin is a natural wax produced by sheep to protect their wool. It is unique because it can hold up to 400 times its weight in water, acting as both a humectant and an occlusive. It mimics the lipids in human skin, making it incredibly effective at repairing severely chapped or cracked lips.
Castor Oil and Rosehip Oil: The Powerhouse Liquids
Castor oil is a staple in the world of lip care because of its high ricinoleic acid content and its natural gloss. it provides a thick, protective layer that stays put. Rosehip oil, on the other hand, is the luxury addition to this formula. Often called a dry oil, it is packed with antioxidants and essential fatty acids that help brighten and rejuvenate the skin. It adds a touch of anti aging benefits to your lip routine, helping to smooth out fine lines around the lip perimeter.
Beeswax and Vitamin E: Structure and Preservation
Beeswax provides the necessary firmness to the mask, ensuring it does not turn into a liquid in warmer temperatures. It also forms a breathable protective layer on the lips. Vitamin E acts as a double threat: it is a fantastic antioxidant for your skin and helps extend the shelf life of your oils by preventing them from going rancid too quickly.
Step by Step Guide: How to Make Your Lip Mask
Creating this mask is a simple and therapeutic process. You do not need a laboratory to get professional results; just a few basic kitchen tools and a bit of patience. Here is how you bring the BamGlam Spa experience into your own home.
Step 1: The Gentle Melting Process
Start by combining your 4g of beeswax, 25g of shea butter, and 25g of lanolin in a heat safe glass bowl. The best way to melt these is using a double boiler method. Place the bowl over a pot of simmering water, ensuring the bottom of the bowl does not touch the water directly. Stir gently until the mixture is completely clear and liquid. Avoid high heat, as overheating can degrade the beneficial properties of the shea butter.
Step 2: Incorporating the Liquid Gold
Once your solids have melted, remove the bowl from the heat. Slowly stir in 30g of castor oil and 15g of rosehip oil. You will notice the mixture begin to cool slightly, but it should remain liquid. Consistent stirring at this stage ensures that the heavier oils are perfectly distributed throughout the wax and butter base.
Step 3: The Finishing Touches
Wait a minute or two for the mixture to cool just a bit more, then add your 1g of Vitamin E. Adding Vitamin E while the mixture is too hot can reduce its effectiveness. This is also the stage where you could add a tiny drop of food grade essential oil, like vanilla or peppermint, if you prefer a scented mask, though the natural scent of rosehip and shea is lovely on its own.
Step 4: Pouring and Setting
Carefully pour the liquid into clean, sterilized 15ml or 30ml jars. Work quickly but steadily to avoid spills. Let the jars sit undisturbed at room temperature for at least two hours. You will see the mask transform from a golden liquid into a beautiful, opaque, creamy pink or tan balm. Once fully set, cap them tightly and they are ready for use.
Customizing Your Recipe for Different Needs
One of the best parts of DIY is the ability to tweak the formula. If you prefer a vegan version, you can swap the beeswax for candelilla wax, though you may need to use slightly less as candelilla is harder than beeswax. For those who find lanolin too heavy, you can substitute it with more shea butter or even a thick mango butter for a different texture. If you want a bit of color, a tiny pinch of mica powder or a sliver of a natural lipstick can give your mask a beautiful tint that looks gorgeous in the jar and on the lips.
Tips for the Best Results
To get the most out of your new DIY Lip Sleeping Mask, consistency is key. Here are a few professional tips to elevate your lip care game:
- Exfoliate First: Once or twice a week, use a simple sugar scrub before applying your mask. This removes dead skin cells and allows the oils to penetrate much deeper.
- Apply on Damp Lips: For extra hydration, splash your face with water and leave your lips slightly damp before applying the mask. The occlusive ingredients will trap that water against your skin.
- A Little Goes a Long Way: You do not need a thick glob. A pea sized amount spread evenly over the lips and slightly past the lip line is perfect for overnight repair.
- Store Correctly: Keep your jars in a cool, dry place. Since this recipe does not contain water, it has a naturally long shelf life, but keeping it out of direct sunlight will keep the oils fresh.
The Economics of DIY Beauty
When you look at the price per ounce of high end lip masks, it can be staggering. By purchasing these raw ingredients in bulk, you are not only ensuring that you know exactly what is going into your products, but you are also saving a significant amount of money in the long run. A 100g batch can easily fill six to seven standard lip balm jars. These make incredible, thoughtful gifts for birthdays, bridal showers, or holiday stocking stuffers. People always appreciate a handmade gift that actually works!
Safety and Patch Testing
Even though these ingredients are natural, it is always a good idea to perform a patch test. Apply a small amount of the finished product to the inside of your wrist and wait 24 hours to ensure you do not have any sensitivities to the lanolin or specific oils. This is especially important if you are giving these away as gifts. Always ensure your workspace and containers are thoroughly cleaned and sanitized before you begin the crafting process to prevent any bacterial growth.
Conclusion: Your Path to a Perfect Smile
Taking control of your skincare routine through DIY projects like this lip sleeping mask is both empowering and effective. You have moved away from mystery ingredients and fillers, opting instead for a concentrated blend of nature’s best healers. After just one night of using this creamy, nutrient rich treatment, you will likely notice a significant difference in how your lips feel. They will be more resilient, smoother, and better prepared for whatever lipstick or gloss you choose to wear the next day. So, gather your ingredients, clear off a spot on your kitchen counter, and treat yourself to a little bit of homemade luxury. Your lips will certainly thank you for it!