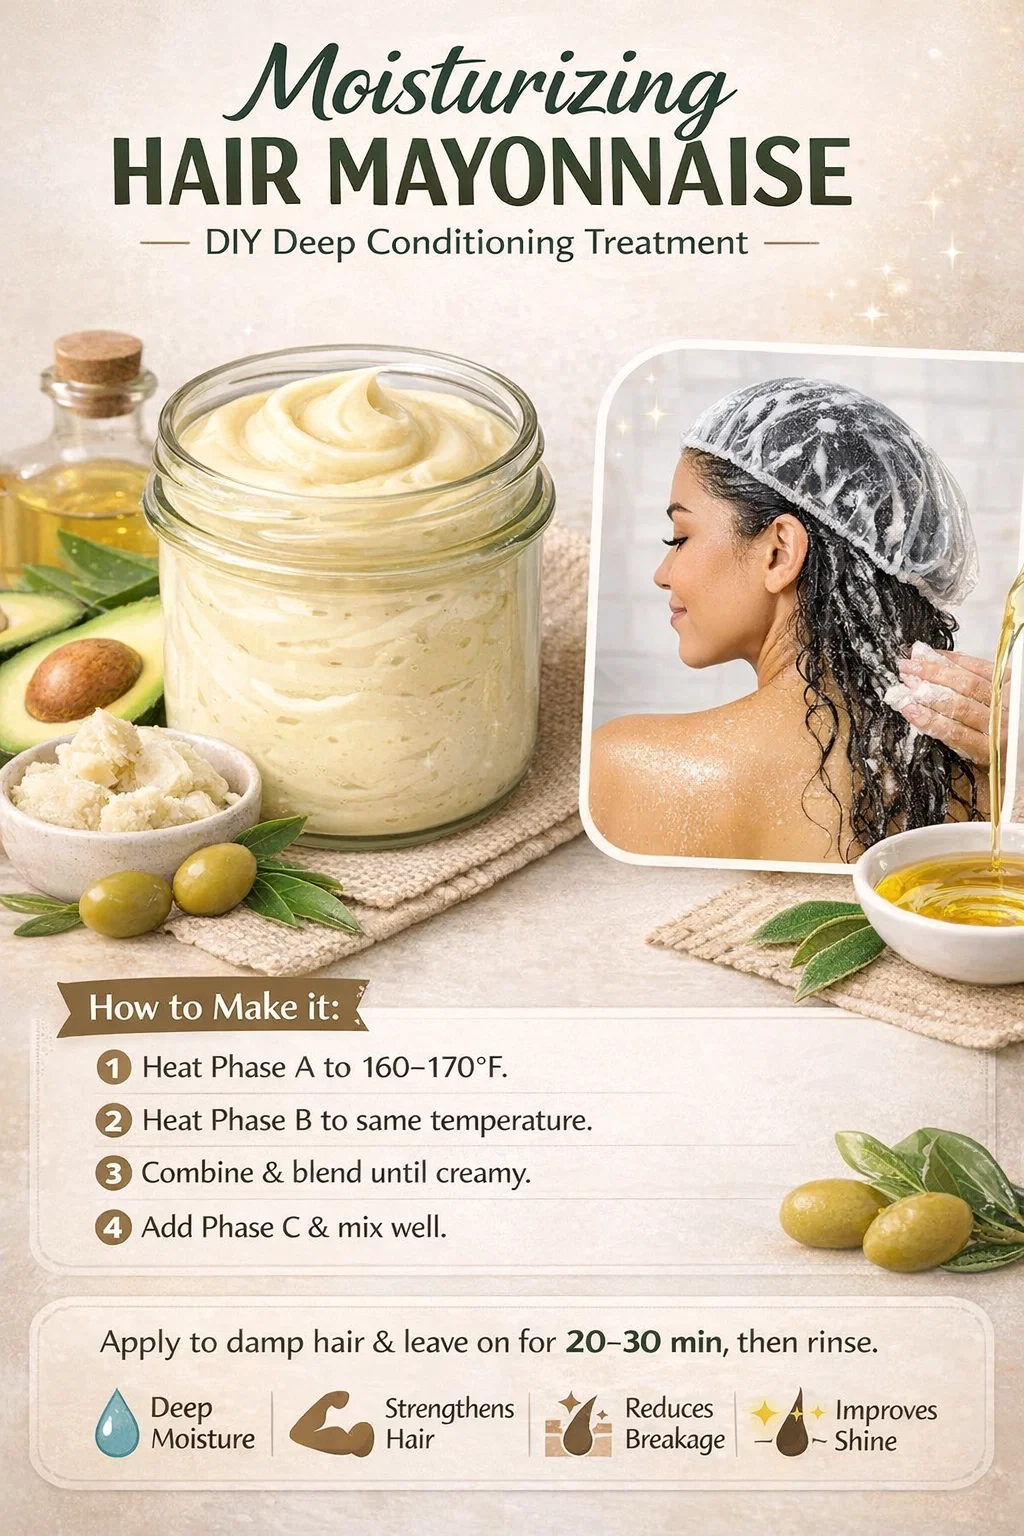
DIY Moisturizing Hair Mayonnaise Recipe Deep Conditioning Treatment for Strong Shiny Hair
If you have been searching for the holy grail of hair care, you might have noticed that the most effective solutions are often found in nature rather than in a laboratory. One of the most legendary treatments in the world of natural hair care is hair mayonnaise. While the name might remind you of a kitchen condiment, this specific DIY moisturizing hair mayonnaise is a sophisticated, nutrient-dense formula designed to penetrate the hair shaft and restore life to even the most parched strands. In this guide, we are going to break down why this specific recipe is a game changer for your beauty routine and how you can master the art of the at-home deep conditioning treatment.
The Science of Hair Mayonnaise
To understand why this recipe works so well, we have to look at the needs of the hair fiber. Our hair is primarily made of a protein called keratin. Over time, exposure to heat, environmental pollutants, and chemical treatments can strip away the natural lipids and weaken the protein structure. This leads to what we commonly recognize as frizz, breakage, and a dull appearance.
The DIY moisturizing hair mayonnaise featured in the recipe is specifically designed to address these issues through a three-phase approach. By separating the ingredients into a water phase, an oil phase, and a cool down phase, you ensure that the final product is a stable emulsion that delivers both hydration and nourishment. Unlike store-bought masks that often contain heavy silicones to create a temporary illusion of shine, this homemade version uses raw ingredients like avocado oil and shea butter to provide actual health benefits to the hair cortex.
Breaking Down the Ingredients
Phase A: The Hydration Foundation
The water phase is the heart of the moisturizing process. While many people think oil is the most important part of hair care, the reality is that hair needs water to stay elastic. Distilled water serves as the base, ensuring that no minerals or impurities interfere with the formula. The addition of aloe vera juice provides a soothing effect on the scalp and helps to smooth the hair cuticle. Vegetable glycerin acts as a humectant, which means it pulls moisture from the air into your hair, keeping it hydrated for days after the treatment.
Phase B: The Nourishing Oil Phase
This is where the magic happens for those struggling with dryness. The oil phase contains emulsifying wax, which is the bridge that allows the water and oils to mix into a creamy, mayonnaise-like consistency. Avocado oil is one of the few oils that can actually penetrate the hair shaft rather than just sitting on top. Shea butter provides a thick, protective barrier that seals in the moisture from Phase A, while olive oil adds that classic weight and shine that hair mayonnaise is famous for.
Phase C: The Power of the Cool Down Phase
The cool down phase is where we add the high-performance actives. Hydrolyzed protein is the star here. Because the protein is hydrolyzed, the molecules are small enough to fill in the gaps in damaged hair cuticles, effectively strengthening the hair and reducing breakage. Vitamin E acts as a powerful antioxidant to protect the hair from oxidative stress, and the preservative ensures that your DIY creation stays fresh and safe to use for multiple sessions.
Step by Step Guide to Crafting Your Treatment
Making your own professional-grade hair mask at home requires a bit of precision, but the results are well worth the effort. Follow these steps to ensure your hair mayonnaise comes out perfectly every time.
First, you need to prepare your workspace and ensure all your tools are clean. Heating the water phase and the oil phase separately to about 70 to 75 degrees Celsius is crucial. This temperature ensures that the emulsifying wax and shea butter are completely melted and ready to bond with the water. Using a digital thermometer can help you hit that sweet spot without overheating the ingredients.
Once both phases have reached the correct temperature, it is time for the emulsion. Slowly pour the oil phase into the water phase while blending. A stick blender is the best tool for this job as it creates the high shear necessary to turn the liquids into a thick, luxurious cream. You will see the mixture transform before your eyes into a pale, rich consistency that looks exactly like traditional mayonnaise.
Patience is key during the cooling process. You must wait until the mixture drops below 40 degrees Celsius before adding Phase C. Many of the active ingredients, especially the protein and vitamin E, are heat-sensitive. Adding them too early could diminish their effectiveness. Once cooled, stir in your fragrance or essential oils and the preservative, then transfer the mixture to a clean glass jar.
The Benefits of Regular Deep Conditioning
Incorporating this moisturizing hair mayonnaise into your weekly routine can lead to a total transformation of your hair texture. One of the primary benefits is deep moisture. Because this recipe contains both humectants and emollients, it addresses dryness from multiple angles. You will notice that your hair feels softer to the touch and is much easier to detangle after a wash.
Strengthening the hair is another major advantage. The inclusion of hydrolyzed protein helps to reinforce the hair structure. If you have high porosity hair or hair that has been color-treated, this protein boost is essential for preventing the “mushy” feeling that often comes with over-moisturized hair. It provides the necessary structure to keep your curls or waves bouncy and defined.
Finally, the shine and breakage reduction cannot be overlooked. By sealing the cuticle with shea butter and olive oil, light reflects more easily off the hair surface, giving you a healthy glow. Furthermore, when hair is properly moisturized and strengthened, it is far less likely to snap during brushing or styling. This means you will see less shedding and more length retention over time.
How to Use Hair Mayonnaise for Best Results
To get the most out of your DIY mask, application technique is just as important as the recipe itself. Start with damp, freshly washed hair. This allows the hair cuticle to be slightly open, making it easier for the treatment to penetrate. Section your hair into four or more parts to ensure that every single strand is coated from root to tip.
Once applied, covering your hair with a plastic shower cap is a vital step. The cap traps the natural heat from your scalp, which further opens the cuticle and helps the oils and proteins sink in deeply. For an extra boost, you can wrap a warm towel around the shower cap or use a hooded dryer on a low setting. Leave the treatment on for at least 20 to 30 minutes. This gives the ingredients enough time to work their magic.
When it is time to rinse, use lukewarm water. You want to ensure that all the excess product is removed so your hair doesn’t feel weighed down, but avoid hot water as it can strip away the moisture you just put in. Most people find that they do not need to follow up with a standard conditioner after using this mask because it is so incredibly nourishing on its own.
Customizing Your Recipe
One of the best things about making your own hair care products is the ability to customize. If your hair is particularly fine, you might choose to swap the olive oil for a lighter oil like jojoba or grapeseed oil. If you are struggling with a dry or itchy scalp, adding a few drops of peppermint or tea tree essential oil to Phase C can provide a cooling, antimicrobial effect.
For those with extremely damaged hair, you can slightly increase the percentage of hydrolyzed protein. However, be careful not to overdo it, as too much protein can make hair feel stiff. The beauty of this specific 250 gram recipe is that it is perfectly balanced for the average user, providing a harmonious blend of strength and softness.
Conclusion: Embrace the DIY Beauty Movement
Taking control of your hair care routine by making your own moisturizing hair mayonnaise is an empowering step toward healthier hair. By using high quality ingredients like aloe vera, avocado oil, and shea butter, you are giving your strands the premium treatment they deserve without the premium price tag of luxury salon brands. This DIY project is not just about saving money; it is about knowing exactly what goes onto your body and tailoring your beauty regimen to your unique needs.
Consistent use of this deep conditioning treatment will help you achieve the moisture, strength, and shine you have always wanted. So, gather your ingredients, set aside some time for self-care, and get ready to fall in love with your hair all over again. Your journey to vibrant, resilient hair starts with this simple, creamy, and effective jar of hair mayonnaise. Save this recipe and try it out this weekend for a salon-quality experience in the comfort of your own home!