DIY Natural Mascara Recipe 3-Step Homemade Non-Toxic Eye Makeup Tutorial
Embracing a clean beauty routine does not have to be expensive or complicated. In fact, some of the most effective beauty secrets are hiding right in your kitchen pantry. If you have ever looked at the back of a standard mascara tube and felt overwhelmed by the long list of synthetic dyes, preservatives, and mysterious chemicals, you are not alone. The delicate area around our eyes is incredibly absorbent, making it the perfect place to start your journey toward non-toxic living. Today, we are diving deep into a simple, three-ingredient DIY natural mascara that provides a beautiful black tint without the irritation of store-bought alternatives.
The Shift Toward Clean Beauty and DIY Cosmetics
The beauty industry is currently undergoing a massive transformation. Consumers are becoming more conscious of what they put on their skin, leading to a surge in demand for organic and mineral-based products. However, even some labeled natural brands can be pricey or contain hidden fillers. Making your own cosmetics at home gives you total control over every single drop of product. You know exactly what is inside, how fresh it is, and you can customize the formula to suit your specific needs.
Mascara is often the most used item in a makeup bag, but it is also one of the most frequently replaced products due to its short shelf life. By learning how to whip up a small batch of homemade mascara, you reduce plastic waste from discarded tubes and ensure that you are always using a fresh, bacteria-free formula on your lashes. It is a win for your health, your wallet, and the planet.
Breaking Down the Ingredients: Why This Formula Works
The beauty of this specific recipe lies in its simplicity. You do not need a laboratory or a degree in chemistry to create a high-quality lash tint. Each ingredient in this DIY natural mascara serves a specific purpose to nourish your lashes while providing that sought-after definition.
Coconut Oil: The Nourishing Base
Coconut oil is a staple in the DIY beauty world for a good reason. It is rich in fatty acids that help to moisturize and strengthen hair follicles. When used in mascara, it acts as a smooth carrier for the pigment, allowing the wand to glide through your lashes without clumping. Beyond the aesthetic benefits, the lauric acid in coconut oil provides mild antimicrobial properties, which is essential for any product used near the eyes.
Aloe Vera Gel: The Ultimate Binder
To give the mascara a gel-like consistency that stays put, we use aloe vera. Aloe vera gel is famous for its soothing properties, making it ideal for those with sensitive eyes who find traditional mascaras itchy or irritating. In this recipe, the aloe acts as a natural primer and sealer. It helps the pigment stick to the lashes and provides a slight hold, similar to a clear brow gel, ensuring your lashes stay lifted throughout the day.
Activated Charcoal: The Secret to Intense Black Pigment
If you want that classic, bold black look, activated charcoal is your best friend. This fine black powder is incredibly potent and provides a deep, matte finish that rivals any professional brand. Activated charcoal is also known for its ability to draw out impurities, though in this context, its primary job is to provide rich, consistent color. For those who prefer a softer brown look, you can easily swap the charcoal for organic cocoa powder.
Step-by-Step Guide to Crafting Your Mascara
Ready to get started? Follow these three easy steps to create your own signature lash formula. Make sure your workspace is clean and you have a small, airtight container or an empty, sterilized mascara tube ready for storage.
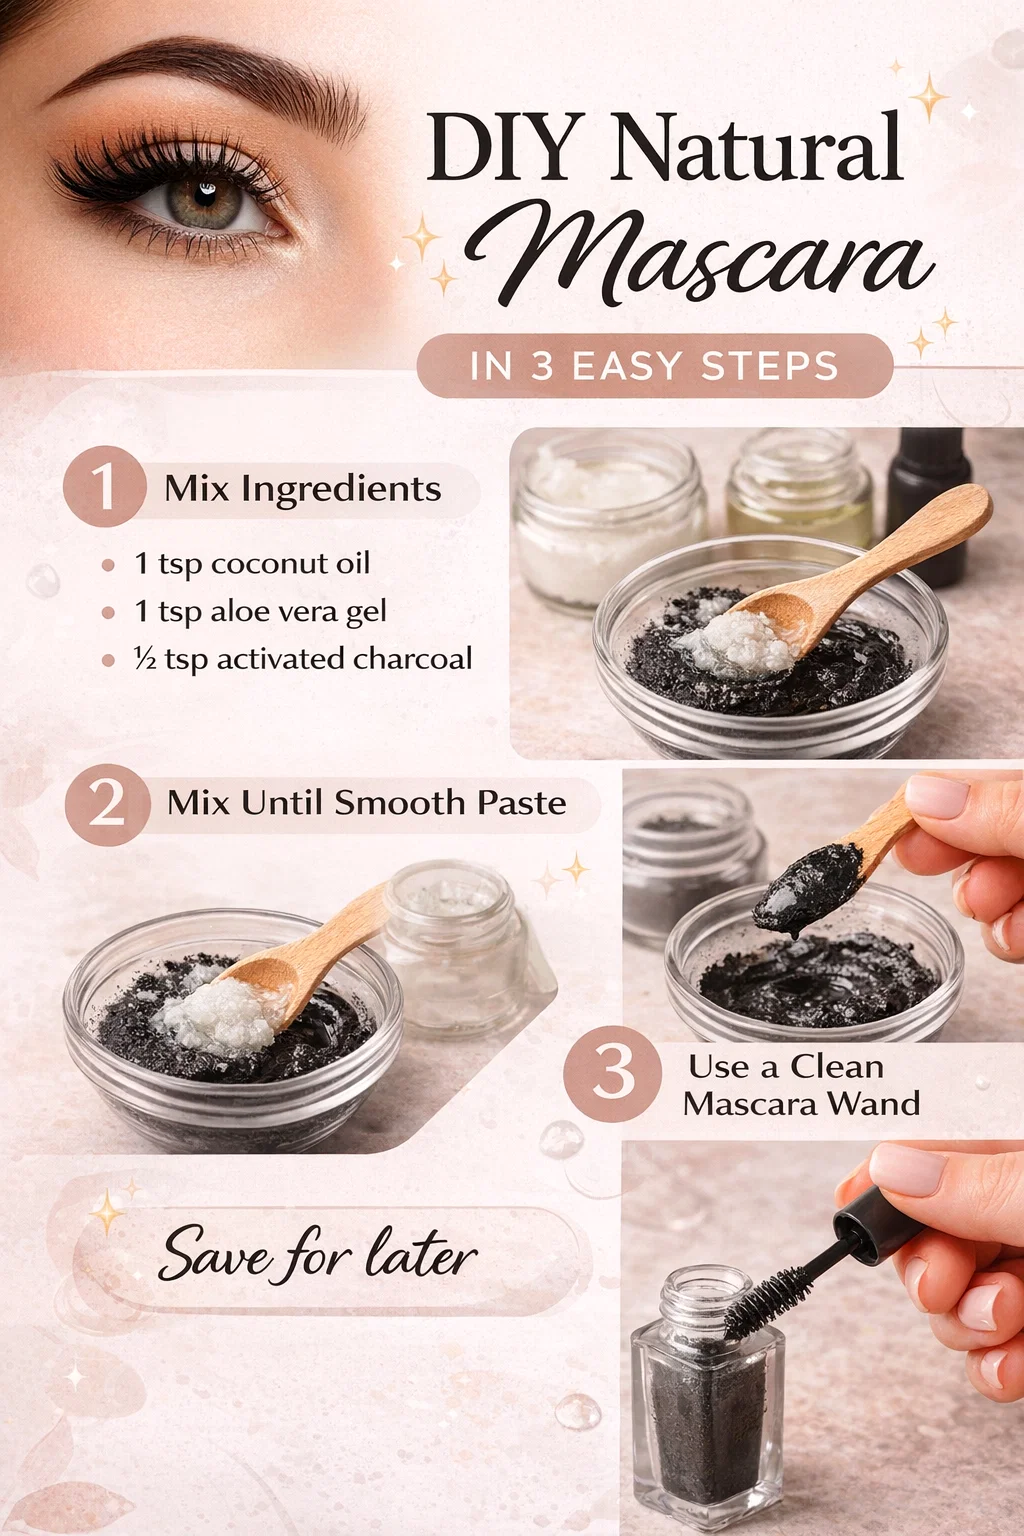
Step 1: Measuring and Mixing
Start by gathering your supplies. You will need one teaspoon of coconut oil, one teaspoon of aloe vera gel, and approximately half a teaspoon of activated charcoal powder. If your coconut oil is solid, you may want to slightly soften it in a warm room so it blends easily, but do not melt it into a hot liquid. Combine these three ingredients in a small glass bowl. Using a small wooden spoon or a spatula, begin to fold the charcoal into the oils and gel. Be careful during this step, as charcoal powder is very light and can fly away easily, staining surfaces.
Step 2: Achieving the Perfect Consistency
This is the most important part of the process. You want to stir the mixture vigorously until it forms a completely smooth, uniform paste. There should be no visible clumps of charcoal or streaks of white coconut oil. The goal is a glossy, jet-black cream. If you find the mixture is too thick, you can add a tiny drop more of aloe vera gel. If it feels too runny, a pinch more charcoal will help thicken the base. The consistency should be thick enough to coat a brush but thin enough to spread evenly.
Step 3: Transfer and Application
Once your paste is smooth, it is time to transfer it to your container. If you are using a traditional mascara tube, you can use a small plastic syringe or a tiny funnel to move the product without making a mess. Alternatively, a small glass pot works perfectly fine if you plan to dip a clean wand directly into it. Always ensure your mascara wand is clean before every use to prevent the introduction of bacteria into your natural formula.
Tips for Application and Longevity
Since this mascara does not contain the synthetic waxes and fibers found in commercial waterproof formulas, the application technique is slightly different. To get the best results, start at the base of your lashes and wiggle the wand upward toward the tips. This helps the coconut oil and aloe vera coat each individual hair for maximum definition.
- Layering: If you want a more dramatic look, allow the first coat to dry for about thirty seconds before applying a second layer. This prevents the weight of the wet product from drooping your lashes.
- Set with Powder: If you have oily eyelids, you might notice some slight smudging under the eyes by midday. A quick fix is to lightly dust a translucent setting powder under your lower lashes to create a barrier.
- Removal: One of the best perks of this DIY mascara is how easily it comes off. You do not need harsh makeup removers. A simple splash of warm water or a cotton pad with a bit of plain coconut oil will take it right off, leaving your lashes conditioned rather than stripped.
Safety and Storage for Natural Cosmetics
Because this recipe is 100 percent natural and contains no chemical preservatives, it requires a little more care than a store-bought tube. Water-based ingredients like aloe vera can eventually grow bacteria if left too long. It is recommended to make small batches that last about three to four weeks. If you notice any change in the smell or texture of your mascara, discard it and whip up a fresh batch.
Always store your DIY beauty products in a cool, dry place away from direct sunlight. If you live in a very hot climate, you might find the coconut oil softens too much, making the mascara runny. In this case, storing it in the refrigerator can keep it at a perfect, creamy consistency while also providing a cooling sensation when applied in the morning.
Customizing Your Recipe
Once you have mastered the basic formula, do not be afraid to experiment. The world of DIY beauty is all about finding what works for your unique features. Here are a few ways you can level up your homemade mascara:
- For Growth: Add a single drop of castor oil to the mix. Castor oil is legendary for promoting hair growth and can help you achieve longer, thicker lashes naturally over time.
- For Vitamin Boost: Prick a Vitamin E capsule and squeeze a drop into your mixture. Vitamin E acts as a very mild natural preservative and provides extra antioxidants for your lash health.
- For Color Variations: As mentioned before, cocoa powder creates a beautiful dark brown. If you are feeling adventurous, you can even use mica powders to create deep blues or purples for a fun, creative look.
The Environmental Impact of Your Beauty Routine
Every year, millions of plastic mascara tubes end up in landfills. Most of these components are not recyclable because of their size and the residual product left inside. By switching to a DIY method, you can reuse the same glass jar or a high-quality metal mascara wand indefinitely. This small change in your morning routine contributes to a much larger movement toward zero-waste living. When you choose to make your own products, you are voting with your lifestyle for a cleaner, more sustainable future.
Final Thoughts on Natural Lash Care
Transitioning to a DIY natural mascara is more than just a beauty hack; it is an act of self-care. It encourages us to slow down, understand the ingredients we use, and appreciate the simplicity of nature. While it may take a few applications to get used to the feel of a natural formula compared to a heavy chemical one, your eyes and lashes will thank you in the long run. No more redness, no more stinging, and no more brittle lashes at the end of the day.
Give this three-step recipe a try this weekend. It is a fun, rewarding project that yields professional-looking results with minimal effort. Whether you are a seasoned DIY enthusiast or a total beginner, this mascara is the perfect entry point into the world of homemade cosmetics. Once you see how easy it is to achieve beautiful, dark lashes using only earth-grown ingredients, you might never go back to the drugstore aisle again.