DIY Rose Oatmeal Soap Recipe Easy Melt and Pour for Dry Winter Skin Repair
Winter brings a certain magic with its frosted windows and cozy sweaters, but for our skin, it often marks the beginning of a seasonal battle. As the temperature drops and humidity levels plummet, the moisture in our skin evaporates faster than we can replenish it. The result is often a tight, itchy, and flaky texture that feels anything but festive. If you have been searching for a natural way to reclaim your glow without relying on store-bought bars filled with synthetic fragrances, you have come to the right place. Creating your own skincare at home is not just a hobby; it is a way to take control of exactly what touches your body.
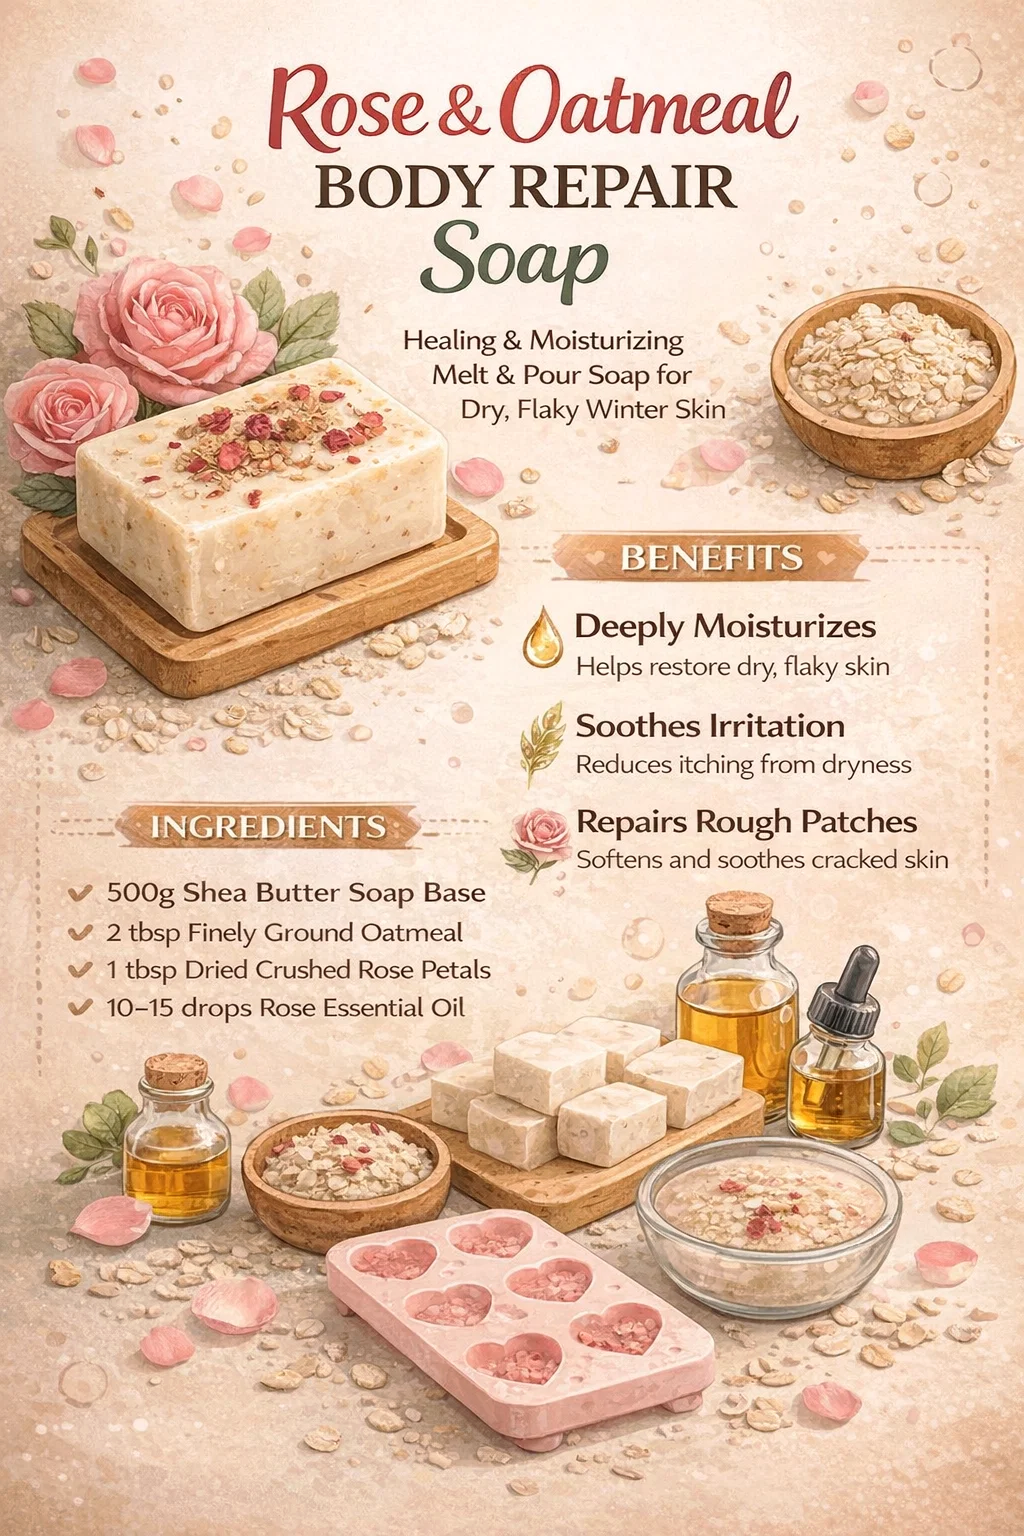
The Rose and Oatmeal Body Repair Winter Soap is specifically formulated to address the unique challenges of cold weather. By combining the legendary soothing properties of colloidal oatmeal with the luxurious, restorative essence of rose, this soap acts as both a cleanser and a treatment. In this guide, we will dive deep into why these ingredients work so well together and how you can master the melt and pour method to create a professional-grade bar of soap in your own kitchen.
The Science of Winter Skin Repair
Before we jump into the crafting process, it is important to understand why our skin suffers so much during the colder months. When the air is cold and dry, it pulls moisture from the epidermis through a process called transepidermal water loss. Without a strong lipid barrier, your skin becomes vulnerable to micro-cracks, which lead to that familiar stinging sensation and redness. This is where a targeted “Body Repair” soap becomes essential.
The Power of Colloidal Oatmeal
Oatmeal is not just for breakfast. In the world of dermatology, colloidal oatmeal is a celebrated ingredient for its ability to form a protective film on the skin. It contains fats, proteins, vitamins, and minerals that help retain water. When you use finely ground oats in a soap bar, you are providing a gentle physical exfoliant that sloughs away dead skin cells while simultaneously depositing a soothing layer that calms inflammation. It is particularly effective for those dealing with eczema or winter-induced dermatitis.
The Elegance of Rose Essential Oil
Rose is often associated with luxury and romance, but its benefits for the skin are deeply practical. Rose essential oil is known for its emollient properties, meaning it excels at softening and hydrating the skin. It also contains antiseptic and anti-inflammatory compounds that help heal the small cracks caused by dryness. Beyond the physical, the scent of rose provides a therapeutic aromatherapy experience, helping to lift the spirits during the “winter blues.”
Gathering Your Ingredients and Tools
One of the best things about the Rose and Oatmeal recipe is its accessibility. You do not need a chemistry degree or expensive laboratory equipment to get started. Here is a breakdown of what you will need to create this moisture-rich masterpiece.
The Soap Base
For this recipe, we recommend using a 500g Glycerin or Shea Butter Soap Base. Glycerin is a humectant, which means it attracts moisture from the air into your skin. Shea butter bases are even creamier, providing an extra dose of fatty acids that are perfect for extremely dry patches. Both options are easy to melt and provide a stable canvas for your additives.
Key Additives for Texture and Scent
- 2 tbsp Finely Ground Oatmeal: Use a blender or food processor to get these as fine as possible so they stay suspended in the soap.
- 1 tbsp Dried Crushed Rose Petals: These add a beautiful visual appeal and a very light natural exfoliation.
- 10 to 15 drops Rose Essential Oil: This provides the signature scent and healing properties.
Optional Boosters for Extra Repair
If your skin is feeling particularly damaged, you can customize your bars with these “boosters”:
- Shea Butter: Add one tablespoon for deep, buttery nourishment.
- Honey: A teaspoon of honey adds natural antibacterial properties and acts as an additional humectant.
- Vitamin E: Prick a Vitamin E capsule and squeeze it in to help with skin regeneration and to act as a natural preservative for the oils.
Step-by-Step: The Melt and Pour Method
The melt and pour method is the safest and most efficient way for beginners to make soap. Unlike “cold process” soap, you do not have to handle lye, and the soap is ready to use as soon as it hardens. Follow these steps for the best results.
Step 1: Preparation and Cutting
Start by cutting your soap base into small, uniform cubes, roughly one inch in size. This ensures that the base melts evenly without overheating. If you leave the base in one large block, the outside will burn before the inside turns to liquid, which can ruin the texture of your finished soap.
Step 2: The Melting Process
You have two main options here: a double boiler or a microwave. If using a microwave, place the cubes in a heat-safe glass bowl and heat in 30-second intervals. Stir between each interval to break up clumps. If you prefer the double boiler method, place the bowl over a pot of simmering water. This method provides more control and prevents the base from boiling, which can cause unwanted bubbles in your bars.
Step 3: Incorporating the Botanicals
Once the base is completely liquid and smooth, remove it from the heat. Now is the time to stir in your finely ground oatmeal and crushed rose petals. Stir slowly to prevent air bubbles from forming. As the soap begins to cool slightly, add your rose essential oil. Adding the oil while the base is boiling hot can cause the scent to evaporate, so timing is key here.
Step 4: Adding the Repair Boosters
If you chose to use shea butter, honey, or almond oil, mix them in now. Ensure everything is thoroughly combined so that every bar has an equal distribution of the “good stuff.” If the oatmeal starts to settle at the bottom, wait a minute for the soap to thicken slightly before giving it one last stir and pouring it into the mold.
Curing and Storage Tips
After pouring the mixture into your silicone molds, let them sit undisturbed at room temperature. Depending on the humidity in your home, this can take anywhere from two to four hours. Resist the urge to put them in the freezer to speed things up, as this can cause the soap to become brittle or “sweat” once it is taken out.
Once the bars are completely firm, pop them out of the molds. Because these soaps are high in glycerin, they can attract moisture from the air (a phenomenon called soap sweating). To prevent this, wrap your bars in plastic wrap or store them in an airtight container until you are ready to use them. This keeps the scent fresh and the texture smooth.
Customizing Your Soap for Different Skin Types
While the Rose and Oatmeal recipe is a fantastic all-rounder, you can easily tweak it to fit your specific needs. Skincare is personal, and your DIY projects should be too.
For Sensitive Skin
If your skin reacts easily to scents, you can reduce the essential oil to 5 drops or even leave it out entirely. The dried rose petals will still provide a very faint, natural aroma without being overwhelming. You might also want to increase the oatmeal content to 3 tablespoons for extra calming power.
For Very Oily but Dehydrated Skin
It is a myth that oily skin does not need moisture in winter. If you struggle with breakouts but still feel “tight,” use a clear glycerin base and swap the shea butter for a lighter oil like jojoba oil. Jojoba mimics the skin’s natural sebum and will not clog pores while still providing the protection you need.
Creating a Spa Experience at Home
Using your handmade Rose and Oatmeal soap is about more than just getting clean; it is about creating a ritual. To get the most out of your repair soap, try using it in a warm (not hot!) bath or shower. Hot water can actually strip more moisture from your skin, so keeping the temperature moderate is essential for winter health.
Gently massage the bar over your skin, allowing the ground oats to exfoliate those rough patches on your elbows and knees. Take a moment to breathe in the floral scent of the rose. After rinsing, pat your skin dry with a soft towel rather than rubbing it. While your skin is still slightly damp, apply a thick moisturizer or body oil to “lock in” the benefits of the soap.
Conclusion: A Winter Essential You Can Trust
In a world of mass-produced beauty products, there is something deeply satisfying about crafting something with your own hands that genuinely improves your well-being. The Rose and Oatmeal Body Repair Winter Soap is more than just a cleaning agent; it is a shield against the elements and a treat for your senses. By choosing high-quality ingredients like shea butter and colloidal oatmeal, you are giving your skin the tools it needs to stay resilient, soft, and healthy throughout the coldest months of the year.
Whether you are making a batch for yourself or creating beautiful, hand-wrapped gifts for your loved ones, this recipe is a testament to the power of simple, natural ingredients. So, clear off your counter, put on your favorite playlist, and start crafting. Your skin will thank you with every wash. Happy soap making!