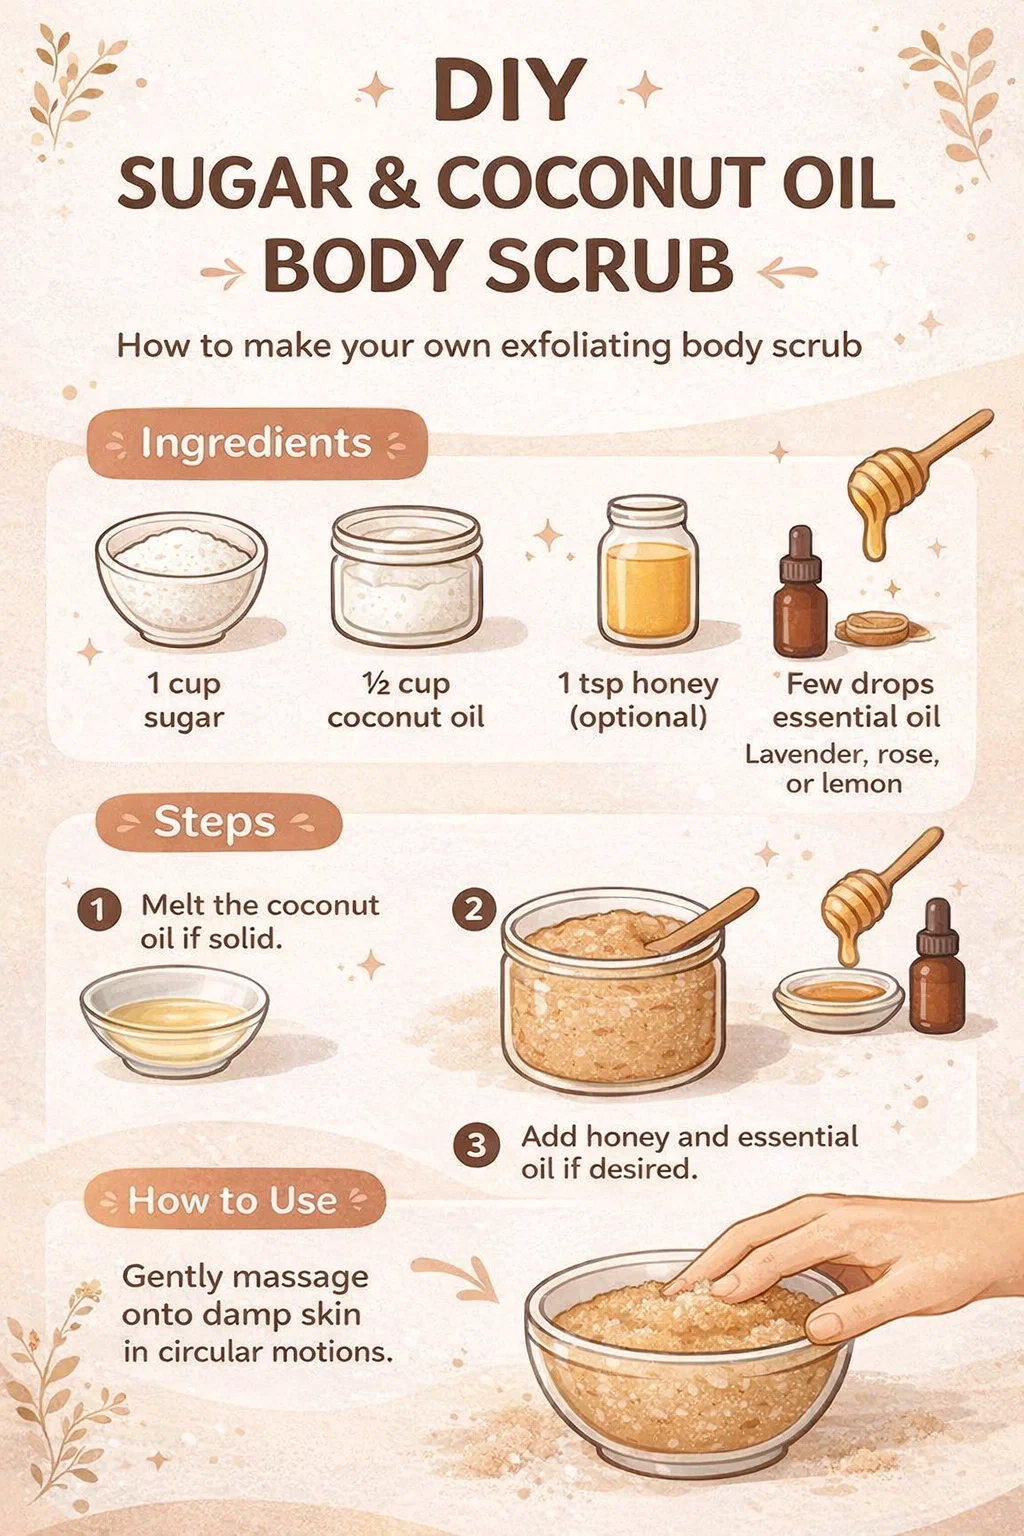
DIY Sugar Coconut Oil Body Scrub Recipe for Glowing Skin 3 Easy Steps
There is something incredibly satisfying about creating your own beauty products right in your own kitchen. Not only do you know exactly what ingredients are going into your skincare routine, but you also save a significant amount of money while achieving results that rival high end spa treatments. One of the most beloved and effective DIY projects is the classic sugar and coconut oil body scrub. This simple combination is a powerhouse for skin health, offering deep exfoliation and intense hydration with just a few natural staples.
If you have ever looked at the back of a store bought exfoliant, you might have been surprised by the long list of chemicals, synthetic fragrances, and preservatives. By making your own scrub, you eliminate those unnecessary additives. Instead, you focus on the raw power of nature. In this guide, we are going to break down why this specific recipe works so well, how to customize it to your personal needs, and the best practices for incorporating it into your weekly self care ritual.
The Science of Natural Exfoliation
Exfoliation is the process of removing dead skin cells from the surface of your body. Our skin naturally regenerates every thirty days or so, but sometimes those old cells do not shed completely. This can lead to clogged pores, flaky patches, and a dull complexion. By using a physical exfoliant like sugar, you are manually buffing away that buildup to reveal the fresh, glowing skin underneath.
Sugar is an ideal choice for a body scrub because it is a natural source of glycolic acid. This alpha hydroxy acid helps to break down the bonds between dead skin cells, making the mechanical scrubbing even more effective. Furthermore, sugar is a humectant, meaning it pulls moisture from the environment into your skin. While salt scrubs can sometimes be too abrasive or drying for sensitive areas, sugar granules are slightly smaller and dissolve more easily, making them perfect for all skin types.
Why Coconut Oil is the Perfect Partner
While the sugar does the heavy lifting of cleaning the skin, coconut oil acts as the ultimate soothing agent. Coconut oil is rich in fatty acids, particularly lauric acid, which has antimicrobial properties. This helps to keep your skin clean and protected against minor irritations. When you apply coconut oil to the skin, it sinks in deeply to provide lasting moisture rather than just sitting on the surface.
The beauty of using coconut oil in a scrub is that it provides an immediate protective barrier. As the sugar clears away the old skin, the oil is right there to nourish the new layer. This prevents the redness or dryness that sometimes occurs after exfoliation. Plus, the natural scent of coconut provides an instant tropical escape, turning your morning shower into a mini vacation.
Step by Step Guide to Crafting Your Scrub
The beauty of the recipe shown in the guide is its simplicity. You do not need any fancy equipment or a degree in chemistry to get this right. Follow these steps to ensure you get a consistent, high quality paste every single time.
Preparing Your Base
Start by measuring out your sugar and coconut oil. The standard ratio is two parts sugar to one part oil. This creates a thick, grainy paste that sticks to your skin rather than sliding off. If your coconut oil is in a solid state, which happens at room temperature in cooler climates, you will want to melt it slightly. You can do this by placing the jar in a bowl of warm water for a few minutes. Avoid using a microwave if possible, as high heat can degrade some of the beneficial nutrients in the oil.
Once the oil is liquid but not hot, pour it over your sugar in a glass mixing bowl. Use a wooden spoon or a spatula to stir them together. You are looking for a consistency that resembles wet sand. If it feels too oily, add a tablespoon more sugar. If it is too crumbly and falls apart, add a little more oil until it holds its shape.
Adding Beneficial Extras
While sugar and oil alone are fantastic, you can level up your scrub with a few optional ingredients. As mentioned in the infographic, honey is a wonderful addition. Honey is a natural antibacterial and antioxidant, which helps to soothe inflamed skin and promote healing. It also adds a lovely velvety texture to the scrub.
Essential oils are another way to customize the experience. If you are a fan of evening showers, a few drops of lavender essential oil can help calm your mind and prepare your body for sleep. If you prefer a morning boost, lemon or peppermint oils are incredibly refreshing and can help wake up your senses. Just remember that essential oils are potent, so three to five drops are usually more than enough for a single batch.
How to Use Your Body Scrub for Best Results
Knowing how to apply the scrub is just as important as knowing how to make it. To get the most out of your DIY creation, you should always start with damp skin. Taking a warm shower for five to ten minutes before exfoliating helps to soften the skin and open up the pores, making the scrub more effective.
Take a small amount of the mixture and apply it in circular motions. Start at your feet and work your way up toward your heart. This technique not only exfoliates but also helps to stimulate lymphatic drainage and improve circulation throughout your body. Pay extra attention to rough areas like your elbows, knees, and heels.
Be gentle. You do not need to press hard to get results. Let the granules do the work for you. Once you have covered your entire body, rinse off with warm water. You will notice that the water might bead on your skin; this is the coconut oil doing its job. Pat yourself dry with a soft towel rather than rubbing, as this allows some of the oil to remain on the skin and continue hydrating throughout the day.
Storage and Shelf Life
Because this scrub is made from natural food grade ingredients and does not contain preservatives, you need to be mindful of how you store it. A glass mason jar with a tight fitting lid is the best container. Keep it in a cool, dry place. While it might be tempting to keep it on a shelf in the shower, the constant humidity and heat can cause the ingredients to separate or spoil faster.
Always use a clean spoon or a dry hand to scoop the scrub out of the jar. Introducing water into the container can lead to mold growth over time. If kept dry and sealed, your DIY body scrub should stay fresh for about two to three weeks. Since it is so easy to make, it is often better to make small batches frequently rather than one giant jar that might go bad before you finish it.
The Benefits of Regular Body Scrubbing
Consistency is key when it comes to skincare. Incorporating this sugar scrub into your routine once or twice a week can lead to significant long term benefits. Beyond just softness, regular exfoliation can help prevent ingrown hairs, especially if you shave or wax regularly. By removing the dead skin that blocks the hair follicle, the hair can grow out straight and clean.
Furthermore, removing that top layer of dead cells allows your other skincare products, like body lotions or serums, to penetrate deeper and work more effectively. You will find that you actually need less moisturizer because your skin is more receptive to the products you apply. It is a simple habit that yields massive rewards for your skin’s health and appearance.
Sustainable and Budget Friendly Beauty
In a world where we are increasingly conscious of our environmental impact, DIY beauty is a great way to reduce waste. By reusing glass jars and buying ingredients like sugar and coconut oil in bulk, you significantly reduce the amount of plastic packaging entering your home. You are also avoiding microplastics, which are sometimes found in commercial exfoliants and can be harmful to aquatic life when they wash down the drain.
From a financial perspective, the cost per use of a homemade scrub is pennies compared to the twenty or thirty dollars you might spend on a luxury brand. This allows you to indulge in a high quality skincare routine without breaking the bank. It also makes for a wonderful, personalized gift for friends and family. Put the scrub in a pretty jar, tie a ribbon around it, and you have a thoughtful present that everyone can use.
Conclusion and Final Thoughts
Taking care of your skin does not have to be complicated or expensive. The DIY sugar and coconut oil body scrub is a testament to the fact that the best solutions are often the simplest ones. By spending just five minutes in your kitchen, you can create a product that leaves your skin glowing, hydrated, and smelling like a dream. It is an act of self care that nourishes both your body and your spirit.
Whether you choose to keep it simple with just two ingredients or experiment with honey and essential oils, the results will speak for themselves. Give this recipe a try during your next bath or shower and see how transformative natural ingredients can be. Your skin will thank you for the extra love and attention. Do not forget to save this recipe and share your favorite essential oil combinations with others who love natural beauty as much as you do.