DIY Vanilla Cinnamon Body Lotion Recipe Easy Homemade Skincare Guide
Welcome, fellow skincare enthusiast, to your new favorite crafting obsession. If you have ever flipped over a bottle of store-bought lotion and found yourself lost in a sea of long, unpronounceable chemical names, then you are in the right place. Have you ever wondered what it would be like to apply a cream that is so pure, you literally made it from scratch in your own kitchen? The good news is, creating your own luxurious, moisturizing products is not only possible but also extremely rewarding. Today, we are walking you through a magnificent, warm, and comforting recipe for Vanilla & Cinnamon DIY Body Lotion. This is not just any lotion; it is a rich, creamy blend that smells like a fresh-baked pastry, minus any of the complex scientific additives.
There is a unique type of satisfaction that comes from creating something useful and beautiful with your own two hands. DIY skincare is a movement that has been gaining immense momentum, and it is easy to see why. People are becoming increasingly conscious of what they are putting on their skin. Making your own products, like this vanilla and cinnamon lotion, gives you complete control over the entire list of ingredients. This means no hidden synthetic fragrances, no harsh parabens, and no phthalates. You can tailer it to your skin’s exact needs. If you are a beginner, it can feel a little intimidating, but let this post be your guiding star. Think of lotion-making as a slightly advanced form of baking. It is a formula, but once you master the basics, a whole new world of creation opens up. So, let’s get your tools ready and dive into the aromatic world of homemade skincare.
The Magic Behind the Scent and the Science of Lotion
Before we jump into the ingredients, let’s take a moment to talk about why vanilla and cinnamon are a match made in heaven. Vanilla is the ultimate comfort scent. It is associated with warmth, sweetness, and nostalgia. This inviting aroma makes it perfect for a product that is designed for relaxation and self-care. Cinnamon, on the other hand, adds a spicy, invigorating, and sweet note that beautifully cuts through the creaminess of the vanilla. Together, they create a full-bodied scent that is both calming and uplifting.
Understanding Emulsions: How Lotion Works
When you are making a product like this, it is crucial to understand what you are actually creating. At its core, any cream or lotion is an emulsion. An emulsion is simply a stable mixture of two things that usually do not mix, which, in this case, is oil and water. Imagine you put some oil and water in a jar and shake it up. They will mix for a second, but if you let it sit, they immediately separate into two layers. The water is heavy and sinks, and the lighter oil floats to the top.
This is where the magic of chemistry comes in. To create that beautiful, smooth, milky lotion that stays blended, we use something called an emulsifier, which, in our recipe, is the emulsifying wax. Without it, you would just have a bottle of oily water that is difficult to apply and does not provide any moisture to your skin. The emulsifier acts as the peacemaker, holding the water and oil phases together. This allows you to reap the benefits of both water-based hydration and oil-based nourishment in one delightful product.
Deconstructing the Ingredients: What Makes This Lotion Special
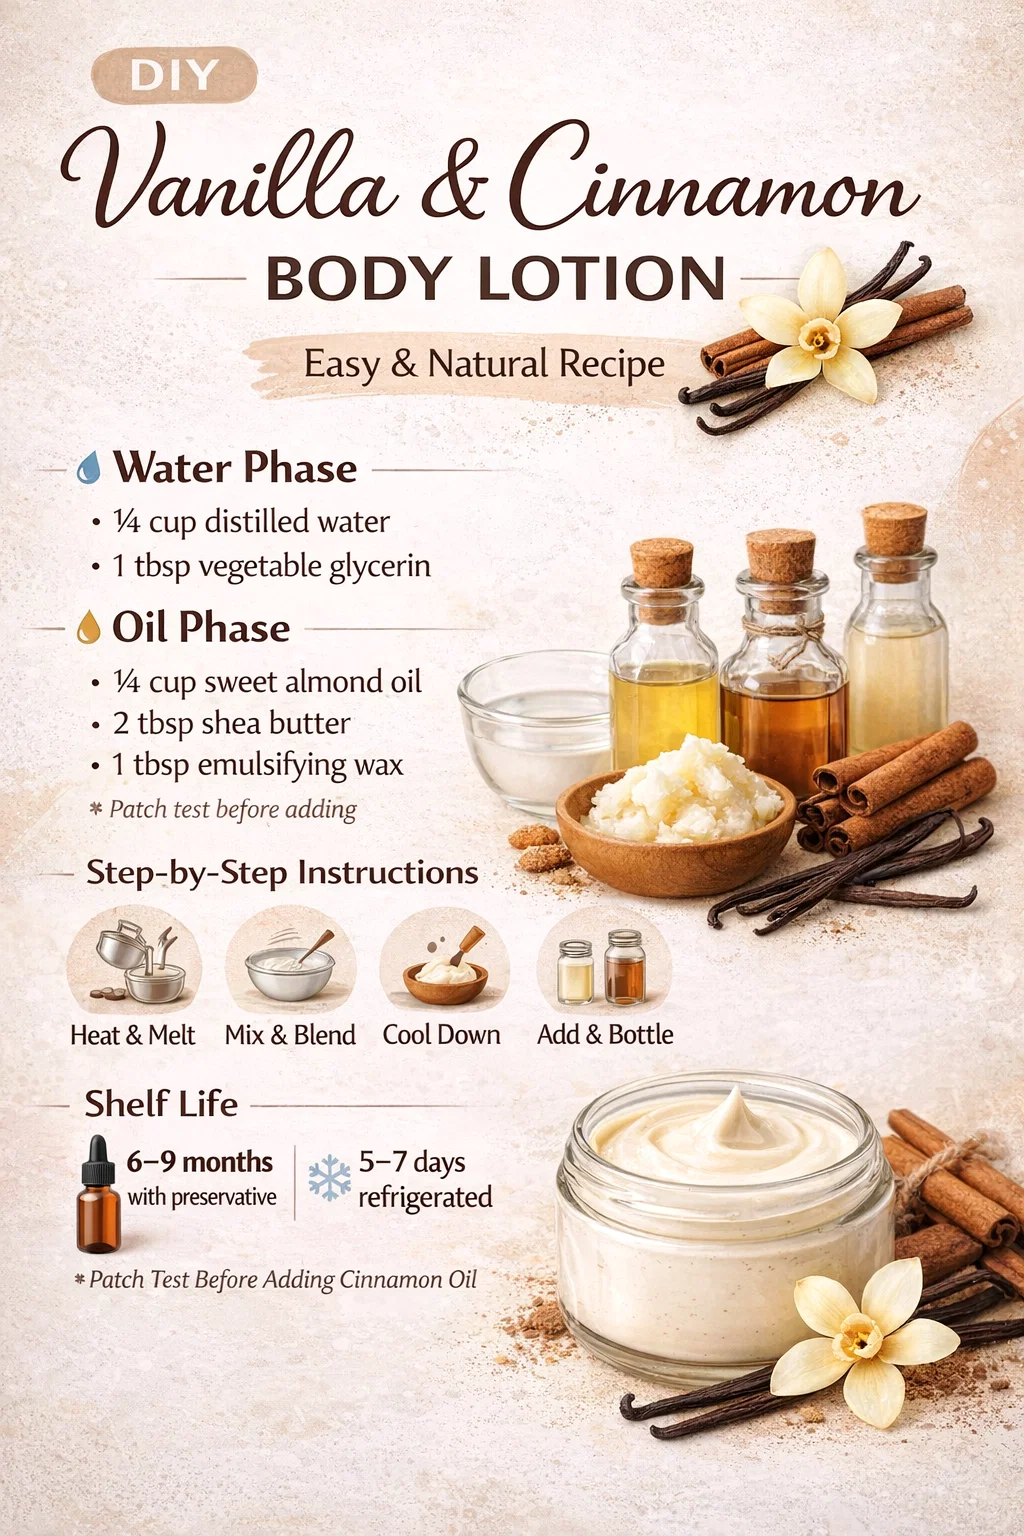
Let’s break down the ingredients from the recipe image. This recipe is divided into three parts: the Water Phase, the Oil Phase, and the Cool Down Phase. This logical structure is standard for lotion making, as different ingredients behave differently when they are heated and cooled.
The Water Phase: The Foundation of Hydration
- 1/4 cup distilled water: This is a non-negotiable step. You cannot use tap water for lotion. Distilled water has been boiled into vapor and condensed back into liquid in a clean container, removing almost all impurities, minerals, and bacteria. Tap water contains minerals that can interfere with the emulsion and, more dangerously, bacteria that will make your lotion mold very, very quickly. Think of distilled water as your clean, blank canvas. It provides the essential moisture that your skin craves.
- 1 tbsp vegetable glycerin: Glycerin is a humectant. This means it has a magical ability to pull moisture from the air and draw it into your skin. It is extremely hydrating on its own and helps the water from your lotion actually stick around, leaving your skin feeling plumper and more supple. It is the secret ingredient for long-lasting hydration.
The Oil Phase: Deep Nourishment and Moisture Locking
- 1/4 cup sweet almond oil: This is our carrier oil. Carrier oils are called such because they “carry” the beneficial ingredients, like essential oils, into your skin. Sweet almond oil is an absolute classic for a reason. It is a lightweight oil that is rich in vitamins E and A. It is known for its ability to soothe, soften, and nourish the skin without being overly greasy. It is very mild, making it an excellent choice for almost all skin types.
- 2 tbsp shea butter: This is what gives the lotion its rich, creamy, and decadent texture. Shea butter is a skin superfood. It is incredibly moisturizing and has been used for centuries to heal and protect the skin. It melts at body temperature, which gives your lotion that beautiful “slip” as you apply it. It creates a protective, nourishing layer on your skin, locking in all that hydration.
- 1 tbsp emulsifying wax: As we discussed, this is the glue that holds everything together. We are typically using a vegetable-based emulsifying wax, which is derived from plant sources. Its job is to bind the oil and water molecules into a stable, smooth, and perfect blend.
The Cool Down Phase: Adding the Active Benefits
- Vanilla extract: For the classic, sweet scent, we are using plain, old vanilla extract. This is a common and safe way to add a sweet aroma to your products. Make sure you are using a pure extract, not a synthetic imitation flavor. The pure stuff will have a more beautiful and true vanilla smell.
- 2-3 drops cinnamon oil*: The asterisk here is critical. The graphic correctly notes that cinnamon is optional. Cinnamon essential oil is incredibly potent. While it smells divine, it is also a well-known skin irritant. It is considered a “hot” oil, and using too much can cause a painful, burning sensation on your skin. We are using just 2-3 tiny drops for a massive batch of lotion. Seriously, that is all you need for the scent without the risk. We will talk more about safety in the patch test section.
- 1 tsp Vitamin E oil: Vitamin E is an antioxidant. In skincare, it serves a dual purpose. First, it is a wonderful, nourishing ingredient for your skin, helping to heal and reduce the signs of aging. Second, and crucially for this recipe, it acts as an antioxidant for the oils themselves. While it is not a broad-spectrum preservative, it helps prevent the natural oils from going rancid, effectively giving your lotion a slightly longer life.
- Preservative: This is the most important part of the entire recipe and where beginner lotion-makers often make a dangerous mistake. Because we are adding water to this recipe, we are creating a perfect, cozy environment for mold, bacteria, and yeast to grow. You absolutely must use a broad-spectrum preservative if you want your lotion to be safe to use for more than a few days. Common, easy-to-use preservatives include things like Optiphen, Germaben, or Leucidal Liquid. Do not, and I repeat, do not skip this step thinking you can use grapefruit seed extract or Vitamin E as a substitute, they are antioxidants, not preservatives, and they will not stop bacteria from growing.
Step-by-Step Instructions: The Making Process
Now, let’s look at the instruction section, which is visualized with lovely little graphics. This is the fun part, but it requires a bit of precision. We are following a standard, professional, heated emulsion process.
Step 1: Heat and Melt
To begin, we need to melt our solid ingredients from the oil phase. The best way to do this without burning anything is using a double boiler. If you do not have one, you can easily create one. Place a heat-safe glass bowl on top of a saucepan containing a few inches of simmering water. The bowl should not touch the water. In the bowl, add your sweet almond oil, shea butter, and emulsifying wax. Allow everything to gently melt until you have a completely clear, golden-colored liquid.
In a separate heat-safe container, you will also want to heat your distilled water and vegetable glycerin. You want your water phase to be roughly the same temperature as your oil phase. Why? If you pour cold water into hot oils, it will cause the butter to resolidify immediately, creating a clumpy mess. Aim to have both phases around 160 to 170 degrees Fahrenheit.
Step 2: Mix and Blend
This is where the magic really happens. Once both phases are at the correct temperature, you are going to slowly, slowly pour your water phase into your oil phase while you are blending. To do this, you will definitely want to use an immersion blender, also known as a stick blender. Trying to do this by hand with a whisk is an exercise in futility. As you pour the water, you will see the clear oils immediately turn into a white, milky substance. This is your lotion coming to life! Continue to blend for several minutes. The mixture will start out quite liquid, but as it cools down, it will naturally thicken.
Step 3: Cool Down
The graphics show a container being placed in a bowl, which is a key part of the process. This step is about quickly and evenly cooling your mixture. An efficient way to do this is to place your blending bowl inside a larger bowl filled with ice water, creating an “ice bath.” Do not let any water splash into your lotion! As you stir and blend, the cold from the ice bath will speed up the thickening process. Continue to blend as it cools. You want to bring the temperature down to about 100 degrees Fahrenheit or lower before adding the delicate, heat-sensitive ingredients.
Step 4: Add and Bottle
This is the moment to personalize your creation. Once your lotion has cooled down to the proper temperature, you will add all the ingredients from your Cool Down Phase: the vanilla extract, the few drops of cinnamon oil, the Vitamin E oil, and your chosen preservative. Blend again for another minute to make sure everything is completely, evenly mixed in. Finally, you are ready to transfer your perfect lotion into clean, sterilized bottles. You can use glass jars, pump bottles, or even squeeze tubes. Make sure to tap the container on the counter to settle the lotion and remove any air bubbles. Then, let it cool completely with the lid off before you seal it.
Essential Considerations: Shelf Life, Safety, and the All-Important Patch Test
Now that you have a finished product, let’s talk about the important rules for safety and longevity that are highlighted at the bottom of the graphic. These are not suggestions, they are critical practices that will make your DIY experience a safe and happy one.
The Cinnamon Question: To Use or Not to Use
Let’s revisit that “Cinnamon Optional” note. As mentioned, cinnamon essential oil is incredibly potent and can be an irritant for many people with sensitive skin. The 2-3 drop limit for this recipe is to make it as safe as possible while still achieving that beautiful, warm aroma. However, if you know you have sensitive skin, or if you are making this lotion for someone else and you are not sure, it is perfectly fine and often recommended to simply omit the cinnamon. The vanilla-only version of this lotion is still absolutely delicious and beautifully scented. Never, ever use cinnamon oil directly on your skin without a carrier oil, and never exceed the suggested amount in a recipe.
The Patch Test: Your Skin’s First Introduction
Before you slather this new creation all over your body, you must do a patch test. A patch test is a simple way to make sure you will not have an adverse reaction to any of the new ingredients, particularly the powerful cinnamon oil. To perform a patch test, apply a small, dime-sized amount of the lotion to a clean, inconspicuous area of your skin, such as the inside of your elbow or the back of your knee. Wait for at least 24 hours. If you experience any redness, itching, burning, or irritation, you should immediately stop using that batch. If, after 24 hours, your skin is clear, then you are good to go!
Understanding Shelf Life: Why Freshness Matters
This section is perhaps the most critical information of all. There are two very different timelines, and you must know which one applies to you.
- With Preservative: 6-9 months. If you correctly added a high-quality, broad-spectrum preservative, you can expect your lotion to be safe and stable for 6 to 9 months. This is a very respectable shelf life for a homemade product. It allows you to make a full batch and work through it at a normal pace. Make sure you follow the usage rate provided by the preservative manufacturer for the total weight of your lotion.
- Refrigerated: 5-7 days. This is the other option. If you decide that you do not want to use any synthetic preservatives, that is your choice, but you must realize that you are not making a product that can sit on your shelf. A non-preserved, water-based lotion must be treated like fresh food, specifically like fresh milk. It needs to be kept in the refrigerator, and it will only be good for about 5 to 7 days before it starts to harbor dangerous levels of bacteria, mold, or yeast. The first sign of spoilage might not even be a change in smell; the bacteria can be there before you know it. Our advice is: always use a preservative for your health and safety.
Embrace the Journey of Homemade Luxury
And there you have it, a complete guide to bringing the delicious scent of vanilla and cinnamon into your daily skincare routine. Making your own body lotion is an act of self-care. It is a way to nourish your body with pure, simple, and wholesome ingredients that you have carefully chosen. Yes, it requires a little bit of equipment and a dash of precise measuring, but the reward is a beautiful, customized product that is safer and more effective for your unique skin. This recipe is the perfect starting point. Once you have made it once, you can experiment with other carrier oils, different butters, or your favorite scent combinations. So, get your tools ready, take a deep breath, and create something truly special. Your skin will thank you.