DIY Whipped Cocoa Butter Body Butter Recipe 5 Ingredient Natural Skincare
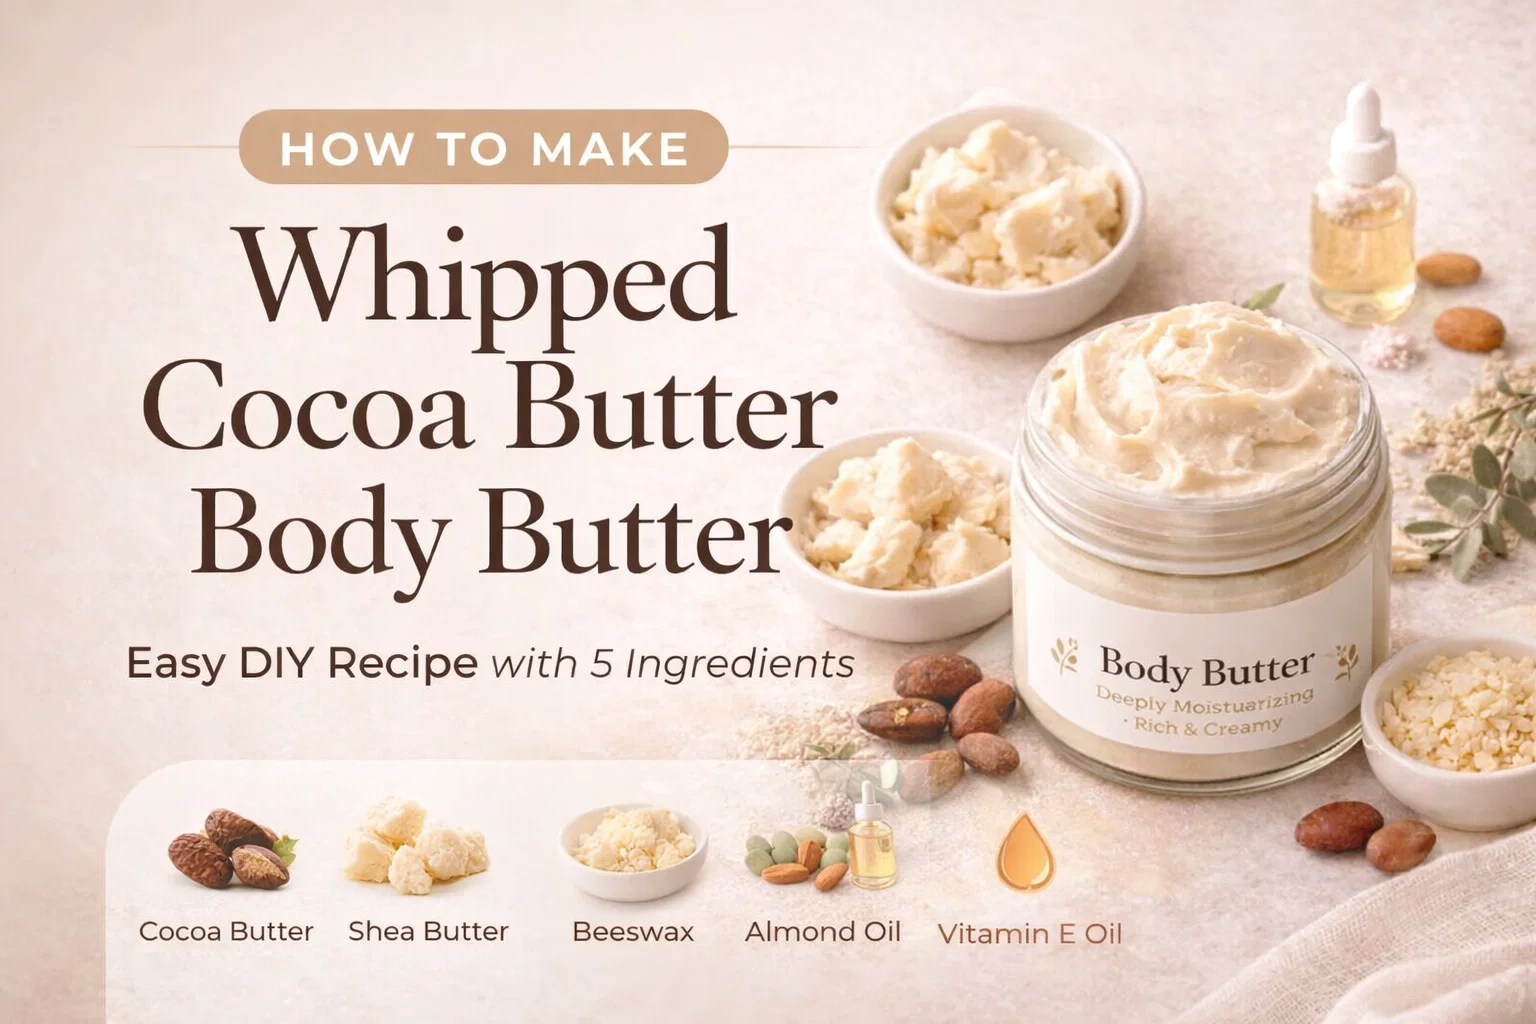
Have you ever looked at a store-bought lotion, tried to pronounce the ingredients, and realized you have no idea what you’re putting on your skin? That’s the moment when many of us start dreaming about creating our own, pure, and effective skincare products. There’s a real joy in knowing every single item that goes into your moisturizer, and the visual recipe we’re exploring today makes that dream incredibly accessible. This gorgeous image isn’t just an advertisement; it’s a blueprint for the most luxurious, homemade whipped cocoa butter body butter you could imagine. With only five simple ingredients and straightforward instructions, it’s the perfect place to start your DIY beauty journey and finally achieve that glowing, deeply hydrated skin you’ve been searching for.
The beauty of this recipe lies in its simplicity. We aren’t dealing with complex chemical processes or hard-to-find synthetics. Instead, we’re harnessing the power of nature’s most effective emollients and oils. Think rich cocoa butter, creamy shea butter, nourishing sweet almond oil, protective beeswax, and healing Vitamin E oil. The resulting product is a fluffy, decadent butter that melts instantly upon contact with your skin, providing hydration that lasts. Today, we’re going to dive deep into this recipe, breaking down each component, understanding the science behind why it works, and guiding you through the step-by-step process of creating your own signature body butter at home.
Deconstructing the 5 Simple Ingredients
The core of any great DIY skincare product is, without a doubt, the quality of its ingredients. The image highlights five key players, and each one brings something unique and essential to the final product. Understanding these components is the first step to becoming a more informed skincare maker and consumer.
1. The King of Hydration: 1 Cup Shea Butter
Shea butter is an absolute powerhouse in the world of natural skincare, and it’s no surprise it’s the largest component of this recipe. Extracted from the nuts of the shea tree, it’s been used for centuries to protect and heal the skin. What makes it so special is its incredibly high concentration of fatty acids and vitamins, including Vitamin A, Vitamin E, and Vitamin F. This rich composition makes it a superior moisturizer, capable of penetrating deep into the skin to lock in moisture.
Beyond its hydration capabilities, shea butter also possesses significant anti-inflammatory and antioxidant properties. This means it’s not just making your skin feel soft; it’s also helping to soothe irritation, reduce redness, and protect your skin cells from environmental damage. In this whipped butter recipe, the sheer volume of shea butter forms the creamy, rich base that gives the final product its luxurious feel. Its texture helps thicken the overall mixture, ensuring that when you whip it, it creates a stable, fluffy cloud-like consistency.
2. Deep, Decadent Cocoa: 1/2 Cup Cocoa Butter
If shea butter is the king, cocoa butter is the queen. This solid fat is derived from cocoa beans and is famous for its delightful, chocolatey aroma. Beyond its enticing smell, cocoa butter is a truly effective emollient. It’s particularly rich in fatty acids like stearic, palmitic, and oleic acid, which create a protective barrier over the skin to lock in moisture and prevent dehydration.
Cocoa butter is also a natural source of antioxidants, specifically polyphenols, which can help fight off free radicals and improve skin elasticity. This makes it an excellent choice for preventing signs of aging and improving the overall texture of your skin. It has a slightly higher melting point than shea butter, which contributes to the body butter’s firm yet melt-on-skin texture. While this recipe uses unrefined (non-deodorized) cocoa butter to enjoy its natural scent, you could also use a refined version if you prefer a product without that distinctive cocoa aroma.
3. Gentle Nourishment: 1/2 Cup Sweet Almond Oil
While the butters provide the rich foundation, we need a carrier oil to help them melt easily, create a spreadable consistency, and deliver additional benefits. Sweet almond oil is an outstanding choice. Known for being extremely gentle, it’s suitable for all skin types, including sensitive and baby skin. Its primary role in this recipe is to act as a emollient, helping the butter mixture blend smoothly and preventing it from becoming too dense or solid.
Sweet almond oil is incredibly rich in Vitamin E, Vitamin A, essential fatty acids, and zinc. This nutrient-dense profile means it’s actively nourishing your skin while you wear it. It penetrates quickly without leaving a heavy, greasy residue, making it ideal for a body butter you can use daily. Because it’s a stable oil with a relatively long shelf life, it helps to extend the overall freshness of your homemade body butter.
4. The Protective Seal: 2 Tablespoons Beeswax
You might wonder why wax is necessary in a product called ‘body butter,’ but beeswax is a critical, multi-functional ingredient. Its main purpose here is to act as a thickening agent, giving the body butter its luxurious, whipped body and structure. Without it, the combined oils and butters would be too soft, potentially melting into a liquid form if the temperature got a bit warm.
Beeswax does much more than just provide texture. It’s also a powerful humectant, meaning it helps to attract and retain water in the skin. Additionally, beeswax is an occlusive, forming a non-comedogenic (won’t clog pores) barrier over the skin. This breathable layer helps protect your skin from environmental elements and prevents trans-epidermal water loss (TEWL), locking in all the wonderful hydration from the other ingredients. When melted, it blends seamlessly with the oils, creating a stable emulsion that enables the final product to be whipped into a light, airy perfection.
5. The Final Touch: 1 Teaspoon Vitamin E Oil
Often referred to as the “skin vitamin,” Vitamin E is a crucial addition to this recipe, serving two primary functions. First, it’s a powerful antioxidant. When applied to the skin, it helps neutralize free radicals caused by UV exposure and pollution, protecting your skin from cellular damage and signs of premature aging. Second, and equally important for a DIY product, Vitamin E oil acts as an antioxidant for the oils themselves. It helps to prevent the oils from oxidizing (going rancid) too quickly, significantly extending the shelf life of your homemade body butter.
You only need a small amount to get these benefits. It’s added at the end of the process, after the main ingredients have slightly cooled, to ensure that the heat doesn’t degrade its beneficial properties. Adding this final touch ensures your body butter remains effective, fresh, and shelf-stable for months.
The Science of Whipping: Why It Works So Well
The image shows three clear states for your ingredients: solid chunks of butter, the melted clear liquid during the process, and the final jar of opaque, fluffy, white product. This transformation is not magic; it’s science, specifically, physical aeration. When we just melt and re-solidify oils and butters, they tend to form a dense, hard block, much like the original cocoa butter you purchased. While still effective, this can be difficult and even unpleasant to use on the skin.
By using a mixer (like the hand mixer and whisk attachment shown in the image), we introduce millions of tiny air bubbles into the cooling oil and butter mixture. This process, called aeration, physically breaks up the fat crystals as they form and suspends them around the air pockets. This physical separation prevents the fats from coalescing into a single, dense mass. The result is a dramatic change in both texture and color, transforming a dense, amber-colored liquid into the voluminous, opaque white, and incredibly light body butter we see in the jar.
The presence of beeswax is key to stabilizing this air-and-oil matrix. The beeswax solidifies slightly sooner than the butters and creates a network of microscopic structures that trap the air bubbles, preventing them from escaping and the mixture from collapsing. This stable, aerated structure is what gives the butter its unique, “whipped” quality. It feels much lighter, applies more smoothly, and absorbs more quickly because the fat crystals are more dispersed. This technique takes a collection of heavy oils and turns them into a cloud of pure, hydrating luxury.
Your Step-by-Step Guide to Perfection
The instructions in the visual recipe are beautifully concise, but we can expand on them to ensure your DIY experience is smooth and successful. Let’s walk through the process together, from start to fluffy finish.
1. Melt with Caution
Start by combining your 1 cup of shea butter, 1/2 cup of cocoa butter, and 2 tablespoons of beeswax in the top of a double boiler. If you don’t have a specific double boiler, you can improvise easily by placing a heat-safe glass or stainless steel bowl over a pot of simmering water. This indirect heat method is essential for natural butters, as direct heat can cause them to overheat, scorch, or even become grainy when they cool.
Stir the mixture gently with a heat-resistant spatula as it melts. Patience is key here. You want to heat everything slowly and evenly until all three components have liquefied completely. The goal is to reach a clear, uniform liquid state without any remaining chunks of solid butter or wax. This step ensures that all the components are fully integrated.
2. Integrate the Fluid Oils
Once your solid ingredients are completely melted and the liquid is clear, you can remove the bowl from the heat. This is the moment to stir in your 1/2 cup of sweet almond oil. Adding the room-temperature oil to the warm butters will immediately begin the cooling process, so make sure to stir everything well to ensure it’s a single, homogenous liquid. Don’t add the Vitamin E just yet, as we want to let the mixture cool a bit more to protect its potency.
3. The Cool and Whip Phase
This is arguably the most critical step for achieving the correct texture. Transfer the bowl of melted oils to your refrigerator. How long you leave it will vary based on your kitchen temperature and the specific bowl, but a good estimate is around 20-30 minutes. You want to cool it just until it reaches an “opaque, creamy solid” state. It shouldn’t be rock hard, but it should hold a firm indent when you press your finger into it. If it’s too liquidy, it won’t whip; if it’s too solid, you’ll burn out your mixer’s motor.
Once you have that perfect “creamy solid” consistency, it’s time to whip! Use a hand mixer or stand mixer with a whisk or paddle attachment. Start on low speed and gradually increase to medium-high. You’ll instantly see the mixture change color from an opaque yellow to a pure white. Continue whipping until the volume has visibly increased, the texture is light and airy, and it forms soft, fluffy peaks, much like perfectly whipped cream.
4. Adding the Vitamin E and Finishing
Now that your body butter is fluffy and luxurious, you can add that final teaspoon of Vitamin E oil. Gently whip or fold it in with your mixer or a spatula until it’s fully incorporated. The cool, stable temperature of the whipped butter is the perfect environment for the Vitamin E to retain its full effectiveness.
Your whipped cocoa butter body butter is now complete! Carefully spoon or pipe the beautiful, finished product into clean, sterile glass or PET plastic jars, like the one shown in the image. Be sure not to pack it down too tightly, as you want to preserve all that lovely air you just worked to incorporate.
Conclusion
There you have it a complete breakdown of how to create your own high-quality, professional-grade whipped cocoa butter body butter at home. Following this simple recipe allows you to skip the unknown ingredients of mass-produced lotions and treat your skin to nothing but pure, natural, and incredibly effective nourishment. The results are undeniable: the rich shea and cocoa butters, coupled with the nourishing oils and protective beeswax, create a truly transformative skincare product that you’ll love using every single day. The process is straightforward, the benefits are clear, and the feeling of creating something so beneficial for your own well-being is incredibly rewarding. So go ahead, source your ingredients, get your mixer ready, and prepare to elevate your self-care routine to a new level of luxurious simplicity. Your skin will thank you.