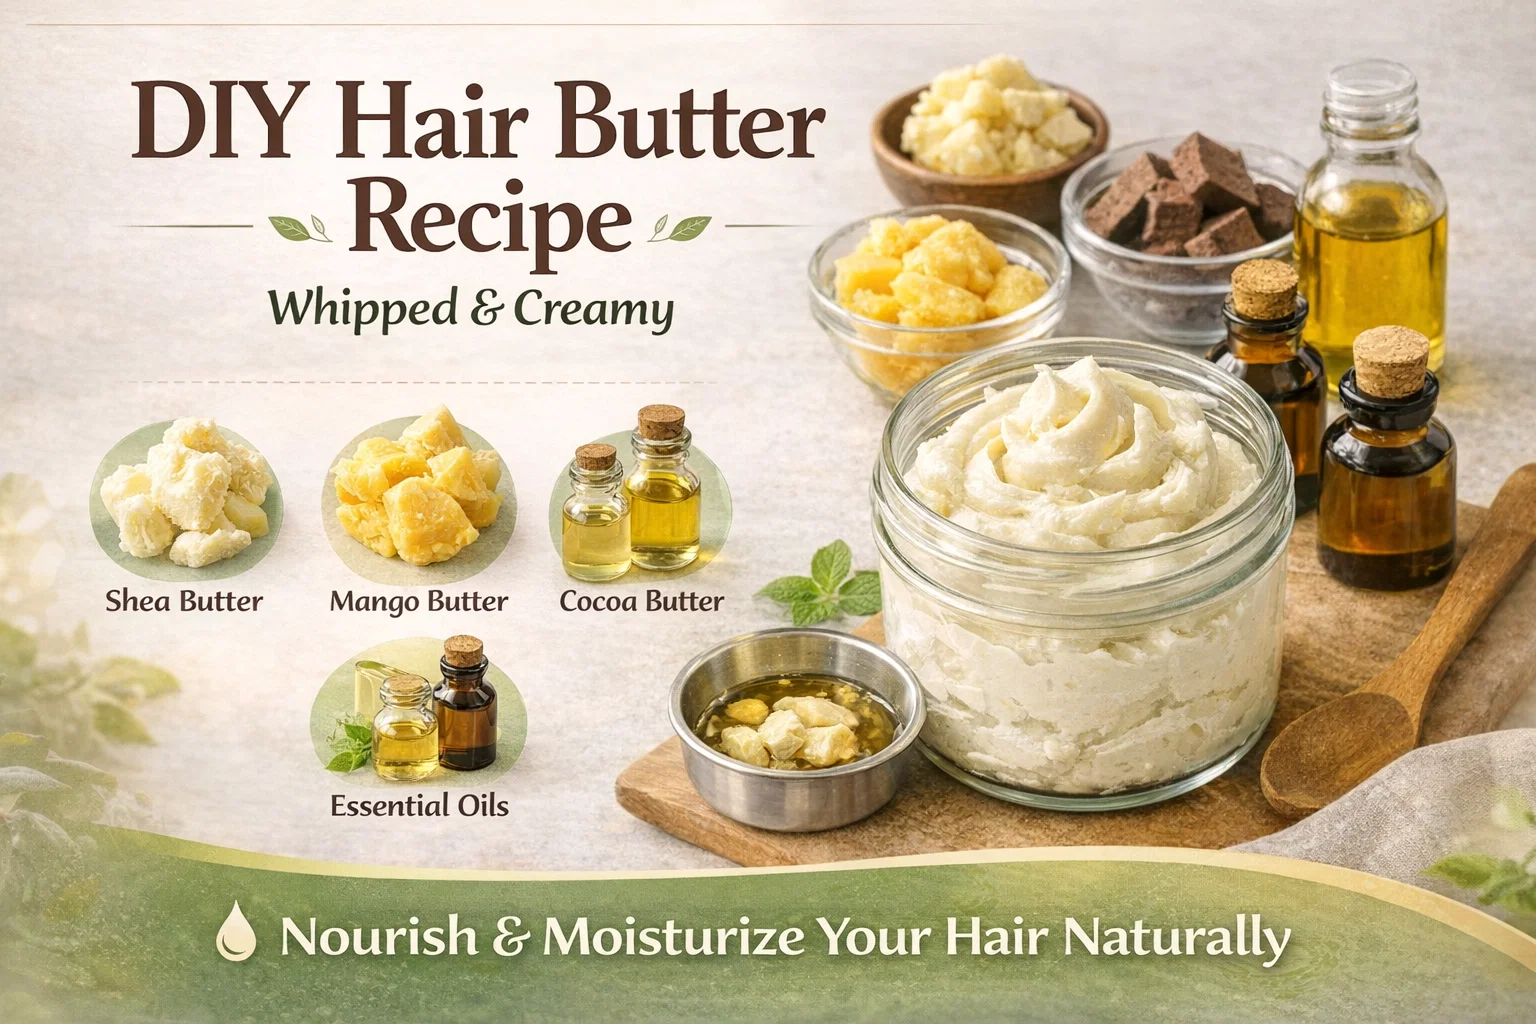
DIY Whipped Shea Butter Hair Recipe for Dry Hair Growth Easy Homemade Hair Butter
Finding the perfect balance of moisture for your hair can feel like an endless quest. Between changing seasons, heat styling, and the natural tendency for textured hair to lose hydration, your strands often end up feeling more like straw than silk. While the beauty aisles are packed with promising tubs and tubes, there is something uniquely satisfying about creating your own specialized treatment. This DIY Whipped Shea Butter recipe is more than just a craft project; it is a potent, nutrient-dense sealant designed to lock in moisture and transform the health of your hair from the scalp to the very tips.
The Magic of Whipped Hair Butter
If you have ever used raw shea butter, you know it can be a bit difficult to manage. It is often hard, grainy, and takes a lot of rubbing between your palms to melt. By whipping it with lighter butters and liquid oils, you change the physical structure of the product. The result is a decadent, frosting-like consistency that glides onto the hair effortlessly. This process does not just make it easier to apply; it helps the ingredients distribute more evenly across your hair fibers, ensuring every strand gets the protection it deserves.
Breaking Down the Powerhouse Ingredients
What makes this specific recipe so effective is the synergy between the solid butters and the liquid carrier oils. Each ingredient has been selected for a specific purpose, ranging from structural repair to intense hydration. Let us take a closer look at what goes into this golden jar of goodness.
The Base Butters: Shea, Mango, and Cocoa
Shea Butter: As the foundation of this recipe, shea butter provides an incredible amount of fatty acids and vitamins. It acts as a powerful emollient, filling in the gaps in the hair cuticle to create a smoother surface.
Mango Butter: Often the unsung hero of hair care, mango butter is packed with salicylic acid and antioxidants. It is slightly lighter than shea, helping to ensure the final product does not feel too heavy or greasy on the hair.
Cocoa Butter: This adds a boost of hardness to the mixture and a delicious subtle scent. Cocoa butter is excellent for strengthening the hair shaft and preventing breakage, which is essential if you are trying to retain length.
The Nourishing Oils
While the butters provide the structure, the oils provide the slip and deep penetration. Sweet Almond Oil is fantastic for adding shine and improving hair elasticity. Castor Oil is a thicker, humectant oil known for its ability to support scalp health and encourage thicker looking hair growth. Finally, Vitamin E Oil acts as a natural preservative for the oils while providing deep nourishment to the hair follicles.
Step by Step Guide to Creating Your Hair Butter
Preparation is key when making DIY beauty products. You want to ensure your workspace is clean and that you have a double boiler or a heat-safe bowl that fits over a pot of simmering water. Never melt your butters directly over a flame, as high heat can strip away the beneficial nutrients.
- The Melting Phase: Combine your 1/2 cup of shea butter, 2 tablespoons of mango butter, and 2 tablespoons of cocoa butter in your double boiler. Stir gently until the mixture is a clear, uniform liquid.
- The Cooling Phase: Once melted, remove from heat and let the mixture sit for about 10 to 15 minutes. You want it to reach room temperature but still be in liquid form before adding the more delicate oils.
- The Infusion: Add in your 3 tablespoons of sweet almond oil, 1 tablespoon of castor oil, and 1 teaspoon of Vitamin E oil. This is also the time to add your 10 to 15 drops of essential oils like lavender, rosemary, or peppermint for a refreshing scent and added scalp benefits.
- The Big Chill: Place the bowl in the refrigerator for about 20 minutes. You are looking for the mixture to become semi-solid. It should look opaque and have a soft, butter-like consistency.
- The Whip: Using a hand mixer or a stand mixer, whip the mixture on high speed. Watch as it transforms from a yellow oil into a bright white, fluffy cream. This usually takes about 5 to 7 minutes of consistent whipping.
How to Incorporate Hair Butter into Your Routine
Having a jar of this whipped heaven is only half the battle; knowing how to use it effectively is where the real transformation happens. Because this recipe is oil-based and contains no water, it is technically a sealant, not a moisturizer on its own. To get the best results, you should always apply it to damp hair or over a water-based leave-in conditioner.
The L.O.C. and L.C.O. Methods
If you follow the Liquid-Oil-Cream (LOC) or Liquid-Cream-Oil (LCO) methods, this whipped butter serves as the “O” or the “C” depending on your hair’s porosity. For high porosity hair, applying the butter last helps create a barrier that prevents moisture from evaporating into the air. For low porosity hair, using a small amount while the hair is warm and damp can help the nutrients settle into the strands without causing excessive buildup.
Protective Styling and End Care
One of the best ways to use this DIY butter is for protective styling. When braiding or twisting your hair, apply a small amount to each section. It provides enough grip to keep the style neat while ensuring your hair stays hydrated for the week. Additionally, pay extra attention to your ends. The ends are the oldest part of your hair and the most prone to splitting. A daily dab of hair butter on the tips can significantly reduce the need for frequent trims.
Storage and Shelf Life Tips
Since this recipe does not contain water, it is much less prone to bacteria growth than a standard lotion. However, you still want to treat it with care to ensure it stays fresh for the full 6 to 9 month shelf life. Always store your jar in a cool, dry place. If your bathroom gets very steamy, consider keeping the jar in a bedroom drawer instead.
If you live in a very hot climate, your whipped butter may melt and lose its fluffiness. If this happens, don’t worry! It is still perfectly fine to use. You can simply pop it back in the fridge and re-whip it to get that airy texture back. To prevent contamination, try to use a clean spatula or spoon to scoop out the product rather than dipping wet fingers into the jar.
Customizing Your Blend
The beauty of a DIY recipe is that it is fully customizable. Once you have mastered the basic formula, you can start tweaking it to fit your specific needs. If your hair feels weighed down, you might replace the castor oil with a lighter option like jojoba or grapeseed oil. If you are dealing with an itchy scalp, increasing the peppermint and rosemary essential oils can provide a soothing, tingly sensation that promotes circulation.
Choosing Your Essential Oils
- Rosemary: Known for stimulating hair follicles and improving thickness.
- Lavender: Calming for the scalp and adds a beautiful, floral aroma.
- Peppermint: Great for waking up the scalp and providing a cooling effect.
- Tea Tree: Excellent if you struggle with dandruff or scalp irritation.
Common Mistakes to Avoid
While the process is straightforward, a few common errors can ruin the texture of your butter. The most frequent mistake is whipping the oils while they are still too hot. If the mixture is liquid when you start whipping, it will never hold air and will remain a runny mess. Patience is your friend during the cooling stage.
Another pitfall is using too much product. Because this butter is highly concentrated, a little goes a very long way. Start with a pea-sized amount for each section of hair. You can always add more, but removing excess oil once it is in your hair is a much more difficult task!
Embracing the Journey to Healthy Hair
Consistency is the secret ingredient to any beauty regimen. By making your own hair butter, you are taking control of what goes onto your body and ensuring your hair receives the highest quality care. Over time, you will likely notice that your hair feels stronger, looks shinier, and holds its style much better than before. There is a special kind of confidence that comes from knowing exactly what is in your products and seeing the tangible results of your efforts.
This DIY project is a small investment of time that yields months of luxury. Whether you are treating yourself to a spa night or looking for a thoughtful handmade gift for a friend, this whipped hair butter is a versatile staple that belongs in every natural hair toolkit. It simplifies the moisturizing process and turns a mundane chore into a sensory, aromatic experience.
Final Thoughts
Creating your own hair products is an empowering step toward self-sufficiency and hair health. This whipped shea butter recipe provides the perfect foundation for anyone looking to ditch harsh chemicals and embrace the power of nature. By following these steps and understanding how these ingredients work, you are well on your way to achieving the soft, manageable hair you have always wanted. Give your strands the gift of deep hydration and watch them flourish.
Happy whipping, and enjoy the beautiful, creamy results of your hard work!