Easy 4-Step Healthy Homemade Granola Recipe with Oats, Nuts Seeds
There is something undeniably comforting about the aroma of toasted oats and warm cinnamon wafting through a kitchen on a quiet morning. While store-bought granola is a convenient staple, it often comes with a side of hidden sugars, inflammatory oils, and a price tag that feels a bit steep for what essentially amounts to toasted grains. Making your own granola at home is not just a culinary project; it is a way to reclaim your breakfast and tailor every single bite to your specific nutritional needs and flavor preferences.
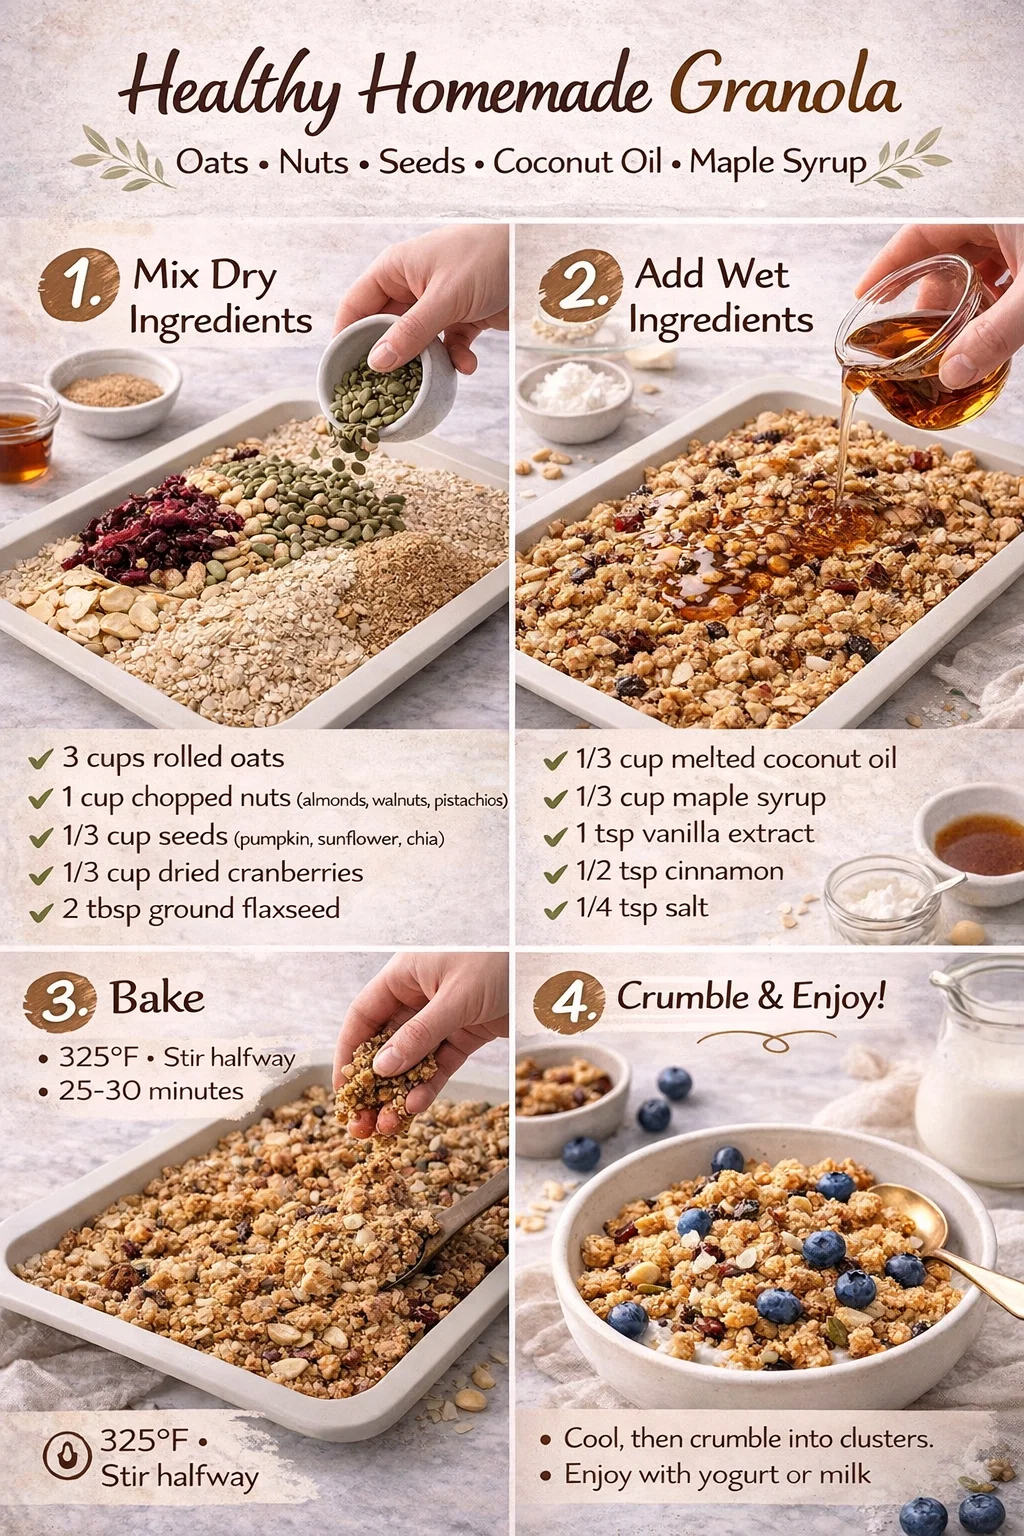
The beauty of the recipe featured in our latest guide is its sheer simplicity. By focusing on a 4-step process—mixing dry ingredients, adding wet binders, baking to golden perfection, and crumbling into clusters—you can transform a few pantry staples into a gourmet topping that rivals any artisanal brand. Whether you are a seasoned meal prepper or a beginner in the kitchen, this guide will walk you through the nuances of creating the ultimate healthy homemade granola.
The Anatomy of a Perfect Granola
To understand why this recipe works so well, we have to look at the components. Granola is a balance of textures and flavors. You need the crunch of the oats, the heartiness of the nuts, the pop of the seeds, and a natural sweetness that binds it all together without being cloying. Unlike commercial versions that rely on corn syrup, this version uses the earthy richness of maple syrup and the subtle tropical note of coconut oil.
The Base: Why Rolled Oats Matter
The foundation of any great granola is the oat. Specifically, you want to use old-fashioned rolled oats. Quick oats or instant oats are processed too thinly and will turn into a dusty, mushy mess in the oven. Steel-cut oats are too hard and won’t cook through in the time it takes to toast the other ingredients. Rolled oats provide that classic, chewy yet crisp texture that defines a high-quality cluster.
The Protein Powerhouse: Nuts and Seeds
Adding a variety of nuts and seeds does more than just provide a satisfying crunch. It elevates the nutritional profile by adding healthy fats, plant-based protein, and essential minerals. In this recipe, we utilize a blend of sliced almonds, walnuts, and pistachios. Almonds offer a mild sweetness, walnuts provide a rich earthiness, and pistachios add a beautiful pop of green color. When combined with pumpkin seeds, sunflower seeds, and chia seeds, you are creating a complex flavor profile that keeps your palate engaged.
The Science of the Golden Crunch
Achieving that elusive “cluster” is the goal of every granola enthusiast. It comes down to the ratio of wet to dry ingredients and the temperature of your oven. If your granola is too dry, it will simply be toasted oats. If it is too wet, it will become sticky and fail to crisp up. The magic ratio used here—one-third cup of oil and one-third cup of syrup for every three cups of oats—creates just enough moisture to allow the ingredients to stick together during the baking process.
The Role of Healthy Fats
Coconut oil is the preferred choice for this recipe because it has a relatively high smoke point and a natural sweetness. However, the versatility of this dish is its greatest strength. If you prefer a more neutral flavor, avocado oil is an excellent substitute. These fats are crucial because they conduct heat to the oats and nuts, ensuring they toast evenly rather than just drying out.
Natural Sweeteners and Flavor Enhancers
Maple syrup is our liquid gold here. It provides a complex, caramelized flavor that honey sometimes lacks when baked at higher temperatures. Beyond sweetness, we incorporate vanilla extract and cinnamon. Vanilla acts as a flavor bridge, connecting the nutty notes with the sweet syrup, while cinnamon adds a warm, spicy undertone that makes the granola feel like a treat rather than just a health food.
Step-by-Step Guide to Baking Success
Following the visual guide, the process is streamlined into four manageable phases. Success in the kitchen often comes down to preparation, so ensuring you have your sheet pan and parchment paper ready is the first step toward a mess-free experience.
Step 1: Mixing the Dry Foundations
In a large mixing bowl, combine your rolled oats, chopped nuts, seeds, and ground flaxseed. It is important to mix these thoroughly before adding any liquid. This ensures that the flaxseed and spices like cinnamon and salt are evenly distributed. If you dump the liquid in first, you might end up with clumps of salt or spice in one bite and none in the next. Ground flaxseed is a secret weapon here; it acts as a subtle binder and adds a boost of Omega-3 fatty acids.
Step 2: Incorporating the Wet Elements
Once your dry mix is ready, pour in your melted coconut oil, maple syrup, and vanilla. Use a large spatula to fold the mixture. You want to ensure every single oat and nut fragment is glistening. This coating is what will caramelize in the oven, creating that golden-brown color and the “snap” when you bite into it. If the mixture looks a bit dry, don’t be afraid to add an extra tablespoon of maple syrup.
Baking Precision and Temperature Control
The oven is where the transformation happens, but it is also where things can go wrong if you aren’t careful. Nuts and seeds have a high oil content, meaning they can go from perfectly toasted to burnt in a matter of sixty seconds.
The Magic Temperature: 325 Degrees Fahrenheit
While many recipes call for 350 degrees, we recommend a slightly lower temperature of 325 degrees (160 degrees Celsius). This lower heat allows the moisture to evaporate slowly, resulting in a deeper crunch without scorching the edges of the oats. Baking for 25 to 30 minutes is the sweet spot. Halfway through, you must stir the granola. This brings the toasted bits from the edges into the center and allows the underside to get some air.
The Secret to Clusters: Don’t Touch!
This is the hardest part of the entire process. Once you take the tray out of the oven, the granola will still feel slightly soft. Your instinct will be to stir it again, but you must resist! As the maple syrup and coconut oil cool, they harden and act as a glue. If you leave the granola undisturbed for at least 30 to 45 minutes after baking, you will be able to break it into those large, chunky clusters that everyone loves.
Customizing Your Granola Blend
One of the best things about homemade granola is that the recipe is merely a template. Once you master the base, the possibilities for customization are endless. You can adjust the ingredients based on the season or whatever you happen to have in your pantry.
Fruit and Sweet Additions
In the original recipe, we use dried cranberries for a tart contrast. However, you can easily swap these for raisins, dried cherries, or chopped dried apricots. A pro-tip: always add your dried fruit after the granola has finished baking. If you bake the fruit, it can become unpleasantly hard or even bitter. For those with a sweet tooth, adding dark chocolate chips after the granola has completely cooled creates a decadent breakfast treat.
Savory and Exotic Twists
If you want to move away from the traditional, try adding a pinch of cardamom or ground ginger for a more exotic flavor profile. For a savory-sweet version, increase the salt slightly and add some smoked paprika or even a hint of rosemary. Savory granolas are becoming increasingly popular as toppings for salads or roasted butternut squash soups.
Storage and Longevity
Because this recipe uses fresh ingredients without artificial preservatives, how you store it matters. To keep your granola at peak crunchiness, store it in an airtight glass jar. Mason jars are perfect for this. When kept in a cool, dry place, your homemade granola will stay fresh for up to two to three weeks. If you find that it has lost some of its crunch due to humidity, you can easily revive it by popping it back into a 300-degree oven for five minutes.
Ways to Enjoy Your Homemade Creation
While a handful of granola straight from the jar is a perfectly valid snack, there are so many ways to incorporate this into your daily meals. The classic choice is a yogurt parfait. Layer Greek yogurt, fresh berries, and a generous sprinkling of your granola for a high-protein breakfast that will keep you full until lunch.
For a cozy winter morning, try using it as a topping for warm oatmeal. It adds a necessary texture contrast to the creamy oats. You can also use it as a healthy alternative to cereal by serving it in a bowl with almond milk or oat milk. The milk will pick up the hints of cinnamon and maple, creating a delicious “cereal milk” finish at the bottom of the bowl.
Conclusion: The Reward of Homemade Goodness
Taking thirty minutes out of your weekend to bake a batch of healthy homemade granola is a small investment with a huge payoff. Not only are you saving money, but you are also nourishing your body with high-quality grains, fats, and proteins. You have total control over the sugar content, the quality of the oil, and the variety of the add-ins. There is a deep sense of satisfaction that comes from seeing a jar full of golden, toasted clusters on your counter, knowing exactly what went into making them. So, grab your oats, preheat your oven, and get ready to elevate your breakfast game to a whole new level of deliciousness.