Easy Baked Pizza Wraps Quick 20-Minute Dinner Recipe
Let us face it, we all have those evenings where the clock is ticking, the family is hungry, and the thought of spending hours in the kitchen is simply exhausting. You want something comforting, delicious, and universally loved. Pizza is always a fantastic answer, but ordering delivery can get expensive, and making dough from scratch is far too time consuming for a busy weeknight. Enter the ultimate culinary lifehack: easy baked pizza wraps. This brilliant recipe takes all the beloved flavors of a classic slice and rolls them up into a neat, crispy, and incredibly fast meal that will have everyone at the table asking for seconds.
These savory roll ups combine the convenience of a simple sandwich with the indulgent, melty goodness of an authentic Italian pie. Best of all, they require minimal prep work and use ingredients you probably already have sitting in your refrigerator or pantry. Whether you need a lightning fast dinner, a fun after school snack, or an easy appetizer for your next casual gathering, this simple method will become a permanent fixture in your recipe rotation.
Why You Will Absolutely Love This Recipe
There are countless reasons to adore this straightforward dish, but the sheer convenience tops the list. When you are juggling work, school runs, and daily chores, finding a meal that comes together in under thirty minutes is a massive victory. Here is why these baked delights will win you over:
- Incredibly Fast Preparation: From assembling the ingredients to pulling a bubbling pan out of the oven, the entire process takes just about twenty minutes. The active hands on time is practically non existent.
- Endlessly Customizable: Just like a traditional pie, you are the master of your own flavor profile. Picky eaters can stick to plain cheese, while adventurous palates can load up on spicy meats and varied vegetables.
- Budget Friendly: Ordering takeout for a family can easily put a dent in your wallet. These utilize affordable staples like flour tortillas and basic pantry spices, making it a highly economical choice.
- Perfectly Portioned: Unlike a giant, greasy slice that might leave you feeling overly stuffed, these neat little packages offer a satisfying portion that is easy to handle, making them especially great for small children and toddlers.
Gathering Your Simple Ingredients
The beauty of this meal lies in its absolute simplicity. You do not need any fancy culinary equipment or hard to find gourmet items. Here is a breakdown of the core components you will need to get started.
The Base and the Sauce
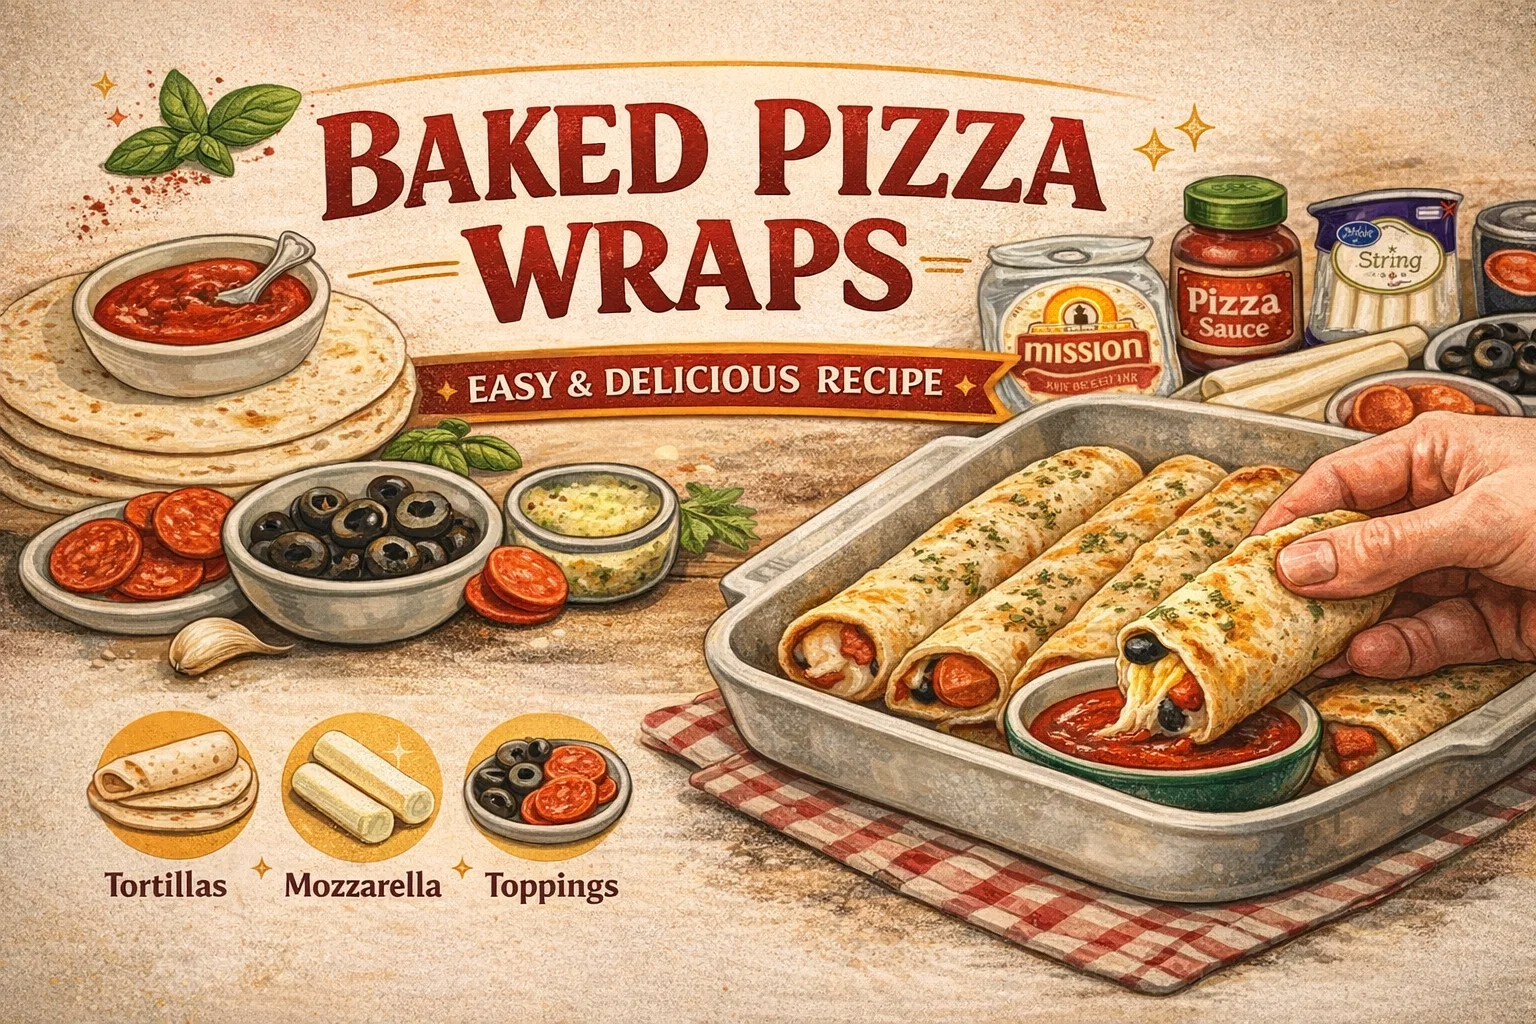
Fajita Size Tortillas: You want to look for soft flour tortillas that are specifically labeled as fajita size. They are the ideal middle ground, large enough to hold a generous amount of fillings but small enough to bake up crispy without getting overly doughy. Corn tortillas tend to crack and break when rolled tightly, so stick to flour for the best structural integrity.
Your Favorite Pizza Sauce: A high quality sauce is the heartbeat of this dish. You can use a store bought jar for maximum convenience or whip up a quick homemade version using crushed tomatoes, garlic powder, dried oregano, and a pinch of salt. A tablespoon or two per serving is plenty to provide that signature tangy tomato flavor without making the interior soggy.
The Cheesy Core and Fillings
Mozzarella Cheese Sticks: This is the secret ingredient that makes the entire process incredibly fast and mess free. Instead of shredding blocks of cheese, simply unwrap a standard string cheese stick and place it right in the center. As it bakes, it melts into a perfectly gooey, stretchy core that holds everything together perfectly.
Classic Toppings: Pepperoni slices and black olives are a timeless combination that provides a wonderful salty, savory bite. However, the sky is the limit here. You can incorporate anything from cooked sausage crumbles and diced bell peppers to sliced mushrooms and sweet onions. Just ensure any vegetables are chopped relatively small so the tortilla can close easily.
The Garlic Butter Glaze
Melted Butter and Seasonings: What elevates this from a simple lunchtime wrap to a decadent, crave worthy dinner is the golden crust. By melting a few tablespoons of butter and mixing in a blend of garlic powder and Italian herb seasoning, you create a rich glaze. Brushing or pouring this over the top before baking ensures a beautifully crisp, flavorful exterior that perfectly mimics a fresh garlic bread crust.
Step by Step Assembly and Baking
Making these is so easy that you can easily enlist the kids to help build their own creations. Here is the foolproof method for achieving golden, crispy perfection every single time.
Step 1: Prep Your Canvas
Begin by laying out your flour tortillas on a clean, flat surface. Take your chosen pizza sauce and spread about one to two tablespoons evenly across the center of each circle. Be careful to leave a small border around the edges untouched. If you spread the sauce all the way to the rim, it will squish out during the rolling process and make a mess in your baking dish.
Step 2: Add the Fillings and Roll
Place one unwrapped mozzarella string cheese stick directly in the middle of the sauced area. Now, layer on your favorite toppings alongside the cheese. If you are using pepperoni, you can lay the slices flat or fold them in half. Once your fillings are set, it is time to wrap.
Carefully lift one side of the tortilla, bring it tightly over the cheese and toppings, and continue rolling until you have a neat, enclosed cylinder. Lightly grease a standard baking dish with non stick cooking spray or a drizzle of olive oil. Transfer each completed roll into the dish, making sure to place them seam side down. Placing them seam side down uses the weight of the wrap to keep it closed while it bakes, preventing it from unrolling and spilling its contents everywhere.
Step 3: Apply the Flavorful Glaze
In a small microwave safe bowl, melt a couple of tablespoons of butter. Stir in your garlic and herb seasoning until well combined. Using a pastry brush or simply a small spoon, generously coat the top of each roll up in the dish. This buttery coating is crucial for achieving that irresistible crunch and deep, savory aroma.
Step 4: Bake to Perfection
Preheat your oven to 375 degrees Fahrenheit. Once the oven is hot, slide the baking dish onto the middle rack. Let them bake undisturbed for about twenty minutes. You are looking for a beautiful golden brown color on top, and you should hear the cheese sizzling gently inside. Once done, remove the dish carefully and let them cool for a few minutes before serving. The melted cheese will be extremely hot, so a brief resting period is highly recommended to avoid burning your mouth.
Pro Tips for the Ultimate Crispy Experience
While this recipe is incredibly forgiving, a few expert tweaks can elevate your meal from good to absolutely spectacular.
- Do Not Overstuff: It is incredibly tempting to load up on extra meats and veggies, but overfilling is the enemy of a tight roll. Too many ingredients will cause the tortilla to tear or unroll during baking. Keep the additions modest.
- Pre Cook Watery Vegetables: If you love mushrooms, spinach, or zucchini, be sure to cook them briefly in a skillet to remove excess moisture before adding them to your wrap. Raw, watery vegetables will release steam as they bake, leading to a soggy bottom.
- Add a Cheese Crust: For an extra layer of decadence, sprinkle a handful of grated parmesan or extra mozzarella directly over the top of the butter glaze during the last five minutes of baking. It creates an incredible crispy, cheesy crown.
Fun and Delicious Flavor Variations
Once you master the basic technique, you can use this blueprint to travel the globe from your kitchen. Here are some fantastic flavor profiles to try next time.
The Meat Lovers Dream
Skip the olives and load up the interior with cooked, crumbled Italian sausage, crispy bacon bits, and chopped ham along with the pepperoni. Swap the simple garlic butter for a spicy garlic chili glaze for a wonderful, lingering kick.
The Hawaiian Holiday
If you firmly believe fruit belongs on savory pies, this one is for you. Use Canadian bacon or diced ham, paired with fresh pineapple chunks. A little bit of finely diced red onion adds a great sharp contrast to the sweet roasted pineapple.
The Barbecue Chicken Twist
Ditch the traditional red sauce entirely and spread a sweet and smoky BBQ sauce on the tortilla instead. Add shredded cooked chicken breast, thin slices of red onion, and swap the mozzarella stick for a cheddar or Monterey Jack cheese stick. Top with fresh cilantro right after baking.
The Veggie Supreme
For a fantastic meatless option, load up on finely diced bell peppers, black olives, sweet corn, and caramelized onions. Add a pinch of red pepper flakes to the interior for a subtle, warming heat.
What to Serve on the Side
While these are perfectly satisfying on their own, pairing them with the right side dishes can turn them into a complete, well rounded feast.
Since the main dish is rich, cheesy, and bread heavy, a crisp, refreshing salad is the perfect counterpoint. A classic Caesar salad with crunchy croutons and a tangy dressing works beautifully. Alternatively, a simple mixed greens salad tossed with an Italian vinaigrette, cherry tomatoes, and cucumber slices provides a bright acidity that cuts through the richness of the melted cheese.
You also cannot go wrong with extra dipping sauces. Serve the rolls with a small bowl of warm marinara sauce, creamy ranch dressing, or even a spicy garlic aioli for dipping. If you want to add more vegetables to the meal, consider roasting some broccoli florets or asparagus spears on a separate baking sheet while the main dish cooks.
Storage and Reheating Advice
If you happen to have leftovers, they are incredibly easy to store and enjoy later. Allow any remaining wraps to cool completely to room temperature. Place them in an airtight container and store them in the refrigerator for up to four days.
When you are ready to eat them again, avoid the microwave if possible. Microwaving will turn the once crispy tortilla soft and chewy. For the best reheating results, place them in an air fryer at 350 degrees Fahrenheit for about four to five minutes until warmed through and re crisped. You can also pop them back into a conventional oven or toaster oven for ten minutes.
Conclusion
Finding joy in weeknight cooking does not mean you have to spend hours hovering over a hot stove or perfectly proofing homemade dough. These easy baked pizza wraps prove that you can achieve comforting, mouthwatering flavors with minimal effort and maximum creativity. By utilizing simple pantry staples and a clever rolling technique, you can serve up a meal that feels special but fits perfectly into the most hectic of schedules. The next time you are staring blankly into the refrigerator wondering what to make, grab some tortillas, unwrap some cheese, and let the magic happen. Your family, and your stress levels, will thank you.