Easy DIY Cocoa Butter Body Butter Recipe for Glowing Skin – Whipped Shea Coconut Oil Recipe
Have you ever stepped out of the shower, caught a glimpse of your skin in the mirror, and felt like it deserved a bit more than just a quick pump of watery, store bought lotion? We have all been there. Most commercial moisturizers are packed with fillers and synthetic fragrances that sit on the surface of the skin without actually nourishing the deeper layers. If you are looking for a way to transform your skincare routine into a luxurious, spa like experience right at home, then making your own whipped body butter is the ultimate game changer. This Cocoa Butter Body Butter recipe is the gold standard of DIY skincare, combining the decadent scent of chocolate with the intense healing properties of natural plant fats.
The Magic of Raw Cocoa and Shea Butter
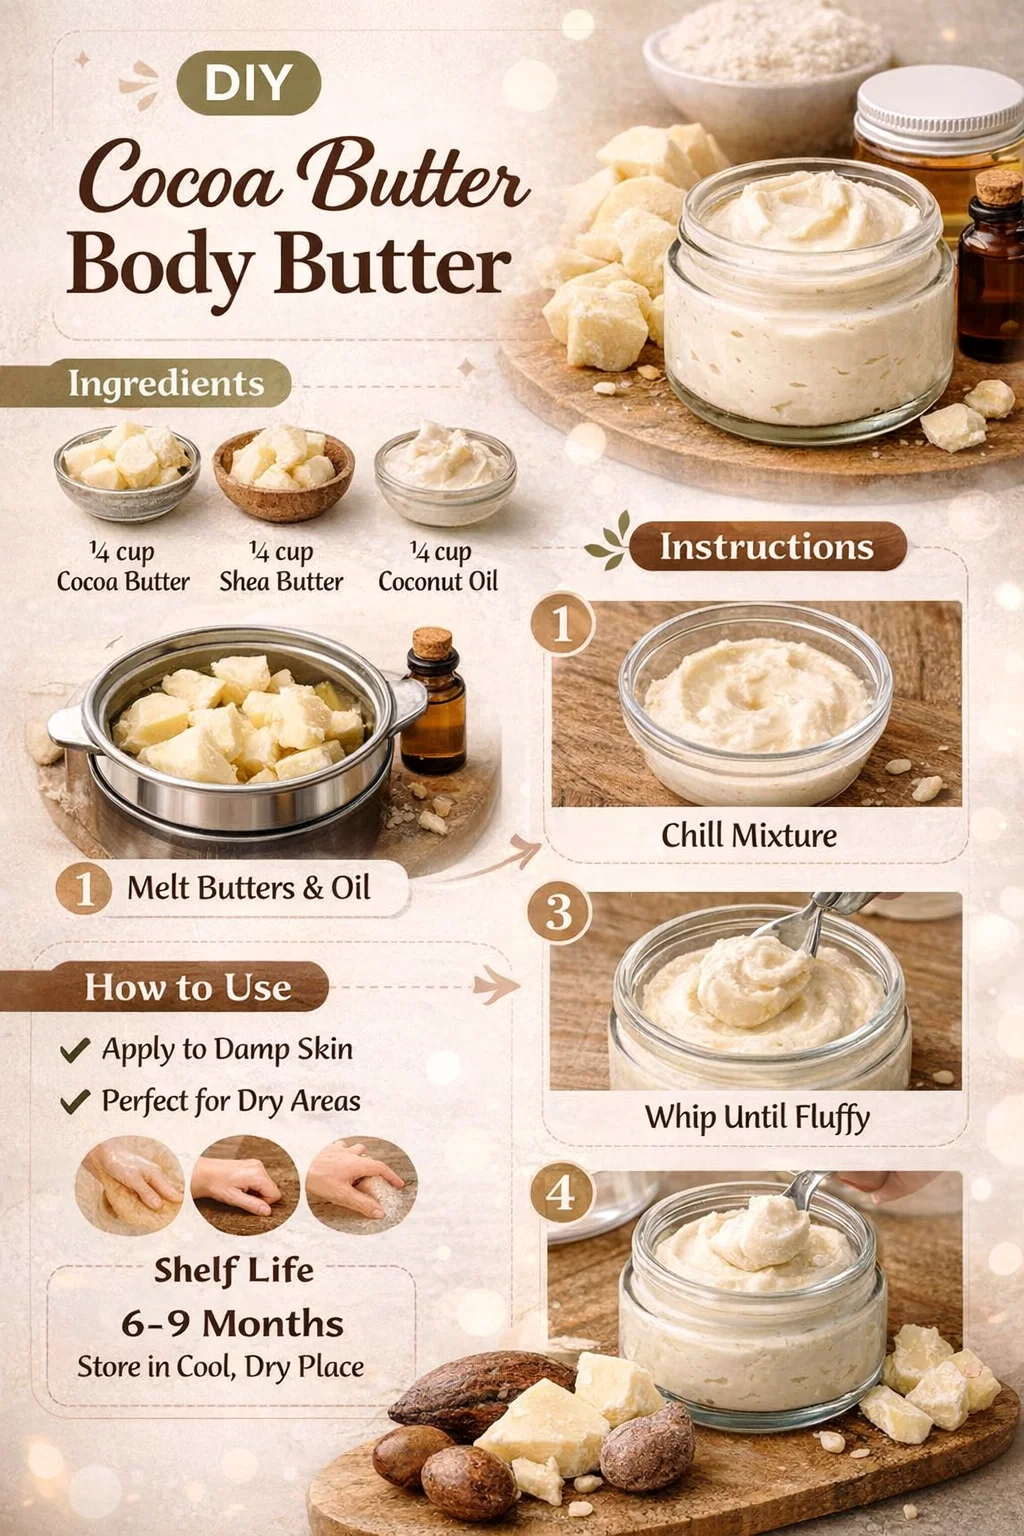
The foundation of any high quality body butter lies in its ingredients. When you look at the recipe in the guide, you will notice a balanced blend of Cocoa Butter and Shea Butter. These two are the powerhouses of the natural beauty world. Cocoa butter, derived from the cacao bean, is rich in fatty acids and antioxidants. It creates a protective barrier over the skin to hold in moisture, while its natural polyphenols can help improve skin elasticity. Plus, who can resist that incredible, natural chocolate aroma?
Shea butter, on the other hand, is the ultimate healer. Sourced from the nuts of the shea tree, it is loaded with vitamins A, E, and F. It is famously non comedogenic, meaning it won’t clog your pores, but it provides a level of softness that most lotions simply cannot match. When you combine these two butters with the silky glide of coconut oil, you create a product that is both deeply penetrating and incredibly soothing for irritated or dry skin.
Why DIY Skincare is Better for You
One of the biggest advantages of following a guide like this is the complete control you have over what goes onto your body. Your skin is your largest organ, and it absorbs much of what you apply to it. By making your own cocoa butter body butter, you are eliminating parabens, phthalates, and artificial preservatives. You know exactly what is in the jar. This is especially important for those with sensitive skin or conditions like eczema and psoriasis, where hidden chemicals in commercial products can often trigger flare ups.
Step by Step Guide to Perfect Whipped Body Butter
Creating this luxurious cream is a meditative and rewarding process. It feels less like a chore and more like a kitchen alchemy experiment. Let us break down the steps shown in the visual guide to ensure you get that perfect, cloud like consistency every single time.
1. The Melting Phase
The first step involves using a double boiler. This is crucial because high, direct heat can actually damage the beneficial properties of the oils. By gently melting the cocoa butter, shea butter, and coconut oil together over simmering water, you ensure a smooth, uniform liquid base. Patience is key here. You want everything to be completely transparent before moving on.
2. The Cooling and Infusing Phase
Once your oils are melted, you need to let the mixture cool down for about 20 to 30 minutes. This is the perfect time to add your Vitamin E oil. Vitamin E is not just great for your skin; it also acts as a natural antioxidant that helps extend the shelf life of your homemade butter. If you want a specific scent, this is also when you would add your essential oils. Lavender is great for relaxation, while citrus oils can provide an energizing morning boost.
3. The Chilling Phase
This is where many beginners make a mistake. You cannot whip a liquid. You must place your bowl in the refrigerator or a cool spot until the mixture becomes semi solid. You are looking for a consistency that is firm but still yields when you press your finger into it. If it gets too hard, just let it sit at room temperature for a few minutes to soften back up.
4. The Whipping Phase
Now for the fun part. Using a hand mixer or a stand mixer, begin to whip the semi solid oils. Within a few minutes, you will see the yellow translucent oils turn into a bright, white, fluffy cream. It will look exactly like whipped cream or frosting. Keep going until you achieve stiff peaks. This aeration is what makes the body butter feel lightweight on the skin instead of greasy.
Essential Ingredients and Their Benefits
- Cocoa Butter: High in antioxidants that fight off free radical damage and provides a thick, protective layer.
- Shea Butter: Deeply moisturizing and helps with skin cell regeneration.
- Coconut Oil: Provides an easy glide and has antibacterial properties to keep skin healthy.
- Vitamin E Oil: Heals scars, reduces inflammation, and preserves the freshness of the recipe.
- Essential Oils: Allow for aromatherapy benefits and a personalized fragrance profile.
The Best Ways to Use Your New Body Butter
While you can use this butter any time of day, there are specific ways to apply it that will maximize the benefits for your skin. The most effective method is to apply the butter to damp skin right after you step out of the shower. When your skin is slightly wet, the oils in the body butter trap that water against your skin, leading to much higher levels of hydration.
Focus on the notoriously dry areas. Your elbows, knees, and heels often have thicker skin that needs more intensive care. Many people find that applying a generous layer to their feet and then putting on cotton socks before bed results in incredibly soft skin by the morning. Because this recipe is so rich, a little bit goes a long way. Start with a small amount and massage it in until it is fully absorbed.
Storage and Shelf Life Tips
Since this recipe does not contain water, it has a much longer shelf life than a typical homemade lotion. Bacteria thrive in water, so a waterless oil based butter is naturally more stable. Generally, your body butter will stay fresh for 6 to 9 months. However, to keep it in peak condition, you should store it in a glass jar in a cool, dry place. If your bathroom gets very steamy, consider keeping the jar in a bedroom cabinet instead. If the butter melts in high summer heat, don’t worry. Just pop it back in the fridge and re whip it to restore its fluffy texture.
Customizing Your Recipe for Different Needs
Once you have mastered the basic recipe, you can start to experiment. If you find the mixture a bit too heavy for summer, you can swap out a portion of the coconut oil for a lighter carrier oil like jojoba or sweet almond oil. If you want a more “glowy” look, you can even stir in a tiny bit of ethically sourced mica powder to give your skin a subtle shimmer when the sun hits it.
For those dealing with specific skin issues, the choice of essential oils can make a huge difference. Tea tree oil can help with minor body acne, while frankincense is renowned for its anti aging and scar fading properties. The possibilities are endless when you are the one in charge of the formulation.
Gift Giving and Sustainability
This DIY Cocoa Butter Body Butter also makes for a thoughtful and impressive gift. In an age where everyone is trying to reduce their plastic waste, presenting a friend with a beautiful glass jar of handmade, organic skincare is a wonderful gesture. You can tie a bit of twine around the lid and add a custom label for a professional, chic look. It is a sustainable choice that reduces the need for single use plastic bottles and supports a more conscious lifestyle.
Conclusion
Making your own skincare is a powerful act of self care. It is a way to slow down, connect with natural ingredients, and treat your body with the respect it deserves. This Cocoa Butter Body Butter is more than just a moisturizer; it is a luxurious treat that provides lasting results. By following these simple steps, you can move away from chemical laden products and embrace a more natural, glowing version of yourself. So, grab your double boiler, put on your favorite playlist, and start whipping up a batch of this skin loving goodness today. Your skin will definitely thank you for it!