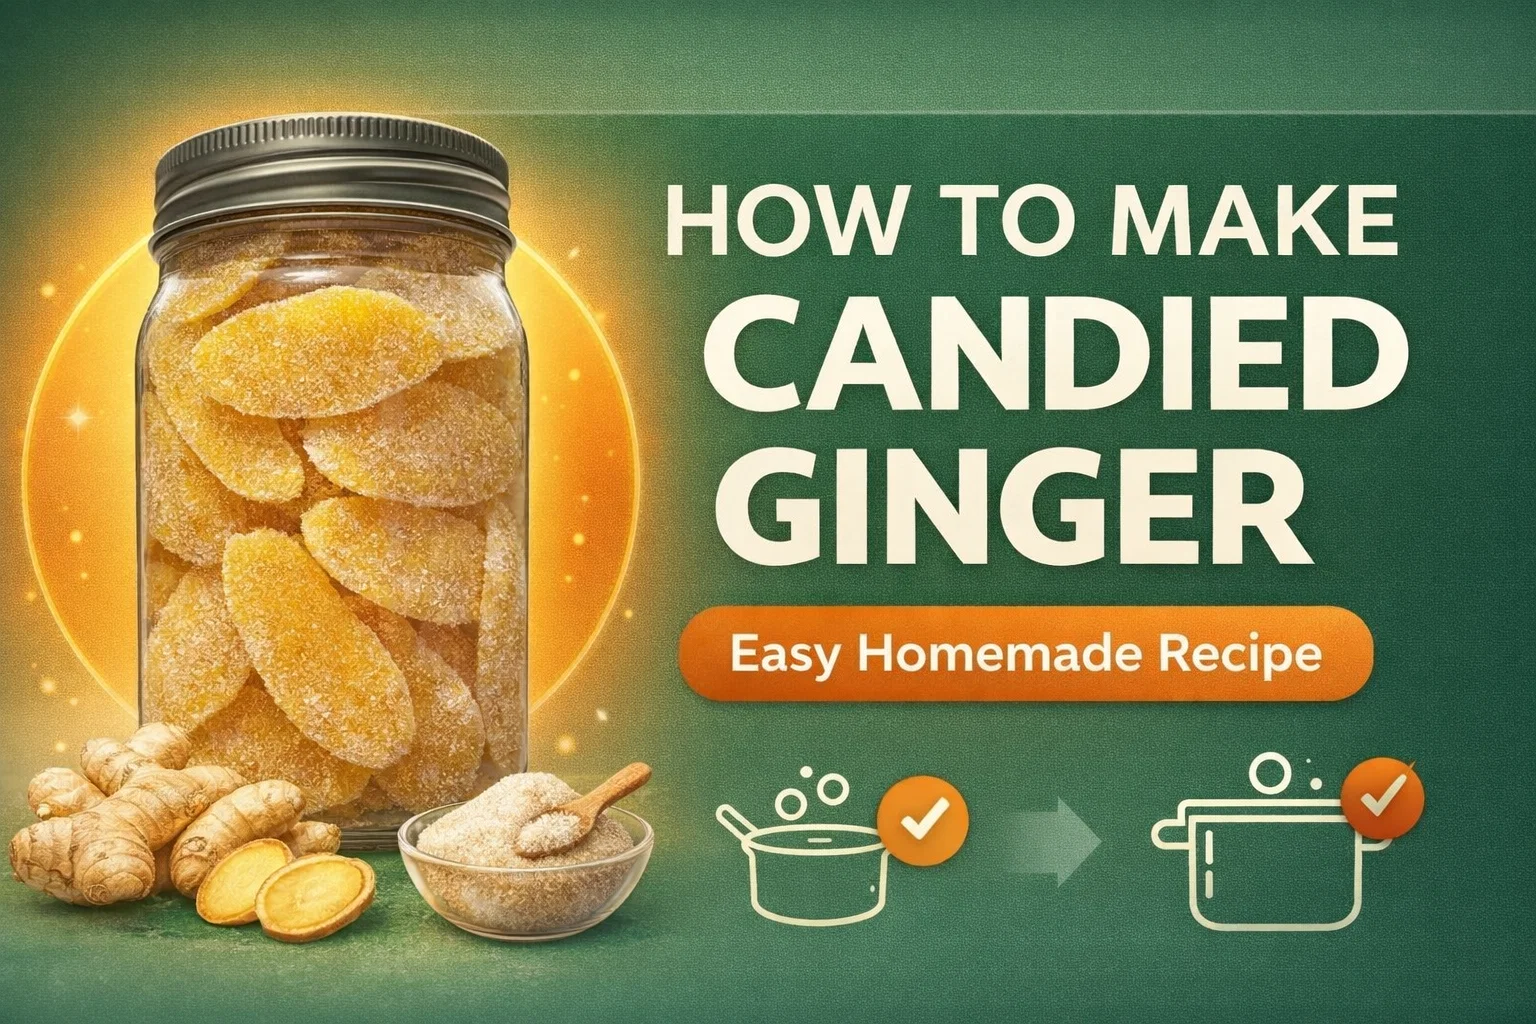
Easy Homemade Candied Ginger Recipe Crystalized Ginger for Baking Snacks
There is something undeniably magical about the transformation of a rugged, gnarled root into a shimmering, translucent jewel. Candied ginger, also known as crystallized ginger, is one of those rare treats that manages to be both a sophisticated confection and a potent natural remedy. If you have ever stared at a hand of fresh ginger in the produce aisle and wondered how it becomes those sweet, spicy cubes found in high end specialty shops, you are in for a treat. Making your own candied ginger at home is not only cost effective, it also allows you to control the spice level and harvest a bonus batch of potent ginger syrup in the process.
In this guide, we are diving deep into the art of making the perfect batch of candied ginger. From choosing the right roots to mastering the sugar coating process, we will cover everything you need to know to fill your pantry with this golden treasure. Whether you want to soothe a sensitive stomach, spice up your holiday baking, or simply enjoy a snack with a serious kick, this recipe is your new best friend.
The Incredible Benefits of Fresh Ginger
Before we get into the sugar and the heat, it is worth talking about why ginger is such a powerhouse ingredient. Gingerol, the natural oil found in the root, is responsible for that signature pungent aroma and sharp flavor. It is also the source of the many health benefits associated with ginger. For centuries, people have turned to ginger to help with various ailments, making it a staple in both culinary and medicinal traditions around the world.
Digestive Health and Nausea Relief
Perhaps the most well known benefit of ginger is its ability to calm the digestive system. It is a classic remedy for motion sickness, morning pregnancy nausea, and general indigestion. Having a jar of homemade candied ginger on hand means you have a natural, tasty way to settle your stomach at a moment’s notice. Because it is portable, it is the perfect travel companion for long car rides or flights.
Anti-Inflammatory and Antioxidant Properties
Ginger is packed with antioxidants, which help your body fight off oxidative stress. It also contains anti inflammatory compounds that can help reduce muscle soreness after a workout or provide relief for those dealing with joint discomfort. While the sugar in candied ginger makes it a treat, the core medicinal properties of the ginger root remain intact, giving you a little boost of wellness with every bite.
Gathering Your Simple Ingredients
One of the best things about this recipe is how short the ingredient list is. You do not need any fancy additives or preservatives. All you need are three basic components that you likely already have or can easily find at your local market.
- Fresh Ginger Root: Look for hands of ginger that are firm to the touch with smooth, tight skin. Avoid any roots that feel soft, wrinkled, or show signs of mold. The younger the ginger, the less fibrous it will be, resulting in a more tender candy.
- Granulated Sugar: This serves two purposes. It creates the simple syrup that cooks the ginger and provides the final sparkling coating. You will want extra sugar on hand for that final toss.
- Water: Clean, filtered water is best. You will use this to boil the ginger to soften it and then use a portion of that ginger infused water to create your syrup.
Step by Step Process to Perfect Candied Ginger
Making candied ginger is a process of patience rather than complex technique. It is about slowly drawing out the harshness of the raw root and replacing it with sweetness while maintaining that iconic heat. Follow these steps for professional results every time.
Preparing and Peeling the Root
Start by washing your ginger thoroughly. Since ginger grows in the ground, it often has dirt hidden in its many nooks and crannies. To peel the ginger, skip the vegetable peeler. Instead, use the edge of a metal spoon to gently scrape away the thin skin. This method allows you to navigate the bumps and curves of the root without wasting any of the precious flesh inside. Once peeled, slice the ginger into uniform pieces. You can do rounds, matchsticks, or cubes, just ensure they are about an eighth of an inch thick so they cook evenly.
The Initial Boil
Raw ginger is incredibly potent and can be quite fibrous. To soften the texture and mellow the flavor, place your sliced ginger in a pot and cover it with water. Bring it to a boil and let it simmer for about 20 to 30 minutes. You want the ginger to be tender but not falling apart. Test a piece with a fork; it should slide in easily. This step is crucial for ensuring your final product is pleasant to chew rather than woody.
Cooking in the Sugar Syrup
After the initial boil, drain the ginger but do not throw away that water. Measure out two cups of that ginger infused water and return it to the pot along with two cups of granulated sugar and your softened ginger slices. Bring this mixture to a simmer. As it cooks, the water will evaporate and the sugar will concentrate, creating a thick syrup that the ginger absorbs. This process usually takes about 45 minutes to an hour. You will know it is ready when the ginger looks translucent and the syrup has reached a drop like consistency.
The Final Touch: Drying and Coating
Once your ginger has finished simmering in the syrup, it is time for the final transformation. This is what gives the candy its beautiful, crystalline appearance and prevents the pieces from sticking together in a clump.
Draining the Slices
Set a wire cooling rack over a sheet of parchment paper. Carefully strain the ginger slices, allowing the excess syrup to drip off. Pro tip: save that leftover syrup! It is a concentrated ginger simple syrup that is incredible in ginger ale, hot tea, or drizzled over vanilla ice cream. Let the ginger slices sit on the rack for about 10 to 15 minutes until they are tacky to the touch but no longer dripping wet.
The Sugar Toss
Place a bowl of granulated sugar nearby. Work in small batches, tossing the tacky ginger slices in the sugar until they are completely coated. The sugar will stick to the surface, creating a sparkling, crunchy exterior that contrasts perfectly with the chewy, spicy interior. Spread the coated slices back out on the wire rack or a clean piece of parchment paper to dry completely. This can take anywhere from two hours to overnight, depending on the humidity in your kitchen.
Ways to Use Your Homemade Candied Ginger
While these are delicious eaten straight out of the jar, they are also an incredibly versatile ingredient to have in your culinary arsenal. Here are a few ways to put your hard work to use.
Baking and Desserts
Finely chop your candied ginger and fold it into cookie dough, especially gingerbread or molasses cookies. It adds a surprising pop of texture and flavor. You can also add it to scones, muffins, or fruit cakes. If you are feeling fancy, dip half of a candied ginger slice into dark chocolate for an elegant after dinner treat.
Savory Applications
It might sound unusual, but candied ginger can add a wonderful depth to savory dishes. Try mincing a small amount and adding it to a glaze for roasted carrots or salmon. It works beautifully in Asian inspired salads or as a garnish for a spicy pumpkin soup. The sweetness helps balance out salty or acidic flavors in a way that is truly unique.
Beverage Garnish
Upgrade your home bar by using candied ginger as a garnish. A single slice on the rim of a Moscow Mule or a Dark and Stormy adds a professional touch. You can also drop a piece into a hot cup of lemon tea; as the sugar dissolves, it sweetens the tea while the ginger continues to steep, providing a slow release of warmth.
Proper Storage for Longevity
Because of the high sugar content, candied ginger has a very long shelf life. To keep it at its best, store the finished, dried slices in an airtight glass jar. Keep the jar in a cool, dark place like a pantry or cupboard. When stored properly, it can stay fresh for up to several months. If you live in a very humid climate and notice the sugar coating starting to melt or get sticky, you can store the jar in the refrigerator to keep the candy firm and dry.
Conclusion
Mastering the art of candied ginger is a rewarding journey that fills your kitchen with the warm, spicy scent of one of nature’s best ingredients. It turns a simple, humble root into a versatile delicacy that serves as a snack, a medicine, and a gourmet baking ingredient all at once. By making it yourself, you ensure that every bite is free from artificial colors or preservatives, leaving you with nothing but pure, crystalline flavor. So, grab a fresh hand of ginger, put on a pot of water, and start creating your own golden jars of sunshine. Once you have tasted the homemade version, you will never want to go back to the store bought bags again. Save this recipe for your next rainy afternoon and enjoy the sweet, spicy rewards!