Easy Sewing Hack for Perfect Pleats on Skirts and Sleeves
Stepping up to your sewing machine with a vision in mind is one of the most rewarding parts of being a creator. You have the fabric, the thread, and the passion, but sometimes the technical hurdles can feel like a roadblock. One of the most common challenges for both beginners and intermediate sewists is achieving that elusive, high-end look with gathered fabric and pleats. If you have ever spent hours pinning, measuring, and re-pinning only to find your pleats are still uneven, you are not alone. The image we are looking at today captures a brilliant, real-world solution to this exact problem, showing a clever hack that turns a tedious chore into a seamless part of your workflow.
The Art of the Perfect Pleat: Why Precision Matters
In the world of garment construction, details are everything. A pleat is not just a fold of fabric; it is a structural element that adds volume, movement, and a professional silhouette to skirts, sleeves, and bodices. When pleats are uniform, the garment looks expensive and well-made. When they are lopsided, the entire balance of the piece can feel off. Traditionally, achieving this level of perfection required a clear plastic ruler, a handful of tailor’s chalk, and dozens of silk pins. However, modern sewing is all about efficiency without sacrificing quality.
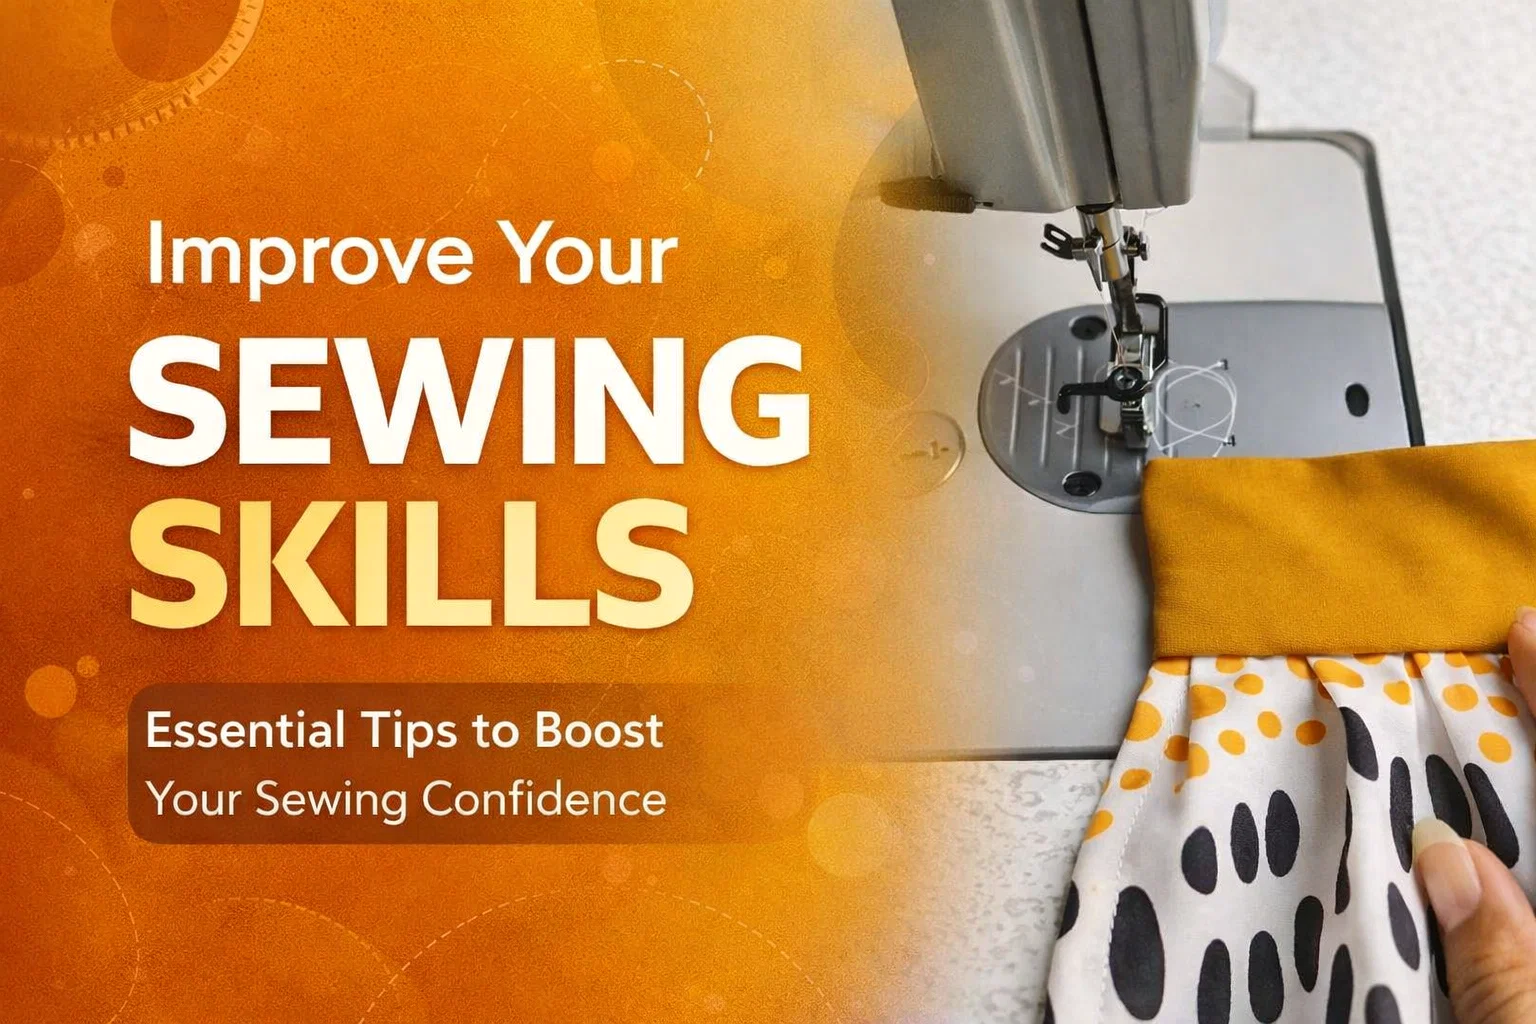
The technique shown in the visual focuses on using the tools already at your disposal to create consistent folds. By utilizing the presser foot and the needle plate as visual guides, you can create a rhythm that ensures every single pleat is the exact same width as the one before it. This “on-the-fly” method is what separates a homemade project from a professional handmade wardrobe.
Essential Tools for Mastering Professional Sewing Hacks
To replicate the success seen in the image, you do not necessarily need expensive industrial equipment. Most of the magic happens with standard tools that you likely already have in your sewing kit. However, understanding how to use them effectively is the real secret. Here are the core components you should have ready at your workstation:
- A Reliable Sewing Machine: Whether it is a heavy-duty industrial model or a versatile domestic machine, ensure it is cleaned and oiled for smooth fabric feeding.
- The Right Presser Foot: A standard zigzag foot or a specialized pleating foot can work wonders. In the image, we see a standard setup being used with great precision.
- High-Quality Thread: Use a thread that matches the weight of your fabric to prevent puckering.
- Fabric Markers: While the hack reduces the need for constant measuring, a few “anchor” marks can help you stay on track for very long seams.
- A Seam Ripper: Even pros make mistakes. Keep this handy so you can experiment with fold widths until you find the perfect look.
Step-by-Step Guide to the “No-Pin” Pleating Technique
Ready to try this for yourself? The goal is to create a series of small, uniform folds as you feed the fabric under the needle. This is particularly effective for mustard-toned linens or printed cottons like the ones shown, as these fabrics hold a crisp crease well.
Step 1: Prepare Your Fabric Edges
Before you start folding, ensure your fabric edges are finished. If you are attaching a skirt to a waistband, as seen in the photo, your main fabric should be cut to the necessary width to allow for the “intake” of the pleats. A good rule of thumb is to have at least two to three times the width of the final waistband.
Step 2: Establish Your Rhythm
Start by sewing a few straight stitches to anchor the fabric. Then, using your fingers, lift a small section of the patterned fabric and tuck it under itself toward the needle. Use the edge of the presser foot as your guide. If the fold touches the edge of the foot, every fold will be identical.
Step 3: Managing the Bulk
As you fold, you will notice the fabric getting thicker. This is where a sharp needle becomes vital. Gently guide the fabric through, ensuring the feed dogs are doing the work. Avoid pulling the fabric, as this can lead to broken needles or skipped stitches. Watch the transition between the solid yellow fabric and the patterned print to ensure the seam remains straight and true.
Top Tips for Working with Different Fabric Weights
Not all fabrics behave the same way when pleated. The technique you use for a lightweight silk will differ significantly from a heavy upholstery fabric or a crisp cotton. Understanding fabric drape is key to selecting the right pleating style for your project.
Lightweight and Sheer Fabrics
For fabrics like chiffon or organza, pleats can be slippery. In these cases, you might want to use a bit of spray starch to give the fabric more “body” before you start sewing. This helps the folds stay in place as you guide them under the presser foot. Smaller, more frequent pleats often look better on these delicate materials.
Medium to Heavyweight Fabrics
Cottons, linens, and light wools are the “goldilocks” of pleating. They take a crease beautifully and are thick enough to handle without being cumbersome. The image shows a perfect example of a medium-weight cotton. For heavier fabrics like denim, you may need to increase your stitch length to accommodate the multiple layers of fabric being sewn at once.
Common Mistakes to Avoid When Sewing Pleats
Even with a great hack, there are a few pitfalls that can trip up even the most experienced sewists. Being aware of these will save you time and frustration in the long run.
One common error is “creeping” seam allowances. As you create the folds, it is easy for the edge of the fabric to slowly drift away from the seam guide. Always keep your eye on the seam allowance markings on your needle plate rather than looking directly at the needle. This ensures your line of stitching stays perfectly straight.
Another mistake is inconsistent fold depth. If one pleat uses one inch of fabric and the next uses an inch and a quarter, your final garment will not fit the waistband correctly. This is why using a physical guide, like the side of the presser foot or even a piece of masking tape stuck to the machine, is so helpful for maintaining consistency.
Enhancing Your Designs with Decorative Pleating
Once you master the basic technique, you can start getting creative. You do not have to stick to simple knife pleats. You can experiment with box pleats, where the folds point away from each other, or inverted pleats, where the folds meet in the center. These add a different architectural feel to your clothing.
You can also play with color blocking. Notice in the image how the solid yellow waistband contrasts beautifully with the black and white spotted fabric. This creates a visual break that draws the eye to the craftsmanship of the pleats. Choosing a contrasting thread color can also turn your functional stitches into a decorative feature.
Why DIY Sewing is More Popular Than Ever
In an age of fast fashion, there is something deeply satisfying about creating a garment that fits perfectly and reflects your personal style. Sewing hacks like the one featured today make the process accessible and fun. They remove the intimidation factor and allow creators to focus on the joy of making. When you learn how to handle fabric with confidence, you are not just making a skirt; you are building a skill set that allows you to express your identity through your wardrobe.
Furthermore, handmade clothes tend to last longer. Because you are in control of the thread quality, the seam reinforcement, and the finishing touches, your pieces can withstand years of wear. It is a sustainable way to approach fashion that rewards patience and precision.
Conclusion: Your Path to Professional Results
Mastering the art of pleating is a milestone in any sewing journey. It transforms a flat piece of cloth into a three-dimensional work of art. By embracing simple yet effective hacks, you can bypass the frustration of traditional methods and move straight to the rewarding part: seeing your vision come to life. The image of the yellow and patterned fabric under the needle is a reminder that with a little bit of technique and the right mindset, professional-grade sewing is within your reach.
Next time you sit down at your machine, try this no-pin method. Experiment with the spacing, find your rhythm, and watch as your projects take on a new level of sophistication. Remember, every expert was once a beginner who decided to try a new trick. Happy sewing!