Easy Sleek Bun Tutorial Two Ponytails Hack for the Perfect Slicked Back Updo
We have all been there, standing in front of the mirror with a handful of hair ties, a comb, and a bottle of gel, trying to achieve that elusive, perfectly sleek bun. It looks so simple on social media, yet the reality often involves lumps, stray hairs, and a ponytail that just won’t sit at the right height. But what if the secret to that high-fashion, snatched look wasn’t about pulling harder, but about working smarter? The two ponytails, one bun method is the viral hair hack that has completely changed the game for anyone craving a polished, professional-grade updo at home. This technique isn’t just a trend; it is a structural solution for hair of all thicknesses, ensuring your style stays secure from your morning coffee until your head hits the pillow at night.
The Evolution of the Sleek Bun Trend
The sleek bun has transitioned from a practical “off-duty” model look to a centerpiece of modern aesthetics. Often associated with the clean girl aesthetic, this hairstyle emphasizes healthy-looking skin, groomed brows, and hair that looks intentionally styled rather than tossed up. The beauty of this look lies in its versatility. It works just as well with an oversized blazer for a business meeting as it does with a simple white tee for a casual day of errands. However, as the popularity of the look grew, so did the frustration of those trying to replicate it. The traditional method of gathering all the hair at once often leads to sagging at the nape of the neck or tension headaches from trying to keep everything tight. That is exactly why the split-section technique has become the gold standard for enthusiasts and professionals alike.
Why the Two Ponytail Method Works
You might wonder why adding an extra step actually makes the process easier. The answer lies in physics and hair density. When you try to pull all your hair into a single elastic, the hair in the center of the bundle has nothing to grip onto, causing the “drop” we often see at the back. By dividing your hair into two distinct sections, you create two separate anchor points. This allows you to control the tension of the hair near your face separately from the volume at the back. The result is a more secure base that provides a natural lifting effect to the eyes and cheekbones, often referred to as the snatched look. It also makes the bun itself appear fuller and more intentional, rather than a small knot at the back of the head.
Mastering the Sectioning Technique
The first step to a flawless finish is the horizontal part. Instead of parting your hair down the middle, you will want to create a part that runs from the top of one ear, over the crown, to the top of the other ear. This separates the front “styling” section from the back “anchor” section. By securing the back section first, you establish the height and position of your bun. Then, when you bring the front section back to meet it, you can focus entirely on smoothing out the sides and top without worrying about the weight of the rest of your hair pulling the style down.
Essential Tools for the Perfect Slicked Back Look
While the technique is the star of the show, having the right kit will make the process much smoother. You don’t need a professional salon setup, but a few key items will elevate your results from basic to breathtaking.
- A Boar Bristle Brush: This is the secret weapon for a bump-free finish. The dense bristles help distribute natural oils and hair products evenly, smoothing down every single strand.
- Strong Hold Hair Gel or Pomade: Look for a formula that offers a high shine without the crunch. Water-based pomades are excellent for a sleek look that still feels touchable.
- Fine-Toothed Tail Comb: Essential for creating that crisp center part or smoothing out small flyaways near the hairline.
- Seamless Hair Ties: Using elastics without metal connectors prevents breakage and ensures a tighter, more comfortable hold.
- Clear Hair Wax Stick: Perfect for those stubborn baby hairs that refuse to stay down around the temples and ears.
Preparing Your Hair for Styling
Interestingly, this style often works best on second-day or third-day hair. The natural oils provide a bit of “grip” that freshly washed hair lacks. If you are starting with clean hair, don’t worry. You can add texture and hold by using a light mist of dry shampoo or a texturizing spray before you begin. If you want that ultra-shiny, wet-look finish, starting with slightly damp hair can help the gel distribute more effectively, though you should be careful not to pull too tightly on wet strands as they are more prone to stretching and breaking.
Step-by-Step Guide to the Two Ponytails, One Bun Hack
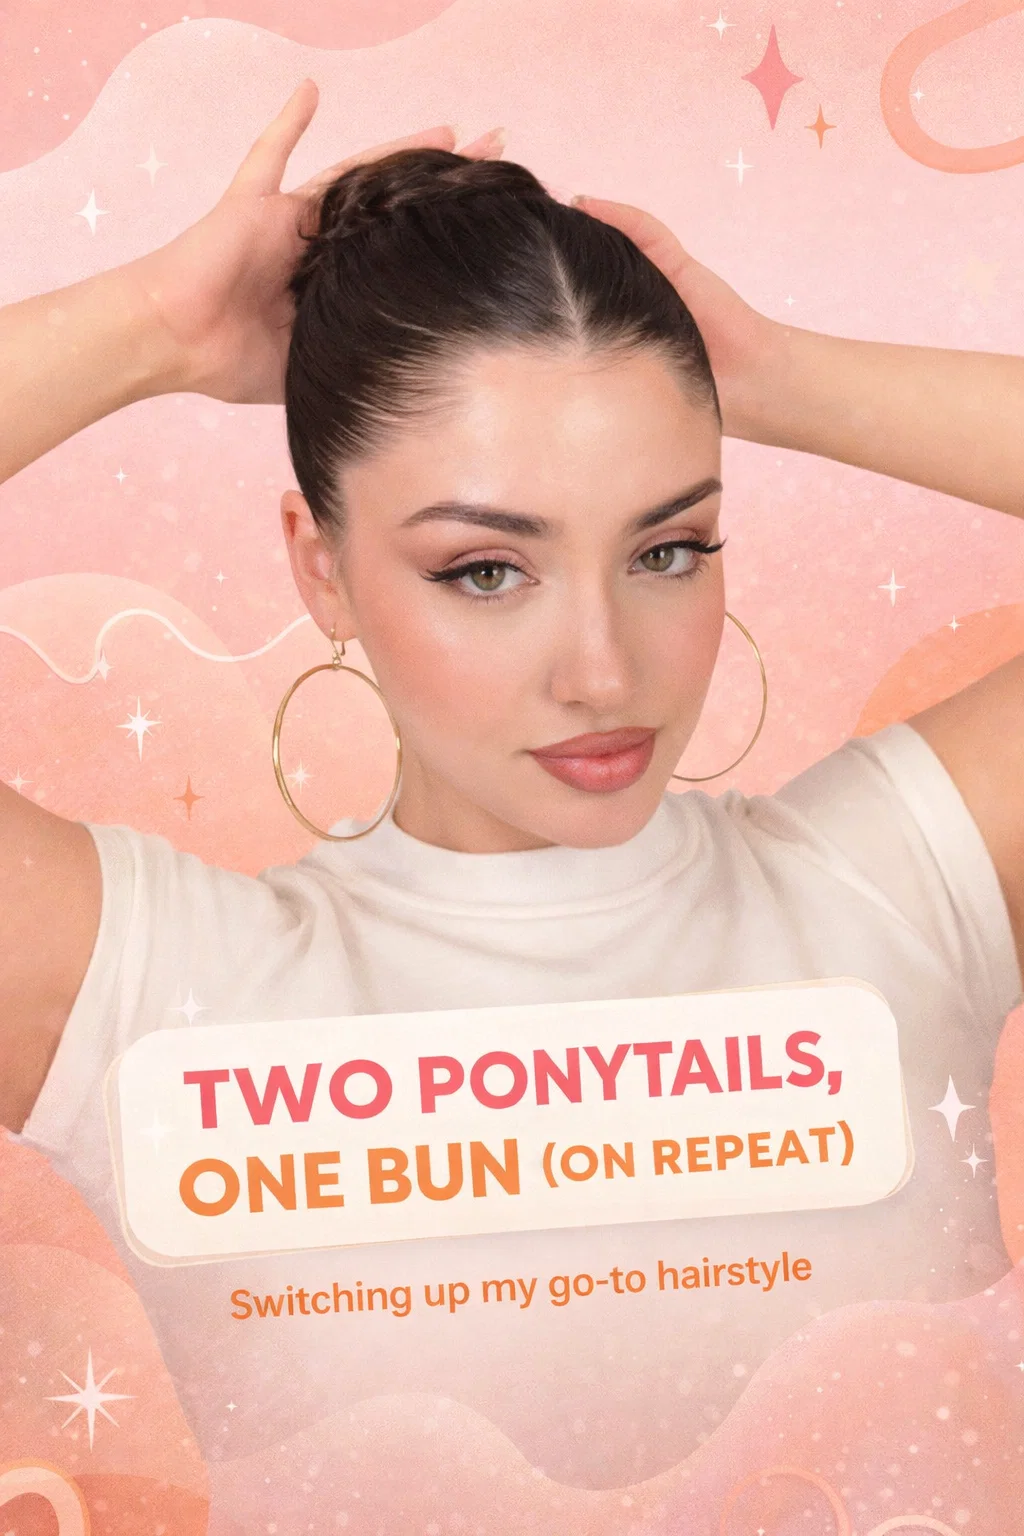
Ready to try it yourself? Follow these steps to achieve the look shown in the image with ease and precision.
Step 1: The Base Anchor
Start by sectioning off the front half of your hair. Use your tail comb to part from ear to ear and clip that front section out of the way for a moment. Take the remaining hair at the back and brush it up to your desired bun height. Secure this into a tight, neat ponytail. This ponytail acts as your foundation; it carries the weight and determines the final silhouette.
Step 2: Smoothing the Front
Unclip the front section. You can choose to keep a sharp middle part for a symmetrical look or brush it all straight back for a more athletic vibe. Apply a small amount of styling cream or gel to the roots of this section. Using your boar bristle brush, sweep the hair back toward your existing ponytail. The goal here is to get the hair as flat to the scalp as possible. Once it is perfectly smooth, wrap a second elastic around both the new hair and the existing ponytail, joining them together.
Step 3: Creating the Perfect Bun
Now that you have one thick, secure ponytail, it is time to form the bun. Twist the ponytail firmly until it begins to coil around itself at the base. As you wrap the hair, tuck the ends underneath the coil. You can secure the bun with a third hair tie for maximum security, or use several large bobby pins for a more seamless, elegant appearance. If you want a more “spiky” or “model off-duty” look, leave the very ends of your hair poking out slightly rather than tucking them all the way in.
The Aesthetic Benefits: More Than Just a Hairstyle
Why has this specific look become such a staple in the beauty community? Beyond its practicality, it serves as a powerful framing tool for the face. When the hair is pulled back tightly and positioned high on the crown, it creates an upward visual pull. This emphasizes the bone structure, making the jawline appear more defined and the eyes more lifted. It is a fantastic choice for showing off statement jewelry, such as the large gold hoops featured in the image, as there is no hair to distract from the accessories. It also allows your makeup to take center stage, whether you prefer a minimalist look or a dramatic winged eyeliner.
Accessorizing Your Sleek Bun
While the bun is a statement on its own, you can easily dress it up or down. For a more formal event, try wrapping a silk ribbon around the base of the bun or adding a decorative pearl pin. For a casual day, a chunky scrunchie can add a pop of color and a 90s nostalgia feel. The sleekness of the hair provides a clean canvas that makes any accessory look intentional and high-end.
Common Mistakes and How to Fix Them
Even with a great hack, things can sometimes go sideways. If you find you have “bubbles” or loose spots at the back of your head, it usually means the first ponytail wasn’t tight enough. Don’t be afraid to take it down and start over; the foundation is the most important part. If you struggle with a “crunchy” feeling once the hair dries, you might be using too much product. Try mixing a little bit of hair oil with your gel in your palms before applying it. This keeps the hair looking shiny and wet without becoming stiff or flaky. Finally, if the style feels too tight and causes discomfort, try loosening the very last wrap of the hair tie. Your style should look snatched, but it shouldn’t be painful.
Maintaining Hair Health While Styling
Because this style involves pulling the hair back firmly, it is important to be mindful of tension. Avoid wearing this style every single day to prevent traction alopecia or thinning around the hairline. When you take the style down at the end of the day, give your scalp a gentle massage to encourage blood flow and use a nourishing hair oil on your ends. Always use a high-quality detangler when brushing out the gel to avoid snapping strands.
Who Should Try This Hairstyle?
The beauty of the two ponytails, one bun method is that it is incredibly inclusive. It works beautifully for those with thick hair who usually find that one elastic just snaps under the pressure. It also works for those with fine hair, as the sectioning creates an illusion of more volume at the base of the bun. Even if you have shorter layers that usually fall out of a ponytail, the two-step process allows you to pin those shorter pieces into the first ponytail before the second section covers them up. It truly is a universal solution for anyone looking to master the art of the updo.
Conclusion: Elevate Your Daily Routine
Mastering the sleek bun doesn’t require a professional stylist or hours in front of the mirror. By adopting the two ponytails, one bun hack, you are giving yourself the gift of a reliable, high-impact hairstyle that works for almost any occasion. It is about confidence, precision, and a little bit of clever sectioning. The next time you want to feel polished and put-together, remember that a few extra minutes spent on the foundation will yield a result that lasts all day. Whether you are rocking it with oversized hoops or a sleek power suit, this hairstyle is a testament to the fact that sometimes, the best beauty secrets are the ones that simplify our lives while making us look our absolute best. So grab your brush, find your favorite gel, and get ready to turn heads with the most secure and stylish bun you have ever worn. Save this technique for your next busy morning and see the difference for yourself.
Would you like me to generate a different style of blog post or focus on a specific hair care routine next?