Essential Makeup Brush Guide Types, Uses Names for Beginners
Stepping into the world of makeup can feel like entering a vibrant, colorful maze. Between the endless rows of palettes, foundations, and lipsticks, there is one category that often leaves beginners feeling a bit stumped: brushes. You might have a gorgeous eyeshadow set, but if you are trying to apply a smoky eye with a flat foundation brush, you are going to have a hard time achieving that seamless, professional finish. Understanding your tools is the secret bridge between a makeup look that feels “painted on” and one that looks effortlessly blended.
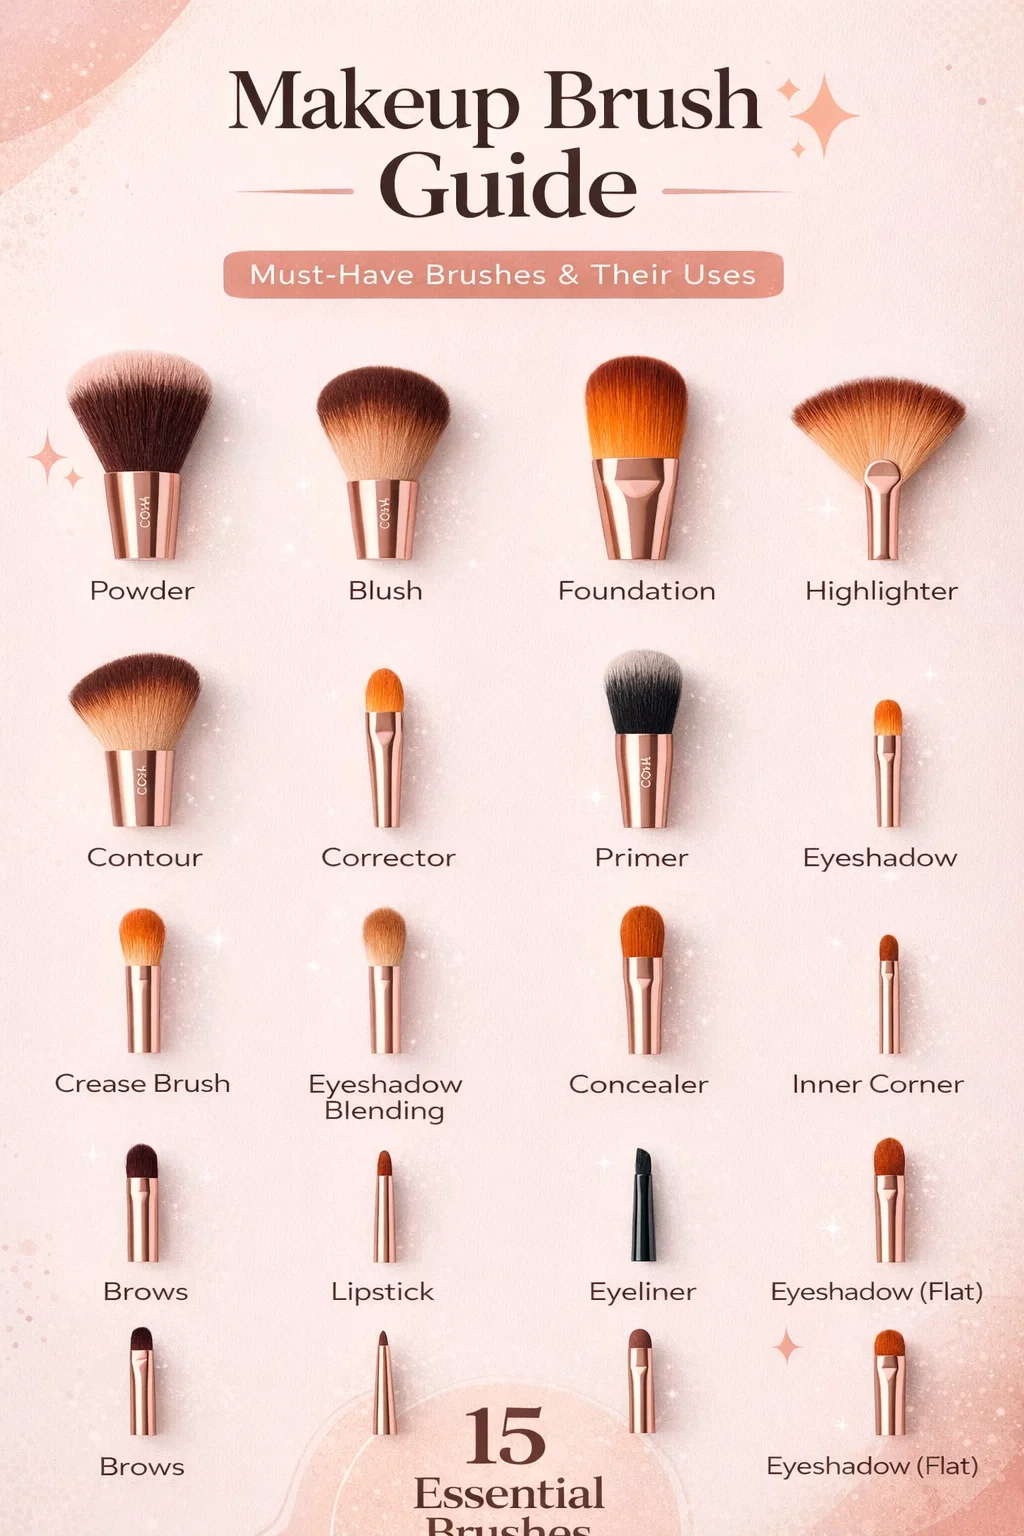
The image provided is a goldmine for anyone looking to de-mystify their vanity. It breaks down the architecture of a complete brush set, showing that every bristle shape and handle size has a dedicated purpose. When you use the right tool for the right task, you not only save time but also use less product, as the bristles are designed to pick up and distribute powders and creams exactly where they need to go. Let us dive deep into this ultimate makeup brush guide to help you master your routine from start to finish.
The Foundation of a Great Look: Face Brushes
Before you get to the artistic details of eyes and lips, you need a solid canvas. Face brushes are typically the largest tools in your kit because they need to cover more surface area quickly and evenly. In the guide, we see several distinct shapes that handle everything from liquid primers to setting powders.
Powder and Blush Brushes
The powder brush is often the fluffiest tool in the collection. Its purpose is to distribute loose or pressed powder across the face to set foundation and reduce shine. Because the bristles are long and dispersed, they apply a light dusting rather than a heavy layer. Right next to it, the blush brush is slightly smaller and more rounded. This allows for precision on the apples of the cheeks while still providing enough fluff to blend the pigment back toward the hairline so you do not end up with harsh streaks.
Foundation and Primer Tools
Applying base products with your fingers can sometimes lead to uneven patches or a shorter wear time due to the oils on your skin. A foundation brush, which often features a flat or slightly tapered top, helps buff product into the skin for a high coverage finish. The primer brush is a specialized tool that ensures your base layer is spread thinly and evenly, filling in pores and smoothing texture before the color even touches your face.
Sculpting and Defining with Precision
Once your base is set, it is time to add dimension. This is where contouring, highlighting, and concealing come into play. These brushes are designed to be more targeted, fitting into the natural hollows and high points of your bone structure.
The Art of the Contour
The contour brush in the guide features an angled edge. This specific shape is intentional; it fits perfectly under the cheekbones and along the jawline. By using an angled brush, you can apply a darker shade in a sharp line and then immediately use the longer bristles to blend it upward, creating a natural shadow effect that makes your features pop.
Highlighter and Fan Brushes
Highlighter brushes are often light and airy. The fan brush, which looks exactly like its name suggests, is a fan favorite for applying shimmering powders to the tops of the cheekbones. Because it has very few bristles touching the skin at once, it prevents you from applying too much “glow” at once, allowing for a buildable, ethereal finish rather than a metallic stripe.
Correcting and Concealing
When it comes to hiding a blemish or brightening under the eyes, size matters. The corrector and concealer brushes are small and usually made of synthetic fibers. Synthetic bristles are ideal for cream products because they do not soak up the moisture, ensuring all the product ends up on your skin. These brushes allow you to pat product onto a specific spot without disturbing the foundation underneath.
Eyeshadow Mastery: From Base to Blend
The eyes are where most people feel the most intimidated, but the guide shows that eye makeup is really just a sequence of using different sized brushes. If you have ever wondered why your eyeshadow looks “muddy,” it is likely because you are using one brush for every step. Breaking it down makes the process much simpler.
The All Over Eyeshadow Brush
This is your workhorse. It is a medium sized, slightly flat brush used to pack color onto the eyelid. It is designed to pick up a good amount of pigment and “press” it onto the skin. If you want your main lid color to look vibrant, this is the tool you reach for first.
The Magic of the Crease and Blending Brushes
If you only buy two eye brushes, make them these. The crease brush is tapered to fit into the fold of your eyelid, allowing you to add depth with darker shades. The eyeshadow blending brush is the most important tool for a polished look. It is fluffy and round, used with no product at all to buff out the edges of your shadow until they fade into the skin. This is the “eraser” of the makeup world; if you make a mistake or a line looks too harsh, the blending brush fixes it.
Detailing: Inner Corners and Flats
For the finishing touches, you need the inner corner brush. This tiny, pointed tool is perfect for adding a pop of shimmer to the tear duct or highlighting the brow bone. We also see flat eyeshadow brushes in the guide, which are excellent for smudging shadow along the lower lash line or applying “cut crease” styles where you need a very sharp, defined edge of color.
Defining the Features: Brows, Liner, and Lips
The final steps of a makeup routine involve the fine lines. These require the smallest, most rigid brushes in the set to ensure total control over the product.
Brows and Eyeliner
The brow brushes usually come in two forms: a spoolie for brushing the hairs into place and a sharp, angled brush for filling in gaps with powder or pomade. A good brow brush needs to be thin enough to mimic the look of natural hair strokes. Similarly, the eyeliner brush is incredibly fine. Whether it is a tiny pointed tip or a sharp angle, it is designed to hug the lash line for a clean, sophisticated wing.
Lipstick Application
While many apply lipstick straight from the tube, a lipstick brush offers a level of symmetry that is hard to achieve otherwise. It allows you to outline the perimeter of the lips with precision and fill in the center without overstepping your natural lip line. It is also the best way to mix two different lipstick shades together to create a custom color.
How to Care for Your Professional Tools
Owning a beautiful set of brushes like the ones in the guide is only half the battle. To keep your skin clear and your makeup looking fresh, you must maintain them. Brushes act like sponges for bacteria, dead skin cells, and old product. If you do not wash them regularly, they can cause breakouts and lead to “patchy” makeup application.
The Cleaning Routine
For brushes used with powders, a deep clean once a week is usually sufficient. However, for brushes used with creams or liquids like foundation and concealer, you should aim to clean them every two to three days. Use a gentle brush soap or even a mild baby shampoo. Swirl the bristles in the palm of your hand or on a silicone cleaning mat, rinse with lukewarm water, and always lay them flat to dry. Never dry them standing up, as water can seep into the ferrule (the metal part) and dissolve the glue, causing the bristles to fall out.
When to Replace Your Brushes
High quality brushes can last for years if cared for properly. You will know it is time for a replacement if the bristles start shedding excessively, if the handle becomes wobbly, or if the bristles lose their original shape and become “stiff” despite being cleaned. A good set of tools is an investment in your confidence and your craft.
Conclusion: Building Your Custom Kit
You do not need thirty brushes to look like a pro. By looking at a guide like this, you can identify which steps of your routine you struggle with the most and invest in the specific tools that solve those problems. Maybe you realize you have been missing a blending brush, or perhaps you see that an angled contour brush is exactly what you need to define your face.
Makeup is an art form, and you are the artist. Just as a painter wouldn’t use a house-painting brush to create a fine portrait, you deserve tools that match the effort you put into your beauty routine. Use this guide as your roadmap, experiment with different shapes, and most importantly, have fun with the process. With the right brushes in your hand, there is no limit to the looks you can create. Start simple, practice often, and watch as your application transforms from amateur to expert!