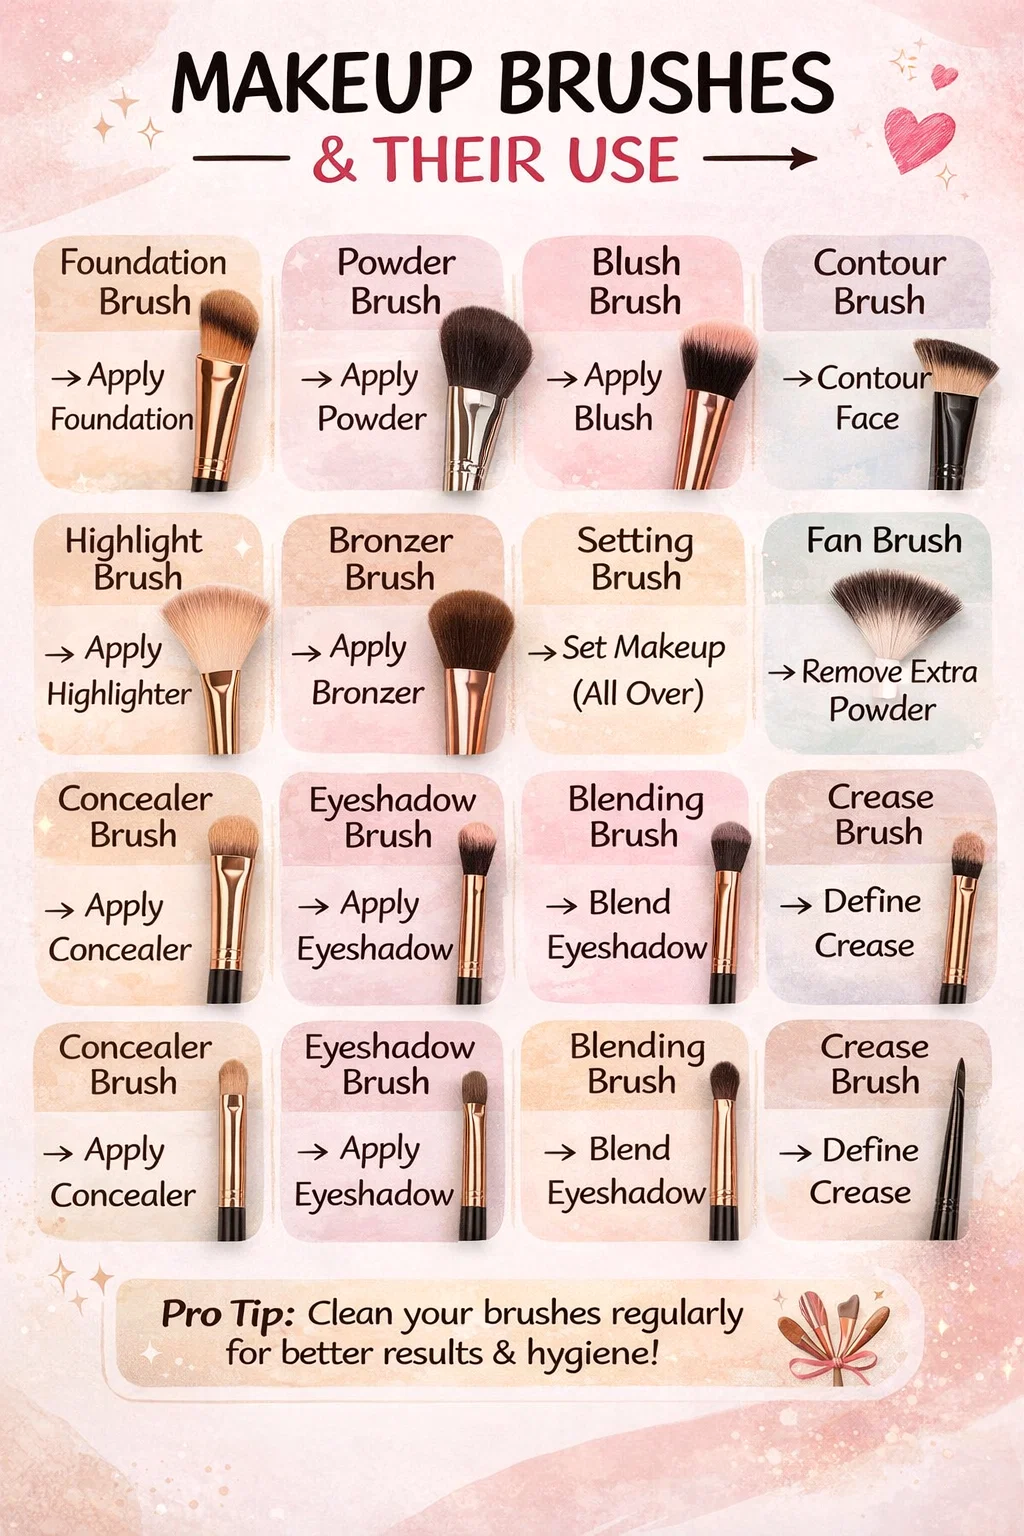
Essential Makeup Brushes and Their Uses A Complete Guide for Beginners
Walking into a beauty store or scrolling through an online makeup catalog can feel like navigating a labyrinth. You see rows of sleek handles and soft bristles in every shape imaginable, from tiny, pointed tips to large, fluffy fans. While it is tempting to use one or two reliable brushes for everything, understanding the specific purpose of each tool is the fastest way to elevate your makeup game from amateur to professional. The right brush does more than just move product around your face; it controls the placement, determines the intensity of the pigment, and ensures a seamless blend that looks like skin rather than a layer of paint.
Mastering the art of makeup is as much about the tools as it is about the products. When you use a brush designed for its specific task, you reduce the risk of patchiness, streaks, and heavy-handed application. This guide will walk you through the essential makeup brushes you need in your kit, explaining exactly what they do and how to use them to achieve a flawless, long-lasting look every single time.
The Foundation of a Flawless Base
The canvas is the most important part of any masterpiece, and in the world of makeup, that means your skin. How you apply your base products determines how the rest of your makeup will sit throughout the day. Using the correct brushes for your liquid, cream, and powder base products is non-negotiable for a polished finish.
The Foundation Brush
A foundation brush is typically dense and can come in a flat, paddle shape or a buffing style with a flat top. Its primary job is to distribute liquid or cream foundation evenly across the skin. A dense buffing brush is particularly effective for achieving high coverage without the streaks often left behind by fingers. When using this tool, start from the center of your face and work outward in circular motions to ensure the product is pressed into the skin rather than just sitting on top of it.
The Concealer Brush
Concealer brushes are essentially miniature versions of foundation brushes. They are designed to fit into the smaller nooks of the face, such as the inner corners of the eyes and around the base of the nose. Because the skin under the eyes is delicate, these brushes usually have soft bristles that allow you to pat the product into place. This prevents the concealer from settling into fine lines and provides a much more concentrated application than a sponge might offer.
The Powder Brush
Once your liquid products are in place, you need to set them to prevent sliding or creasing. A powder brush is large, fluffy, and rounded. Its loose bristles are designed to pick up just the right amount of loose or pressed powder and distribute it lightly over the skin. This prevents a “cakey” appearance while ensuring your base stays matte and locked in place for hours. For the best results, tap off the excess powder before sweeping the brush across your T-zone.
Defining Your Features with Dimension
After the base is applied, your face can sometimes look a bit flat or one-dimensional. This is where contouring, bronzing, and highlighting come into play. These techniques rely heavily on precision, making the shape of your brush incredibly important.
The Contour Brush
Contour brushes often feature an angled head or a very tapered tip. The goal of contouring is to create shadows that define your bone structure, specifically under the cheekbones, along the jawline, and at the temples. The angled shape fits perfectly into the hollows of the cheeks, allowing for a sharp, defined line that can then be blended upward for a sculpted look. It provides more control than a standard round brush, ensuring your “shadows” do not turn into muddy patches.
The Bronzer Brush
While contouring is about creating shadows, bronzing is about adding warmth. A bronzer brush is usually large and very soft, similar to a powder brush but often with a bit more density. It is used to apply sun-kissed color to the high points of the face where the sun naturally hits, like the forehead and the tops of the cheeks. Because you want the warmth to look natural, a fluffy brush is essential for diffusing the pigment so there are no harsh edges.
The Blush Brush
Blush brushes are slightly smaller than powder brushes and are often domed or angled to fit the apples of the cheeks. The key to a great blush application is a soft, diffused glow. A brush with a bit of “give” allows you to deposit color onto the cheeks and blend it back toward the hairline seamlessly. If the bristles are too stiff, you might end up with a concentrated circle of color that is difficult to fix without ruining your foundation underneath.
The Highlighter Brush
For that perfect glow, a highlighter brush is a must. Many people prefer a fan brush for this step. The thin, spread-out bristles of a fan brush allow for a very light application of shimmering powder along the tops of the cheekbones, the bridge of the nose, and the cupid’s bow. It ensures the highlight looks like a delicate sheen rather than a stripe of glitter. If you prefer a more intense glow, a small, tapered “tulip” brush can provide more concentrated placement.
Mastering the Art of Eye Makeup
The eyes are often the most complex part of a makeup routine, requiring several different brushes to achieve a professional result. From packing on color to creating a smoky transition, the size and density of your eye brushes make all the difference.
The Eyeshadow Shader Brush
This is your “workhorse” eye brush. It is flat, short, and dense, designed specifically for picking up pigment and “packing” it onto the eyelid. Instead of sweeping, you should use a patting motion with this brush to get the most color payoff from your eyeshadow. It is perfect for applying a base color or a shimmering metallic shade to the center of the lid.
The Blending Brush
If you only own one eye brush, let it be a fluffy blending brush. This tool has long, soft bristles and a rounded head. Its sole purpose is to blend out harsh lines in the crease of the eye. By using light, “windshield wiper” motions, you can transition one color into the next, creating that professional gradient look. Blending is the difference between a messy eye look and a polished one.
The Crease Brush
The crease brush is typically more tapered and slightly firmer than a standard blending brush. It is used to apply darker “transition” shades into the fold of the eye to create depth. Because it is more precise, it keeps the darker colors exactly where you want them without letting them spread too far up toward the brow bone.
The Smudger Brush
For those who love a smoky eye, the smudger brush is an essential tool. It has very short, stiff bristles that are perfect for softening eyeliner or smudging eyeshadow along the lower lash line. It allows you to move product around in a very controlled way, creating a sultry, lived-in look without making the eyes appear messy or bruised.
The Pencil Brush
As the name suggests, this brush has a tiny, pointed tip that looks like a pencil lead. It is the ultimate tool for detail work. Use it to apply a pop of highlight to the inner corners of the eyes, add a dark shadow to the “outer V” for intensity, or smoke out the lash line with extreme precision.
Finishing Touches and Special Tools
A complete look requires attention to the smaller details, like the eyebrows, lips, and lashes. These final steps pull everything together and ensure your makeup looks intentional and balanced.
The Angled Brow Brush and Spoolie
Eyebrows frame the face, and an angled brow brush is the best tool for filling them in. The sharp angle allows you to create hair-like strokes using powder or pomade. Most brow brushes come with a spoolie on the other end, which is a spiraled brush used to comb through the hairs and blend the product. This ensures your brows look natural and groomed rather than drawn on with a heavy hand.
The Eyeliner Brush
If you prefer gel or cream eyeliner, an ultra-thin eyeliner brush is required. These brushes have very few bristles and a fine point, allowing you to create a sharp wing or a thin line right against the lashes. They provide much more stability and precision than the felt-tip applicators that often come with liquid liners.
The Lip Brush
While many of us apply lipstick straight from the tube, a lip brush is a game changer for bold colors like reds or berries. It allows you to outline the lips with perfect symmetry and fill them in evenly. Using a brush also helps the product last longer as you are working the pigment into the lines of the lips rather than just coating the surface.
The Kabuki Brush
The Kabuki brush is a dense, short-handled tool that is incredibly versatile. While it is often used for applying mineral foundation, it is also perfect for “buffing” your entire face at the end of your routine. If you feel your blush or bronzer is a bit too heavy, a clean Kabuki brush can be used in circular motions to soften the edges and blend everything together for a seamless, airbrushed finish.
Maintaining Your Tools for Longevity
Investing in high-quality brushes is only half the battle; you also have to take care of them. Makeup brushes collect product buildup, oils from your skin, and dust from the air. If left uncleaned, they can become a breeding ground for bacteria, leading to skin irritation and breakouts. Furthermore, dirty brushes do not perform as well. Product buildup makes the bristles stiff, which prevents smooth blending and accurate color placement.
You should aim to deep clean your brushes at least once a week if you use them daily. Use a gentle brush cleanser or a mild baby shampoo and lukewarm water. Swirl the bristles in the palm of your hand or on a textured cleaning mat to work out the pigment. When rinsing, keep the water away from the “ferrule” (the metal part that holds the bristles to the handle), as water can dissolve the glue and cause the brush to shed. Always dry your brushes flat or hanging upside down to maintain their shape and prevent water damage.
Conclusion: Building Your Perfect Kit
You do not need fifty different brushes to look your best, but having a curated selection of the right tools will transform your routine. By understanding the specific function of each brush, from the fluffy powder brush to the precise pencil brush, you gain the ability to manipulate products exactly how you want them. This knowledge empowers you to experiment with new looks and achieve professional results from the comfort of your own vanity.
Start with the basics: a foundation brush, a powder brush, a blending brush, and an angled brow brush. As you become more comfortable, you can add specialized tools like fan brushes or smudgers to refine your technique. With a little practice and a clean set of tools, you will be amazed at how much easier and more enjoyable your makeup application becomes. Happy blending!