Full Face Highlight and Contour Mapping Guide for a Flawless Makeup Base Makeup Tips
Achieving a flawless makeup base often feels like a complex puzzle. We see stunning transformations on social media where a few swipes of cream and powder turn a flat canvas into a sculpted masterpiece. The secret to those red carpet looks is not just the quality of the products used, but the strategic placement of light and shadow. By understanding the geometry of your face, you can lift your cheekbones, slim your nose, and brighten your under-eyes with professional precision. This guide breaks down the essential map for highlighting and contouring to help you master your daily beauty routine.
The Fundamentals of Face Mapping
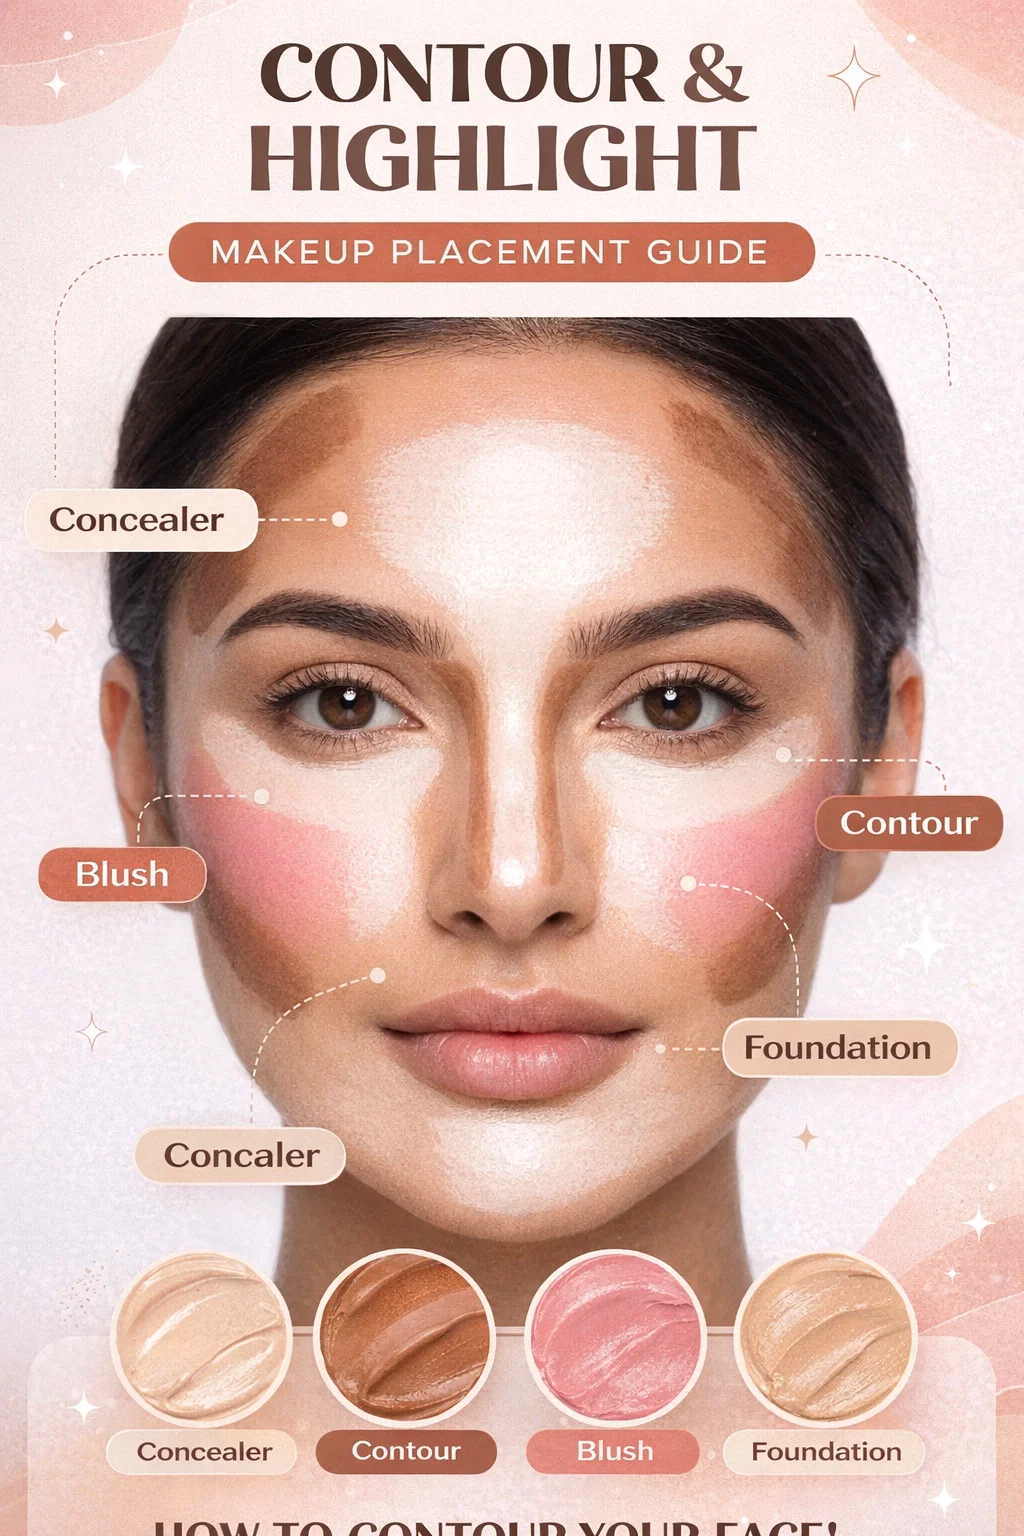
Face mapping is the process of identifying specific zones on your skin that respond best to different types of cosmetic products. Instead of applying a single layer of foundation and hoping for the best, mapping allows you to treat different areas of your face according to their structural needs. Darker shades, known as contour, are used to create depth and recede features, while lighter shades, known as highlight or concealer, bring features forward and capture the light.
When you look at a professional makeup map, you will notice that it resembles a painting in progress. There are distinct blocks of color that look intense at first but transform into a natural glow once blended. The goal is to mimic how natural light hits the high points of your bone structure while reinforcing the shadows that define your jawline and forehead. Mastering this balance is what separates a cakey application from a seamless, airbrushed finish.
Strategic Placement for Contour
Contour is arguably the most transformative step in any makeup routine. The objective is to use a matte product that is two to three shades darker than your natural skin tone to mimic the appearance of a shadow. Unlike bronzer, which is meant to add warmth and a sun-kissed glow, contour is cool-toned and structural.
Sculpting the Forehead and Hairline
Applying contour along the upper perimeter of your forehead helps to frame the face. If you have a larger forehead, bringing the contour slightly further down toward the temples can create the illusion of a smaller, more balanced facial proportion. By blending this product into the hairline, you ensure there are no harsh lines, making the shadow look like a natural part of your anatomy.
Defining the Cheekbones
The most popular area for contouring is directly beneath the cheekbones. To find your ideal placement, feel for the hollow space just below your zygomatic bone. Starting from the ear and moving toward the center of the face, apply your contour product in a diagonal line. Be careful not to bring the product too close to the mouth, as this can make the face look droopy rather than lifted. The key is to blend upward to maintain that sought-after lifting effect.
Nose Contouring for Precision
For many, nose contouring is the most intimidating step. However, it is quite simple once you visualize two parallel lines running down the bridge of the nose. By placing contour on the sides of the nose and connecting them at the tip, you can make the nose appear slimmer or straighter. Precision is vital here, so using a smaller brush or a fine-tip cream wand is highly recommended.
The Power of Brightening with Concealer
While contour adds the drama, concealer and highlight provide the life and energy to the look. Using a concealer that is one or two shades lighter than your foundation allows you to draw attention to the center of the face, creating a youthful and wide-awake appearance.
The Center of the Forehead
Applying a generous amount of concealer in an upside-down triangle or a circular patch in the center of the forehead acts as a focal point. This draws the eye inward and upward, complementing the contour placed around the edges. It creates a sense of dimension that makes the face look three-dimensional rather than flat.
The Under-Eye Triangle
Gone are the days of simply dotting a little concealer on dark circles. For a truly professional look, apply your brightening product in a large inverted triangle shape under the eyes. This area should extend from the inner corner of the eye down toward the nostril and back up toward the temple. This technique not only hides fatigue but also acts as a “highlight” for the upper cheekbones, working in tandem with your blush.
Highlighting the Bridge of the Nose and Chin
To finish the central highlight, run a thin line of concealer down the center of the nose bridge and place a small amount on the center of the chin. Highlighting the chin helps to balance out a heavy forehead highlight, while the nose highlight provides the necessary contrast to the side contour lines you created earlier.
Adding Life with Blush
Blush is the bridge between your highlight and your contour. It adds a flush of color that mimics a healthy circulation, preventing the sculpted look from appearing too skeletal or clinical. The placement of blush has shifted in recent years from the “apples of the cheeks” to a more lifted approach.
- The Lifted Method: Apply blush slightly above the contour line on the cheekbones, blending it back toward the temples. This creates a cohesive transition between the dark contour and the bright under-eye area.
- The Seamless Blend: Ensure that your blush overlaps slightly with both the contour and the highlight. This “sandwiching” technique is what creates that blurred, filtered look where one color ends and another begins without a visible seam.
Choosing the Right Tools and Textures
The success of your face map depends heavily on the tools you use. If you are using cream products, a damp beauty sponge is often the best choice for stippling the product into the skin without moving it around too much. For powder products, soft angled brushes allow for a more diffused and airy application.
Consider your skin type when choosing your formula. Cream products are excellent for dry or mature skin as they provide a dewy finish and blend easily into the base foundation. Powder products are generally better for oily skin types as they stay in place longer and help to mattify the face. Many professionals choose to use both, applying creams first to map out the face and then “setting” those areas with matching powders for maximum longevity.
The Importance of Blending
If there is one rule to live by in makeup, it is that blending is everything. You can have the most perfect map in the world, but if the lines remain visible, the effect is lost. The secret is to blend in a specific order. Start with your lightest colors first, such as the concealer on your forehead and under your eyes. This ensures your sponge or brush stays clean for the brightening areas.
Next, move to the blush, and finally, blend the contour. When blending the contour, always move the brush in upward or circular motions. Dragging the product downward will pull your features down and negate the lifting effect you worked so hard to achieve. Take your time and check your reflection in different lighting to ensure there are no harsh streaks on the jawline or neck.
Adapting the Map to Your Face Shape
While the general map works for most people, small adjustments can make a big difference based on your specific face shape. For a round face, you might want to focus more on the jawline and the angles of the cheekbones to create more “edges.” For a long or rectangular face, placing contour across the bottom of the chin and the very top of the hairline can help to visually shorten the face for a more oval appearance.
Experimentation is part of the process. Do not be afraid to move your blush a half-inch higher or make your nose contour lines a bit closer together. Everyone’s bone structure is unique, and your makeup should be a celebration of your specific features rather than a one-size-fits-all mask.
A Step by Step Workflow for Success
To keep things organized during your morning routine, follow this simple workflow to ensure your mapping stays crisp and clean.
Step 1: Prep and Foundation
Start with a hydrated base and apply a thin, even layer of foundation. This acts as your canvas. You do not need heavy coverage here because the mapping process will add more pigment to the skin later.
Step 2: Map the Shadows
Use your contour stick or cream to mark the forehead, cheekbones, and nose. Do not blend yet. Seeing the lines on your face helps you ensure that everything is symmetrical before you commit to the placement.
Step 3: Add the Light
Apply your brightening concealer to the forehead, under-eyes, nose bridge, and chin. At this point, you will look a bit like a warrior in face paint, which is exactly where you want to be.
Step 4: The Final Flush
Add your dots of blush to the tops of the cheekbones. Now that all your “colors” are on the face, you can see how they interact with one another before the final blend.
Common Mistakes to Avoid
Even seasoned makeup enthusiasts can fall into a few traps. One of the most common issues is using a contour shade that is too warm or orange. Remember, contour is supposed to look like a shadow, and shadows are naturally cool-toned. Save the warm, golden tones for your bronzer.
Another mistake is over-applying product. It is much easier to add more color than it is to remove it once it has been blended. Start with small amounts and build the intensity gradually. Finally, always remember to blend into the neck. A perfectly contoured face with a pale, un-contoured neck is a dead giveaway that you are wearing a heavy mask of makeup.
Conclusion: Embrace the Transformation
Mastering the art of highlight, contour, and blush mapping is a game changer for anyone’s beauty routine. It empowers you to take control of your appearance and highlight the features you love most while subtly minimizing the ones you don’t. While it may look intimidating at first, it is a skill that improves with every application. By following the structural lines of your face and focusing on seamless blending, you can achieve a professional, polished look from the comfort of your own vanity. So, grab your brushes, find your light, and start sculpting your way to a more confident version of yourself.