Hand Embroidery Stitches Tutorial for Beginners Woven Wheel Rose Stem Stitch Guide
There is something undeniably rhythmic and soothing about the pull of a needle through taut fabric. In a world that moves at lightning speed, hand embroidery offers a necessary pause, allowing us to create something tactile, beautiful, and permanent. If you have been looking at a blank hoop and wondering where to start, you are looking at the perfect roadmap. This guide breaks down the essential floral and decorative stitches that transform a simple piece of linen into a garden of texture.
The Foundations of Decorative Embroidery
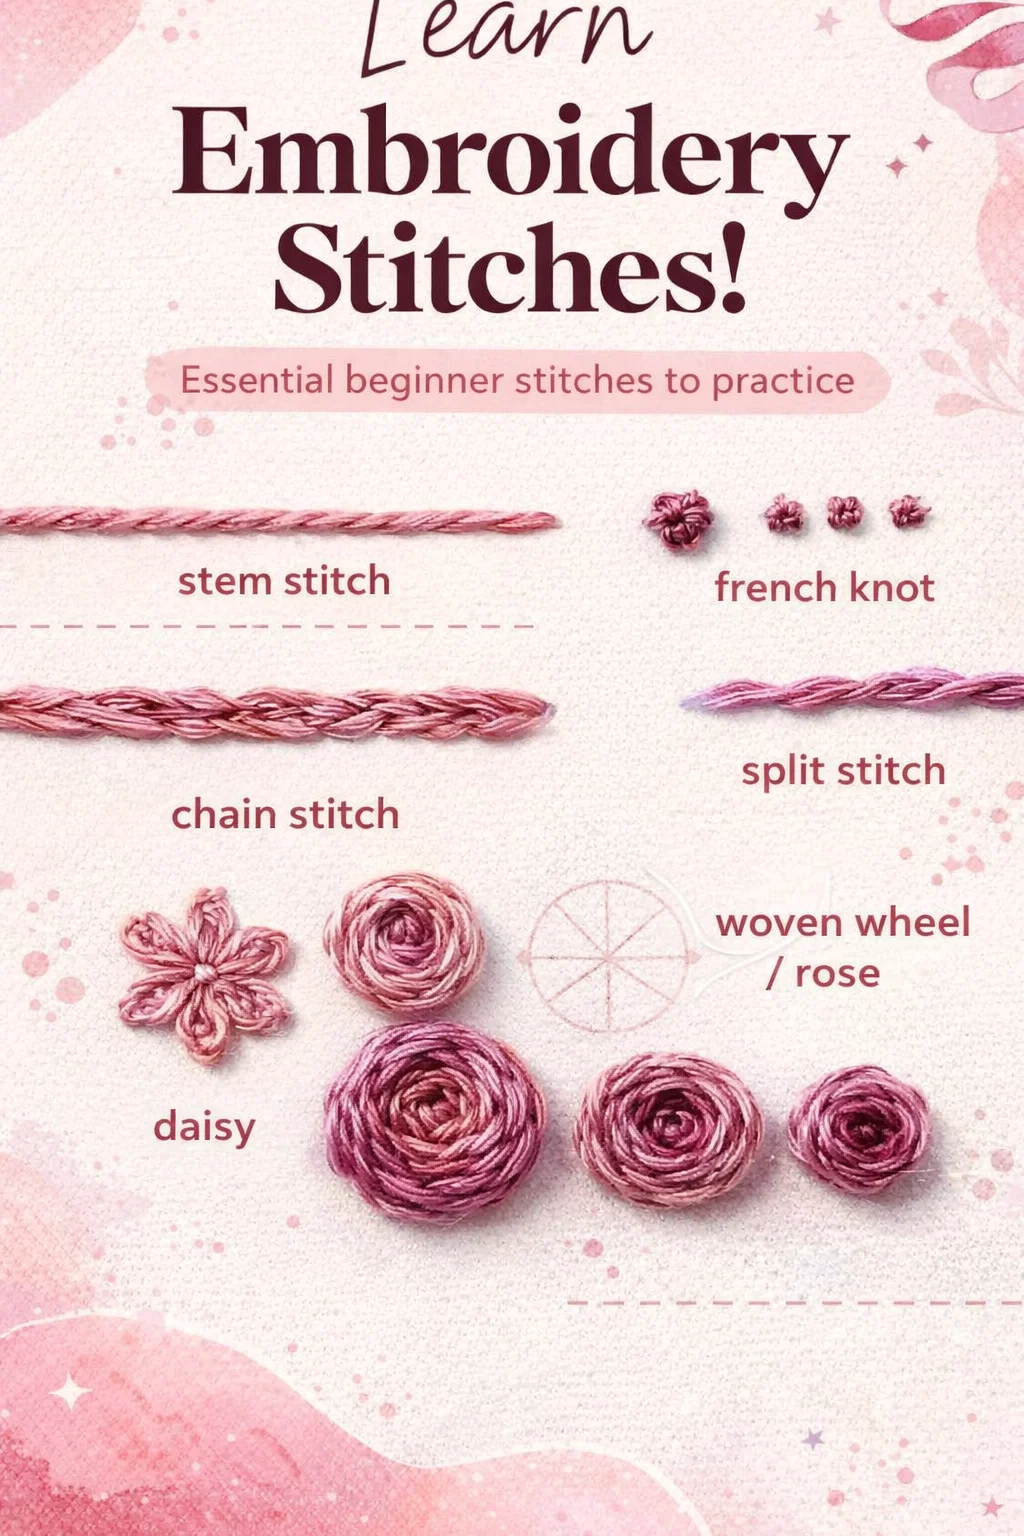
Before diving into complex patterns, every artist needs to master the basic strokes. Think of these stitches as the alphabet of fiber art. Once you know how to form the letters, you can write your own stories in thread. The sampler in the image highlights a sophisticated palette of dusty rose and mauve, proving that even a limited color range can produce incredible depth when you vary your stitching techniques.
One of the most important things for a beginner to understand is thread weight. Most embroidery floss comes as a 6 strand thread. For delicate work like the split stitch or stem stitch seen here, you might only use 2 or 3 strands. However, for those bold, 3D woven wheel roses, using all 6 strands helps build that luscious, pillowy volume much faster.
Mastering the Woven Wheel Rose
The woven wheel, also known as the spider web rose, is often the “star of the show” in modern floral embroidery. It looks incredibly intricate, yet it is one of the most satisfying and simple stitches to execute. It creates a raised, circular flower that literally pops off the fabric.
Setting the Spokes
To start a woven wheel, you must first create a base of “spokes.” As shown in the diagram on the sampler, you typically draw a circle and divide it into five or seven segments. It is crucial to use an odd number of spokes. If you use an even number, the weaving pattern will not alternate, and you will end up with a stack of thread rather than a woven flower.
The Weaving Process
Once your spokes are anchored, you bring your needle up near the center and begin weaving over and under the spokes without piercing the fabric. The key here is tension. If you pull too tight, the rose will look strangled and flat. If you keep your loops slightly loose, the rose takes on a soft, romantic, and realistic appearance. You continue this until the spokes are completely covered.
The Art of the Stem Stitch and Split Stitch
While flowers provide the flair, the stems and outlines provide the structure. The stem stitch is a classic for a reason. It creates a rope-like texture that flows beautifully around curves. It is the go-to choice for flower stalks, cursive lettering, and vine details.
On the other hand, the split stitch offers a much finer, more delicate line. By piercing back through the previous stitch, you create a continuous chain that looks almost like a solid line of thread. This is perfect for detailed outlines where you want the texture to be subtle rather than chunky.
Adding Texture with French Knots and Chain Stitches
Texture is what separates hand embroidery from machine work. The French knot is perhaps the most famous decorative stitch. These tiny dots of thread act as the “polka dots” of the embroidery world. They are perfect for the centers of flowers, mimicing pollen, or grouped together to create a mossy, tufted effect.
The chain stitch, also visible on our sampler, adds a series of looped links that look like a heavy braid. It is wonderful for filling in larger shapes or creating bold borders. When you see these stitches laid out together, you start to realize how much variety can be achieved with just a few simple movements of the hand.
Understanding Fabric and Tension
The image shows a beautifully even tension on a light, breathable fabric, likely a linen or a high quality cotton. Choosing the right fabric is just as important as the thread itself. You want something with a visible weave that isn’t too stretchy. If the fabric is too thin, those heavy woven roses might cause the material to sag or pucker.
Using a Hoop Effectively
To get the crisp results seen in the sampler, your fabric must be “drum tight.” When you tap the fabric in the hoop, it should make a slight ringing sound. This prevents the fabric from shifting as you pull your thread through, ensuring that your straight stitches stay straight and your lazy daisies stay plump.
Creating Your Own Stitch Sampler
If you are feeling inspired by this visual guide, the best way to learn is to create your own sampler. Instead of trying to finish a massive project, dedicate a small hoop to practicing these individual elements. Draw small squares or circles and label them with a fabric pen, just like the “basket weave” and “whipped back stitch” sections seen at the bottom of the image.
Why Samplers Matter
- Muscle Memory: Repeating the same stitch twenty times in a row helps your hands remember the motion.
- Color Testing: It is a great way to see how your thread colors interact before committing to a final piece.
- Reference Tool: You can keep your sampler in your sewing kit to remind yourself of what each stitch looks like when finished.
Advanced Textures: Basket Weave and Beyond
As you move down the sampler, you see more geometric patterns like the basket weave. This technique involves laying down horizontal “foundation” threads and then weaving vertical threads through them. This creates a thick, textile-like fill that is perfect for stitching baskets (obviously!), fences, or even textured clothing on an embroidered figure.
The whipped back stitch is another fantastic variation. You start with a basic back stitch and then “whip” a second thread around the stitches without going through the fabric. This transforms a dashed line into a smooth, raised cord. It is a brilliant way to add a second color to a line for a candy cane or variegated effect.
Common Mistakes to Avoid
Even seasoned pros run into hiccups. One common issue is “shadowing,” where dark threads show through the back of light fabric. To avoid this, try not to “jump” your thread across large gaps on the back of your work. Instead, tie off your thread and start fresh in the new area.
Another tip is to avoid using thread that is too long. While it is tempting to use a giant piece of floss to avoid re-threading, long threads are prone to tangling and fraying. A piece about the length of your forearm is usually the “sweet spot” for manageable stitching.
The Mental Health Benefits of Hand Embroidery
Beyond the physical beauty of the finished product, the process of embroidery is deeply therapeutic. The repetitive motion acts as a form of “stitch meditation.” It requires enough focus to quiet the mind but is rhythmic enough to be relaxing. In a digital age, spending an hour away from a screen to work on a chain stitch or a woven rose can significantly lower stress levels.
Conclusion: Finding Your Unique Style
Hand embroidery is a journey, not a race. The sampler we analyzed today is a beautiful example of how simple lines and loops can create a sophisticated work of art. Whether you find yourself drawn to the 3D realism of the woven wheel rose or the clean, crisp lines of the stem stitch, there is no right or wrong way to express yourself through thread.
Take these techniques, experiment with different colors, and don’t be afraid to make mistakes. Every “wrong” stitch is just a lesson in how thread behaves. With a bit of patience and a few skeins of your favorite floss, you will be amazed at the gardens you can grow with just a needle and a hoop.
Would you like me to generate a specific pattern or a list of essential supplies for your first embroidery kit?