Homemade Stuffed Dinner Rolls Recipe Easy Soft Fluffy Cheese and Veggie Rolls
There is nothing quite like the smell of fresh bread wafting through a home. It is a scent that signals comfort, warmth, and the promise of a delicious meal. While many people feel intimidated by the idea of working with yeast, creating bakery-quality dinner rolls is surprisingly achievable in your own kitchen. Today, we are diving deep into a recipe that takes the classic dinner roll to the next level by adding a savory, gooey cheese and vegetable filling. These rolls are golden, buttery, and incredibly soft, making them the perfect addition to any holiday table or a cozy Sunday dinner.
The Magic of Homemade Yeast Bread
Making bread from scratch is often described as a therapeutic process. From the initial mixing of the flour to the rhythmic motion of kneading the dough, there is a tangible connection to the food you are preparing. Unlike store-bought rolls that can sometimes be dry or packed with preservatives, homemade rolls offer a superior texture and a rich, buttery flavor that simply cannot be replicated. Using simple ingredients like all-purpose flour, warm milk, and sugar, you can create a dough that is light, airy, and the perfect vessel for various fillings.
Understanding Your Ingredients
Before you start mixing, it is essential to understand how each ingredient contributes to the final product. Bread making is a science, and the balance of these components determines whether your rolls will be dense or fluffy.
- All-Purpose Flour: This provides the structure. The proteins in the flour develop into gluten when mixed with liquid and kneaded, which traps the gases produced by the yeast.
- Warm Milk and Water: Liquid is necessary to hydrate the flour and activate the yeast. Using milk instead of just water adds fat and sugar, resulting in a softer crumb and a richer flavor.
- Instant Yeast: This is the leavening agent. Instant yeast is convenient because it can be mixed directly into the dry ingredients, though many bakers prefer to dissolve it in warm liquid first to ensure it is active.
- Sugar: Beyond adding a touch of sweetness, sugar acts as food for the yeast, helping it work faster and more effectively.
- Butter: Fat interferes with gluten development just enough to keep the bread tender. It also provides that signature golden crust and rich mouthfeel.
- Egg: Adding an egg to the dough contributes to the rise and creates a brioche-like richness.
Step-by-Step Guide to the Perfect Dough
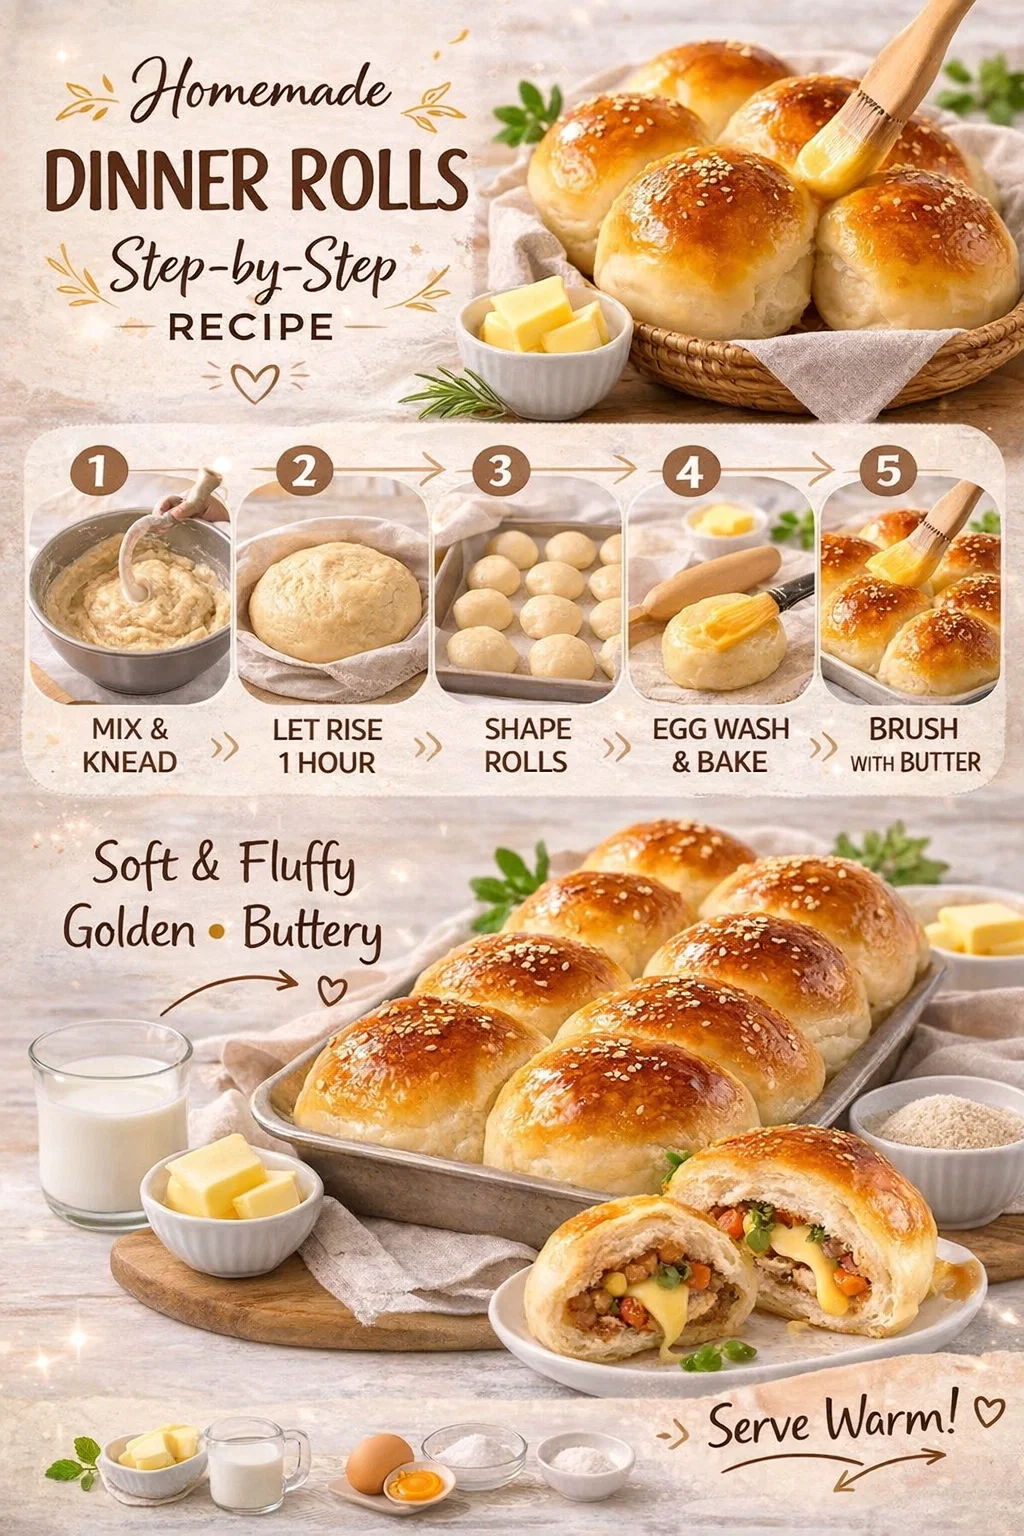
To achieve that sought-after “soft and fluffy” texture, you need to follow a specific process. It begins with the mix and knead phase. You want to combine your dry and wet ingredients until a shaggy mass forms. If you are using a stand mixer, use the dough hook attachment. If you are working by hand, prepare for a bit of a workout. You are looking for a dough that is smooth, elastic, and slightly tacky but not sticking to your fingers.
The Importance of the First Rise
Once your dough is kneaded, it needs to rest. This is known as the proofing stage. Place your dough in a lightly greased bowl, cover it with a damp cloth, and let it sit in a warm, draft-free spot for about one hour. During this time, the yeast ferments the sugars, producing carbon dioxide. This causes the dough to double in size. This step is non-negotiable because it develops the flavor and creates the internal air pockets that make the rolls light.
Creating the Savory Cheese and Veggie Filling
While a plain butter roll is delicious, a stuffed roll is an experience. The filling shown in our guide features a colorful medley of vegetables and melted cheese. This adds a layer of complexity to the bread, turning a side dish into a potential main course or a very hearty snack. You can use a mix of finely diced carrots, peas, corn, and perhaps some sautéed onions or bell peppers. The key is to ensure the vegetables are relatively dry so they do not make the dough soggy from the inside.
Choosing the Right Cheese
For the ultimate cheese pull, you want a variety that melts well. Mozzarella is a classic choice for stretch, while a sharp cheddar adds a punch of flavor. You could even experiment with Gruyere or Fontina for a more sophisticated palate. When you assemble the rolls, place a small spoonful of the veggie mix and a cube of cheese in the center of a flattened piece of dough, then pinch the edges tightly to seal it into a ball.
Shaping and Baking for Success
After stuffing your rolls, arrange them on a baking sheet. You want to give them a little space to grow, but placing them close enough so they “touch” as they rise results in those soft, pull-apart sides that everyone loves. This is the second rise, which usually takes about 20 to 30 minutes. It ensures the rolls stay airy even after being handled during the shaping process.
The Secret to the Golden Crust
Before the rolls go into the oven, they need an egg wash. Whisk one egg with a tablespoon of water or milk and lightly brush it over the tops. This is what gives professional bread that shiny, deep golden-brown finish. For an extra touch of texture and visual appeal, you can sprinkle sesame seeds or poppy seeds on top. Bake them at 180 degrees Celsius for 15 to 18 minutes. You will know they are done when they are beautifully browned and sound slightly hollow when tapped on the bottom.
Customizing Your Homemade Rolls
One of the best things about this recipe is its versatility. Once you master the basic dough, the possibilities are endless. You can lean into different flavor profiles depending on what you are serving for dinner.
Sweet Variations
If you prefer something sweet, you can swap the savory filling for cinnamon sugar and raisins, or even a dollop of cream cheese and fruit preserves. Instead of an egg wash, you could brush them with a simple honey glaze after they come out of the oven.
Herb and Garlic Infusions
For a more aromatic roll, try kneading fresh herbs like rosemary or thyme directly into the dough. After baking, brush the hot rolls with a mixture of melted butter, minced garlic, and parsley. This creates a garlic bread hybrid that is absolutely irresistible with pasta dishes or soups.
Common Troubleshooting Tips for Home Bakers
Even experienced bakers encounter hiccups. If your rolls didn’t turn out quite as expected, here are a few things to check for next time:
- The dough didn’t rise: Your liquid might have been too hot, killing the yeast, or too cold, keeping it dormant. Aim for a temperature around 40 degrees Celsius. Also, check the expiration date on your yeast.
- The rolls are dense: This usually happens if the dough wasn’t kneaded enough or didn’t get enough time to rise. Be patient with the proofing stages.
- The filling leaked out: Make sure you are pinching the seams very firmly when shaping the balls. Placing the seam-side down on the baking sheet also helps keep everything contained.
Serving and Storage Suggestions
These rolls are at their absolute peak when served warm, right out of the oven. The cheese inside will be perfectly melted, and the crust will be at its most tender. If you have leftovers, they can be stored in an airtight container for up to two days. To revive that fresh-baked texture, simply pop them in the oven or an air fryer for a few minutes at a low temperature.
For those who like to plan ahead, these rolls freeze remarkably well. You can freeze them after they have been shaped but before the second rise, or you can freeze them fully baked. If freezing baked rolls, just let them thaw at room temperature and warm them up before serving. It is a fantastic way to have “fresh” bread available for busy weeknights without the full time commitment of starting from scratch.
Conclusion
Mastering the art of the homemade dinner roll is a journey that ends in pure deliciousness. By following these steps, you are not just making bread; you are creating a centerpiece for your meal that shows care and craft. The combination of a soft, buttery exterior with a surprise savory filling of cheese and vegetables is sure to make these a new staple in your recipe rotation. So, clear off your counter, grab your flour, and get ready to impress your friends and family with these incredible stuffed rolls. There is truly nothing more satisfying than breaking open a warm roll that you made entirely with your own hands. Happy baking!