How to Build a Potato Tower Grow More Potatoes in Less Space with Vertical Gardening
Imagine walking out to your backyard and harvesting a massive pile of fresh, organic potatoes without ever picking up a shovel or straining your back. It sounds like a dream for any gardener, especially those dealing with limited space or tough, rocky soil. The traditional method of hilling potatoes in long rows requires significant real estate and a lot of manual labor, but there is a vertical revolution happening in the world of urban homesteading. The potato tower is the ultimate solution for maximizing your caloric yield in a tiny footprint. By encouraging potato plants to grow upward rather than outward, you can turn a few square feet of lawn into a high-production food factory. This method is not just about saving space; it is about working with the natural biology of the potato plant to trigger massive tuber production throughout the entire height of the structure.
The Science Behind Vertical Potato Gardening
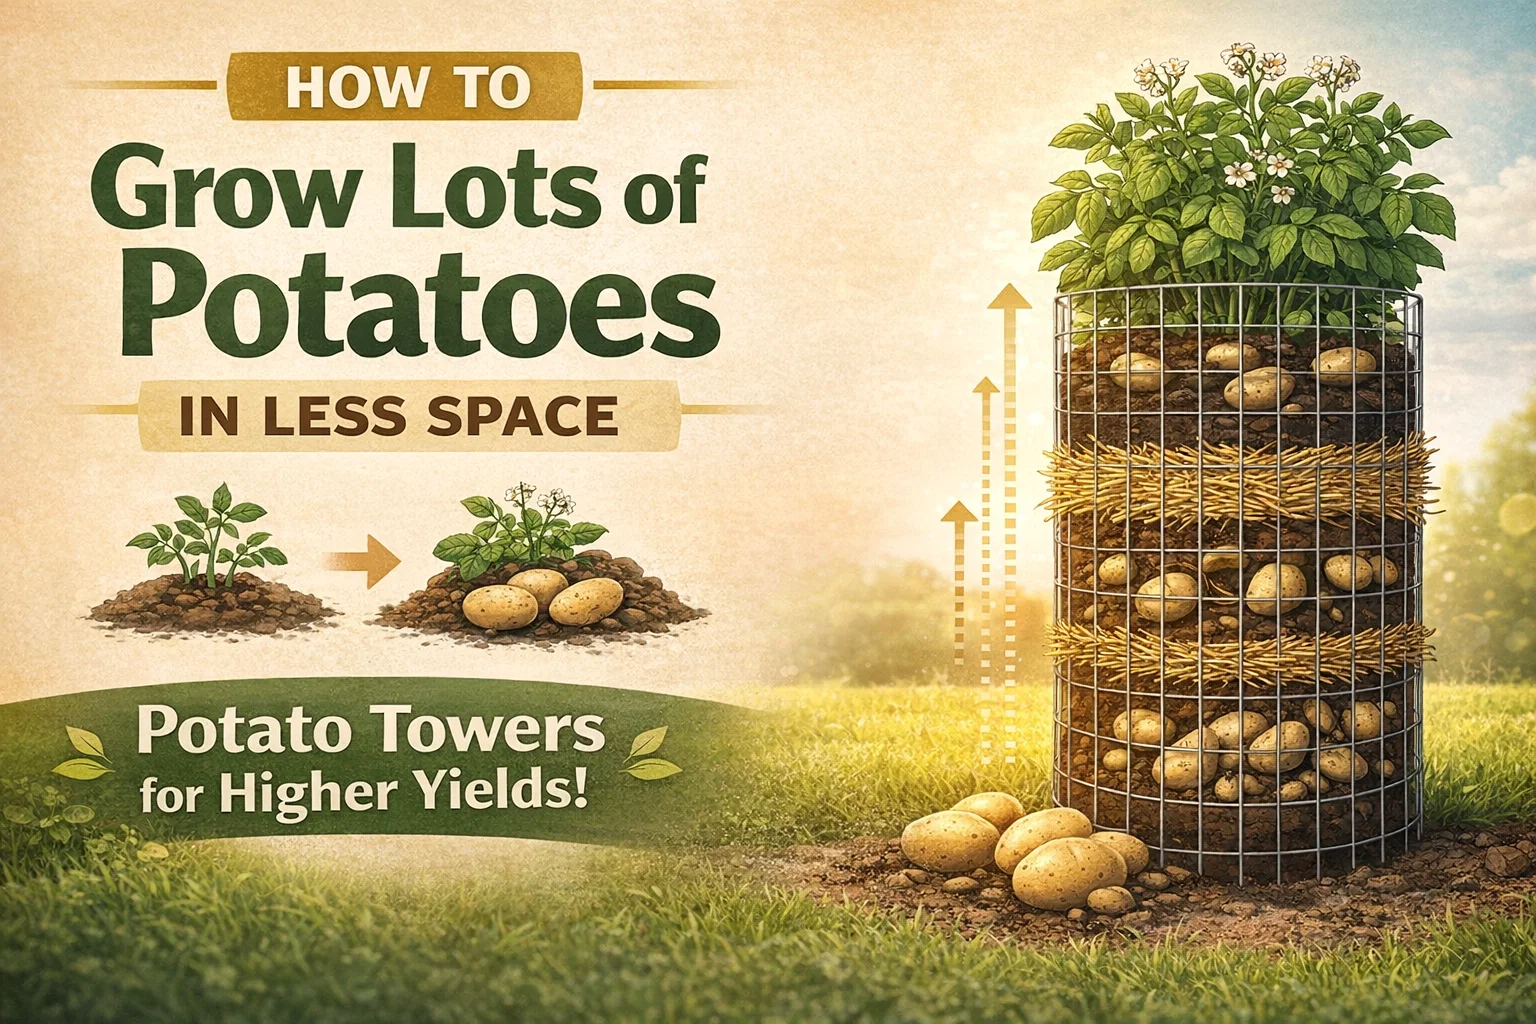
To understand why potato towers are so effective, you have to look at how a potato plant actually grows. Most people assume that potatoes only grow at the root level, but they actually produce tubers from the stems that are buried underground. When you plant a seed potato and it begins to sprout, the stems reach for the light. If you progressively cover those stems with soil or mulch as they grow, the plant will continue to send out stolons, which are the underground stems that eventually swell into the potatoes we eat.
In a standard garden bed, you can only pile soil so high before it slumps over. A potato tower provides a structural cage that allows you to keep burying the stems higher and higher, sometimes up to three or four feet. This creates a multi-layered skyscraper of potatoes. Instead of having one layer of tubers at the bottom, you have a vertical column of food. This vertical expansion is why the potato tower is often cited as the most efficient way to grow root vegetables in an urban environment.
Choosing the Right Materials for Your Tower
Building a potato tower does not require expensive equipment or specialized kits. In fact, some of the most successful towers are built from simple, repurposed materials found at any local hardware store. The most common choice is galvanized wire fencing or hardware cloth. You want something sturdy enough to hold the weight of wet soil but with gaps large enough to allow for some air circulation. A mesh size of 2 by 4 inches is usually ideal.
Aside from the cage itself, you will need a high-quality growing medium. Using straight garden soil is often too heavy and can compact over time, making it difficult for the tubers to expand. A mix of compost, peat moss, and vermiculite provides the fluffy texture potatoes love. Many experienced growers also incorporate straw into their towers. Straw acts as a lightweight filler that retains moisture while allowing the potatoes to grow clean and easy to grab during the harvest phase.
The Role of Straw in Drainage and Aeration
While soil provides the nutrients, straw is the secret ingredient for a healthy tower. It prevents the soil from washing out through the wire mesh and creates air pockets that prevent the roots from rotting. By lining the outside of your wire cage with a thick layer of straw and filling the center with soil, you create a self-contained ecosystem that mimics the perfect forest floor environment. This layered approach ensures that water reaches every level of the tower without becoming stagnant at the base.
Step-by-Step Guide to Setting Up Your First Tower
The setup process is straightforward but requires timing. You should start your tower in the spring, once the danger of a hard frost has passed. Begin by forming your wire mesh into a cylinder approximately two to three feet in diameter. Secure the ends with zip ties or wire. Place the cylinder in a spot that receives at least six to eight hours of direct sunlight every day, as potatoes are sun-loving plants that need plenty of energy to produce those starchy tubers.
Once your cage is in place, add about six inches of your soil mix to the bottom. Place your seed potatoes on top of this layer, spacing them about six inches apart. Cover them with another few inches of soil. As the green shoots begin to emerge and reach about six to eight inches in height, it is time to start the layering process. Add a ring of straw around the edge of the cage and pour more soil into the center, leaving just the top few inches of the green leaves exposed.
Repeat the Process for Maximum Height
Continue this cycle of waiting for growth and then adding soil and straw until you reach the top of your tower. It is important not to bury the entire plant at once; the leaves need to remain above the surface so they can continue to photosynthesize and provide energy to the growing tubers below. By the time you reach the top of the cage, your tower will be a lush, green pillar of potato foliage. At this point, you can simply sit back and focus on maintenance.
Essential Maintenance: Watering and Feeding
One of the few challenges of vertical gardening is that towers can dry out faster than traditional garden beds. Because they are elevated and surrounded by air, evaporation happens more quickly. Consistent moisture is the key to large, hollow-heart-free potatoes. You want the soil to feel like a wrung-out sponge. In the heat of the summer, this might mean watering your tower every single day. A soaker hose spiraled inside the tower during construction is an excellent way to ensure water reaches the middle levels.
Potatoes are also heavy feeders. While a good compost mix provides a great start, adding a balanced, organic liquid fertilizer every few weeks can significantly boost your yield. Look for a fertilizer that is slightly lower in nitrogen and higher in phosphorus and potassium to encourage tuber growth rather than just excessive leaf production. Organic seaweed or fish emulsion is often a favorite among potato enthusiasts for its micronutrient profile.
Common Pitfalls and How to Avoid Them
Even with a perfect setup, gardeners can run into issues. One common mistake is using the wrong variety of potato. Determinate potatoes, like Yukon Golds, tend to grow all their tubers in one single layer and may not take full advantage of a tall tower. Indeterminate varieties, such as Russet or many fingerling types, are much better suited for vertical growth because they continue to produce tubers as the stem grows upward. Always check the variety before you plant to ensure it is a climber.
Another issue is pests, specifically the Colorado Potato Beetle. These striped invaders can defoliate a plant in days. Because your potato tower is a concentrated area of foliage, it is easy to inspect. Hand-picking the beetles and their orange egg clusters from the undersides of leaves is usually sufficient for a small home tower. Additionally, ensure your tower has good airflow to prevent fungal issues like late blight, which thrives in damp, crowded conditions.
The Magic of the No-Dig Harvest
The harvest is where the potato tower truly shines. In a traditional garden, you have to carefully dig around the plants with a pitchfork, often accidentally slicing through the very potatoes you spent months growing. With a tower, the process is incredibly satisfying and clean. Once the vines have died back and turned brown in late summer or autumn, your potatoes are ready.
To harvest, simply snip the zip ties or unhook the wire cage and pull it away. The column of soil and straw will spill out, revealing hundreds of potatoes nested inside. It is like a treasure hunt where every handful of straw uncovers more gold. Because you used a light mix of straw and compost, the potatoes will usually come out clean with very little dirt clinging to them. This method protects the skin of the potatoes, which leads to better long-term storage and less waste.
Curing Your Potatoes for Long-Term Storage
After the excitement of the harvest, it is important to cure your potatoes before putting them into long-term storage. Lay them out in a cool, dark, and well-ventilated area for about two weeks. This allows the skins to thicken and any small nicks to heal over. Once cured, store them in a dark place with high humidity and temperatures around 40 to 45 degrees Fahrenheit. A basement or a root cellar is ideal. Whatever you do, keep them out of the light, as light exposure causes potatoes to turn green and produce solanine, which is toxic if consumed in large quantities.
Transforming Your Backyard and Your Diet
Starting a potato tower project is more than just a gardening experiment; it is a step toward food sovereignty. Potatoes are a calorie-dense staple that can form the backbone of many meals. When you grow them yourself, you have access to varieties you will never find in a supermarket, and the flavor of a freshly harvested potato is incomparably better than something that has been sitting in a warehouse for months. Beyond the food, there is a deep sense of accomplishment that comes from building a structure that turns a small bag of seed potatoes into a massive winter supply.
Whether you have a sprawling farm or a tiny balcony, the principles of vertical potato gardening apply. It is a testament to how creative we can be with our space when we understand the needs of the plants we grow. By utilizing the potato tower method, you are choosing a smarter, more efficient way to garden that respects your time and your physical health. It is time to stop digging in the dirt and start building upward.
Conclusion
The potato tower is a brilliant intersection of biology and engineering, offering a high-yield solution for the modern gardener. By focusing on vertical growth, choosing the right materials, and maintaining a consistent watering schedule, you can achieve a harvest that far exceeds the traditional garden row. From the initial setup with wire and straw to the final, effortless harvest, every stage of the process is designed to be rewarding and efficient. If you are looking for a way to grow more food with less effort and space, this is the project for you. Grab some wire, a bale of straw, and a few seed potatoes this weekend to start your own vertical farm. You will be amazed at what you can grow in just a few feet of space.
Would you like me to generate a specific list of indeterminate potato varieties that work best for these towers?