How to Embroider for Beginners 10 Essential Hand Embroidery Stitches Sampler Guide
Embroidery is more than just a hobby. It is a timeless form of artistic expression that allows you to transform a simple piece of fabric into a textured masterpiece. When you look at a beautifully stitched sampler, you are seeing the building blocks of a craft that spans generations. Whether you are holding a needle for the first time or returning to the hoop after years away, mastering the fundamental stitches is the key to unlocking your creative potential. From the delicate curves of a rose to the structured symmetry of a fishbone stitch, every movement of the thread tells a story of patience and precision.
The Magic of the Embroidery Sampler
An embroidery sampler is essentially a playground for your needle. Traditionally, samplers were used by young stitchers to record different patterns and techniques they had learned, acting as a physical reference book before the digital age. Today, they remain the best way to practice without the pressure of a finished project hanging over your head. By working on a sampler, you allow yourself the freedom to make mistakes, experiment with thread tension, and truly understand how different stitches interact with the weave of the fabric.
One of the most rewarding aspects of starting with a sampler is the visual progress you see. As you fill the cloth with lines of split stitches, rows of French knots, and leafy fishbone textures, you are building a tactile library of skills. This foundation is what separates a beginner from an artist who can confidently tackle complex floral patterns or intricate portraits.
Essential Line Stitches for Beginners
Every great embroidery project starts with a solid line. Line stitches are the skeleton of your work, defining shapes and providing the borders for more complex fills. Understanding the subtle differences between these stitches can completely change the look of your design.
The Reliable Back Stitch
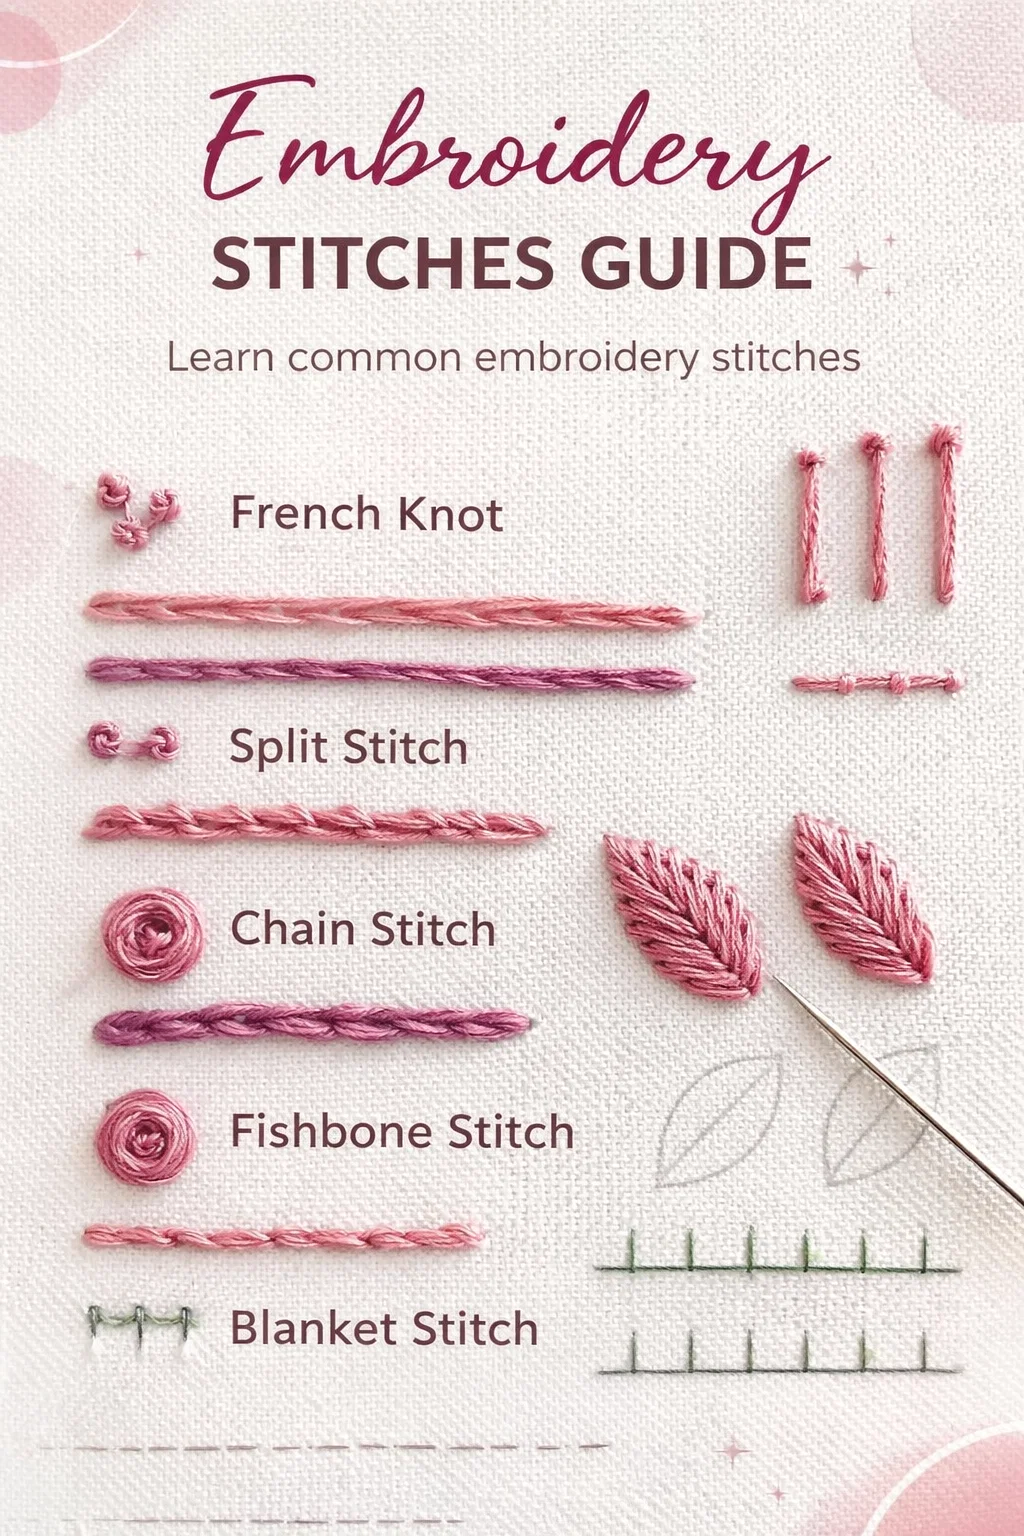
The back stitch is often the first one taught to beginners because of its simplicity and versatility. It creates a solid, continuous line that is perfect for outlining shapes or stitching text. Because the needle goes backward into the previous hole, it results in a very strong and durable seam. If you want a clean, minimalist look, the back stitch is your best friend.
The Elegant Split Stitch
As seen in many classic floral designs, the split stitch offers a slightly more textured, rope-like appearance. By piercing the thread of the previous stitch with your needle, you create a seamless flow that handles curves beautifully. It is a favorite for stems and delicate outlines because it hides the gaps between stitches more effectively than a standard running stitch.
The Textured Chain Stitch
If you are looking for volume and a bold presence, the chain stitch is the way to go. This stitch creates a series of looped circles that look like a tiny chain laying on the fabric. It adds a wonderful dimension to borders and can even be used as a filling stitch if worked in rows close together. It provides a chunky, cozy feel that works perfectly for modern embroidery styles.
Mastering Decorative and Filling Stitches
Once you are comfortable with lines, it is time to add depth and character. Filling stitches allow you to color in your drawings with thread, creating shadows, highlights, and realistic textures.
The Fishbone Stitch for Perfect Leaves
The fishbone stitch is a game changer for anyone who loves botanical embroidery. It is specifically designed to fill small shapes like leaves or feathers. By overlapping stitches at a slight angle toward a center spine, you create a feathered effect that mimics the natural veins of a leaf. The result is a professional, symmetrical finish that looks far more complicated than it actually is to execute.
Creating Dimensional Roses
Nothing captures the imagination quite like a dimensional rose. Using techniques like the woven wheel or the bullion knot, you can create flowers that literally pop off the fabric. These stitches require a bit more patience and a steady hand with thread tension, but the payoff is a stunning, tactile bloom that adds a high-end feel to any piece of hoop art.
Choosing the Right Materials
Your success in embroidery depends heavily on the tools you use. While you can technically stitch on almost anything, starting with the right materials will make the learning process much smoother and more enjoyable.
- Fabric: Look for natural fibers with a visible, even weave. Linen and cotton are the gold standards for hand embroidery because they hold their shape well and allow the needle to pass through without snagging.
- Needles: Embroidery needles, also known as sharps, have a larger eye to accommodate multiple strands of floss and a very sharp point to pierce the fabric cleanly.
- Hoops: A good hoop keeps your fabric drum-tight. This is crucial for maintaining even tension. If your fabric is loose, your stitches will likely pucker once you take the piece out of the hoop.
- Floss: Six-strand cotton embroidery floss is the most common choice. The beauty of this thread is that you can strip it down to use one, two, or three strands depending on how fine you want your detail to be.
Tips for Maintaining Perfect Tension
One of the biggest challenges for new stitchers is tension. If you pull too hard, your fabric will bunch up. If you leave the thread too loose, your stitches will look sloppy and might snag. The key is to find a rhythmic middle ground. Always ensure your fabric is tight in the hoop before you start. If you notice the fabric softening as you work, stop and tighten it immediately. Consistency is more important than speed. Take your time to pull each stitch with the same amount of force, and you will notice a massive improvement in the overall look of your sampler.
The Therapeutic Benefits of Hand Embroidery
In our fast-paced digital world, embroidery offers a much-needed escape. It is a slow craft that demands focus and presence. Many people find that the repetitive motion of pulling thread through fabric acts as a form of meditation. It lowers the heart rate, reduces stress, and provides a sense of accomplishment that is hard to find elsewhere. There is a deep satisfaction in turning a blank piece of cloth into something beautiful with nothing but your own hands and a few simple tools.
Building a Creative Habit
You do not need hours of free time to enjoy embroidery. Even fifteen minutes a day can be enough to finish a small section of a sampler. By making stitching a part of your daily routine, you give your brain a chance to unwind and engage in creative problem-solving. Whether you are listening to a podcast, watching a favorite show, or sitting in silence, embroidery is the perfect companion for a quiet evening.
Taking Your Skills Further
Once you have mastered the basic stitches on your sampler, the world of embroidery is wide open to you. You can begin exploring more advanced techniques like goldwork, silk shading, or needle painting. You can also start applying your skills to functional items. Think about adding a small floral detail to the collar of a denim jacket, personalizing a set of cloth napkins, or creating a custom birth announcement for a friend. The possibilities are truly endless once you have a strong grasp of the fundamentals.
Conclusion: Start Your Stitching Journey Today
Embroidery is a journey, not a destination. Every stitch you make is a step toward becoming a more confident and skilled maker. By starting with a sampler, you are giving yourself the best possible foundation. You are learning the language of thread, understanding the behavior of fabric, and developing a unique artistic voice. Do not worry about making every stitch perfect on your first try. The beauty of handmade art lies in its imperfections and the visible touch of the creator. So, pick up your hoop, choose a color that inspires you, and start stitching. You might be surprised at how quickly you fall in love with this beautiful, tactile craft.