How to Sew Lace Trim on DIY Lingerie Step-by-Step Sewing Machine Tutorial for Beginners
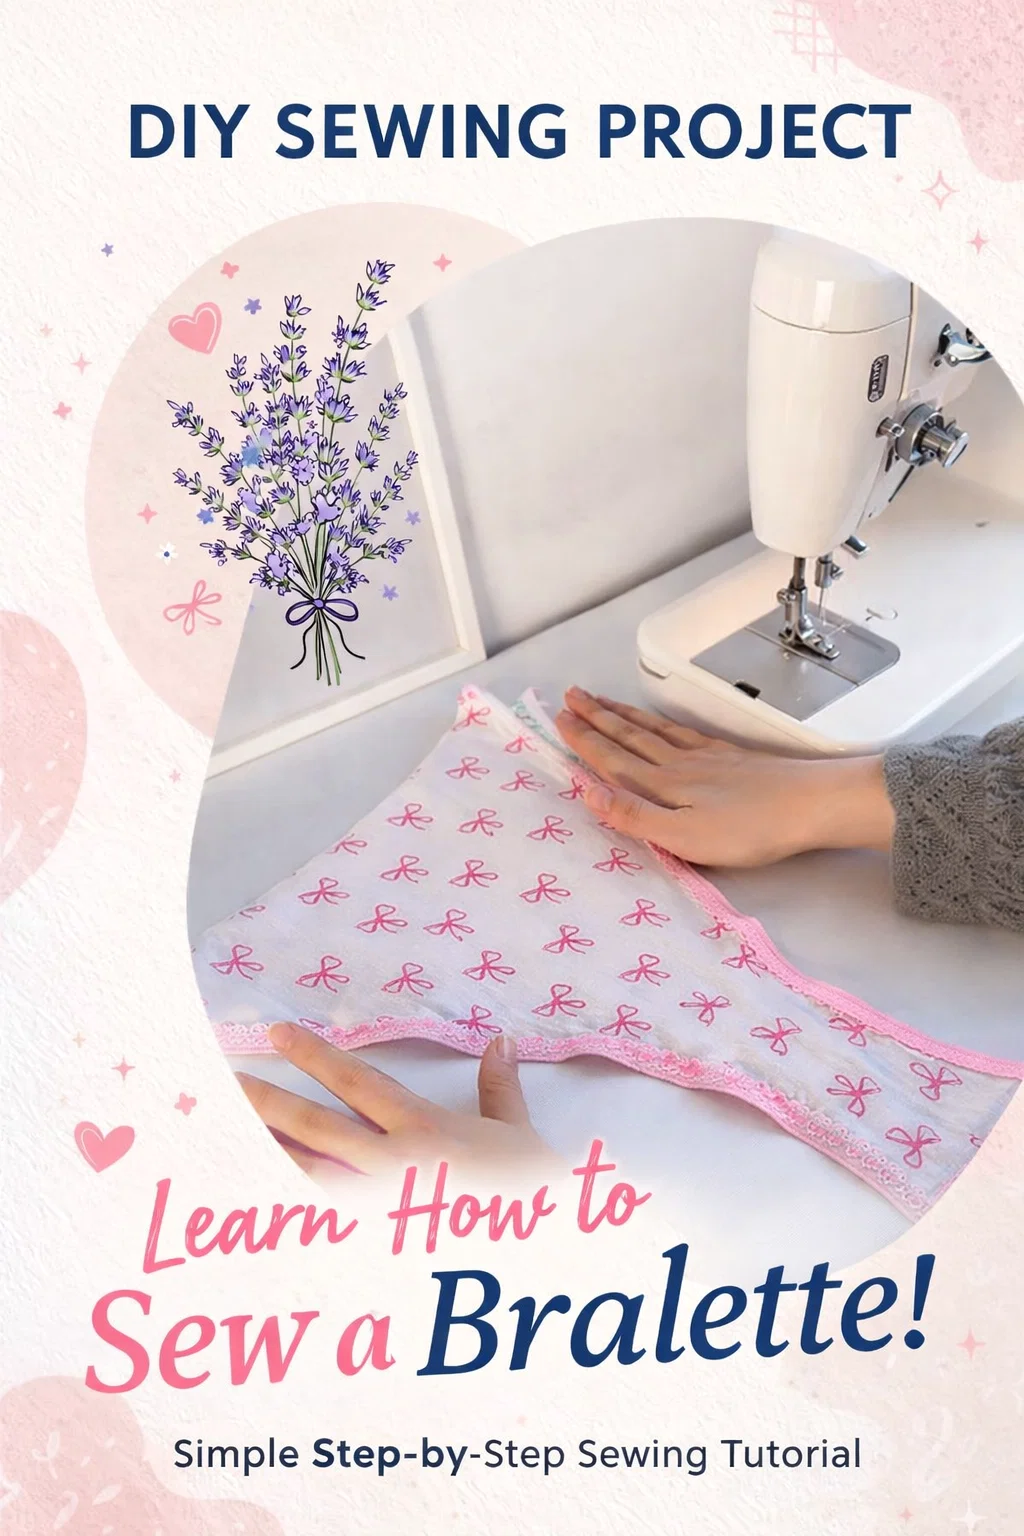
There is something undeniably magical about the process of transforming a simple piece of fabric into a delicate, wearable work of art. If you have ever wandered through a high-end boutique and marveled at the intricate lace detailing on a bralette or a pair of silk knickers, you might have felt that such craftsmanship was out of reach for a home sewist. However, as the image of this beautiful bow-printed fabric and pink lace trim suggests, creating your own DIY lingerie is not only possible but incredibly fulfilling. Whether you are looking to save money, achieve the perfect fit, or simply express your unique style, diving into the world of intimate apparel is a journey worth taking.
The beauty of sewing your own undergarments lies in the details. In this comprehensive guide, we are going to break down the barriers to entry for lingerie making. We will explore the essential tools, the nuances of handling stretch fabrics, and the specific techniques required to attach that perfect lace trim. By the end of this post, you will have the confidence to turn your sewing machine into a powerhouse for professional-grade delicates.
Understanding the Anatomy of DIY Lingerie
Before we drop the presser foot and start stitching, it is vital to understand what makes lingerie different from standard garment construction. Lingerie is high-performance clothing. It needs to stretch with the body, recover its shape after wear, and feel soft against the most sensitive areas of the skin. Most projects, like the one pictured, utilize a combination of knit fabrics and elasticated trims.
Choosing the Right Fabric
The foundation of any great pair of undies or a soft-cup bra is the fabric. For beginners, cotton spandex or cotton jersey is the gold standard. It provides breathability and is much easier to handle than slippery silks or sheer meshes. As you progress, you can experiment with stretch galloon lace, power net for support, or bamboo jerseys for ultimate comfort. Look for fabrics with at least 40 percent to 50 percent stretch in both directions to ensure the garment moves with you.
The Role of Findings and Notions
In the world of sewing, findings refer to the small bits and pieces that complete a garment. For lingerie, this includes plush-back elastics, rings, sliders, hook-and-eye closures, and, of course, decorative lace trims. The pink lace trim seen in our inspiration image is likely a stretch lace, which is essential because it allows the leg opening or waistline to expand as you put the garment on without snapping the stitches.
Essential Tools for Lingerie Success
You do not need a specialized industrial machine to make beautiful underwear. A standard domestic sewing machine is more than capable, provided you have the right accessories. Precision is key when working with small seam allowances and delicate materials.
The Magic of the Stretch Needle
Using a universal needle on stretch fabric is the most common cause of frustration for new sewists. Universal needles can pierce the fibers, causing small holes or, more frequently, skipped stitches. Always opt for a Stretch or Ballpoint needle. These needles have a rounded tip that pushes the fabric fibers aside rather than cutting through them, ensuring a smooth, continuous seam even on the finickiest of elastics.
Rotary Cutters and Weights
Lingerie patterns are small, and every millimeter counts. Using large dressmaking shears can often shift the fabric, leading to asymmetrical pieces. A small rotary cutter (28mm is ideal) paired with pattern weights allows you to cut with extreme accuracy. Since you are not pinning the pattern to the fabric, you also avoid distorting the delicate knit before you even start sewing.
Step by Step: How to Sew Lace Trim Like a Pro
The image shows a crucial moment in the construction process: aligning the lace trim with the fabric edge. This is where the personality of the garment truly comes to life. Follow these steps to achieve that clean, boutique-quality finish.
Preparation and Alignment
Start by laying your fabric piece right side up on your work surface. Place your lace trim on top of the fabric. Depending on the design, the decorative “scalloped” edge of the lace should usually point toward the center of the garment or hang off the edge for a flutter effect. In the example provided, the lace is being applied to the edge to create a soft, feminine border. Use a few pins or sewing clips to hold it in place, but be careful not to stretch the fabric as you pin.
Selecting the Right Stitch
Since the fabric and the lace both need to stretch, a straight stitch is out of the question. A straight stitch has no “give” and will break the moment the garment is pulled over the hips. Instead, use a narrow zig-zag stitch or a three-step zig-zag stitch. The three-step zig-zag is particularly effective because it distributes the tension across three small movements, preventing the fabric from “tunneling” or bunching up under the stitch.
The Sewing Technique
As you feed the fabric through the machine, keep your hands light. Your goal is to guide the lace so it sits perfectly along the edge. Avoid pulling the fabric through the machine; let the feed dogs do the work. If you find the fabric is being sucked down into the needle plate, try placing a piece of tissue paper underneath the start of your seam. You can easily tear it away once you are finished.
Mastering Elastic Tension
One of the most common questions in DIY lingerie is how much to stretch the lace or elastic. If you do not stretch it at all, the garment will gape and fail to stay in place. If you stretch it too much, you will end up with uncomfortable ruffles and a garment that is far too small.
The Rule of Thumb
A general rule for leg openings is to use a 1:1 ratio for the flat areas and apply a slight tension (about 5 percent to 10 percent) only on the curves. This “snugs” the garment against the body without digging in. For waistbands, you generally want the elastic to be about 2 inches shorter than the actual waist measurement of the garment to ensure a secure fit.
Common Mistakes and How to Fix Them
Even the most experienced sewists run into hiccups when working with tiny pieces of lace and stretch fabric. Recognizing these issues early will save you hours of seam ripping.
Wavy Seams and Lettuce Edges
If your seam looks wavy after sewing, it usually means the fabric was stretched while it was being fed through the machine. You can often fix this with a good steam iron (use a press cloth to protect the lace!), but if it is severe, you may need to decrease the pressure of your presser foot. Many modern machines allow you to adjust this setting to handle lightweight knits more gently.
Thread Bunching (Birds Nests)
If you see a mess of thread on the underside of your fabric, it is actually usually a problem with the top threading or the tension. Re-thread your machine with the presser foot in the UP position to ensure the thread seats properly in the tension discs. Also, ensure you are using a high-quality polyester thread, as cotton thread lacks the necessary strength and elasticity for lingerie.
Beyond the Basics: Customizing Your Creations
Once you have mastered the basic attachment of lace trim, the world is your oyster. You can start mixing and matching prints, like the whimsical bow pattern in the image, with contrasting lace colors. Try layering different widths of lace or adding small ribbon bows at the center front for a classic “coquette” aesthetic.
Working with Sheer Fabrics
If you decide to move into sheer meshes or lace-only garments, consider using a French seam or a soft overlock stitch. Because these fabrics are transparent, the internal construction is visible from the outside. Keeping your seam allowances small and tidy is the mark of a true professional.
Why Sewing Your Own Lingerie is the Ultimate Act of Self-Care
In a world of fast fashion, where undergarments are often mass-produced with little regard for comfort or longevity, making your own is a radical act. It allows you to celebrate your body exactly as it is today. You can adjust the rise of a panty, widen a gusset for more coverage, or choose fabrics that don’t irritate your skin. Every time you wear a piece you made yourself, you are reminded of your skill and creativity.
Conclusion: Your Creative Journey Starts Now
Sewing lingerie is a skill that rewards patience and practice. The image of the hands carefully guiding that pink lace serves as a perfect reminder that great things are built one stitch at a time. Do not be intimidated by the delicate nature of the materials. With a stretch needle, a trusty zig-zag stitch, and a bit of imagination, you can create a collection of intimates that fits better and looks more beautiful than anything you could buy in a store.
Now it is time to clear off your sewing table, pick out a fun printed knit, and start experimenting with those lace trims. Remember, every mistake is just a lesson in disguise, and every finished garment is a reason to celebrate. Happy sewing!