How to Use Colour Correctors Ultimate Makeup Guide for Flawless Skin
Understanding the color wheel is not just for painters and graphic designers. If you have ever struggled to hide a stubborn blemish, dark under-eye circles, or persistent redness with just concealer, then you are ready to master the art of color correction. This professional makeup technique uses the science of complementary colors to neutralize skin imperfections, creating a perfectly even canvas before you even touch your foundation.
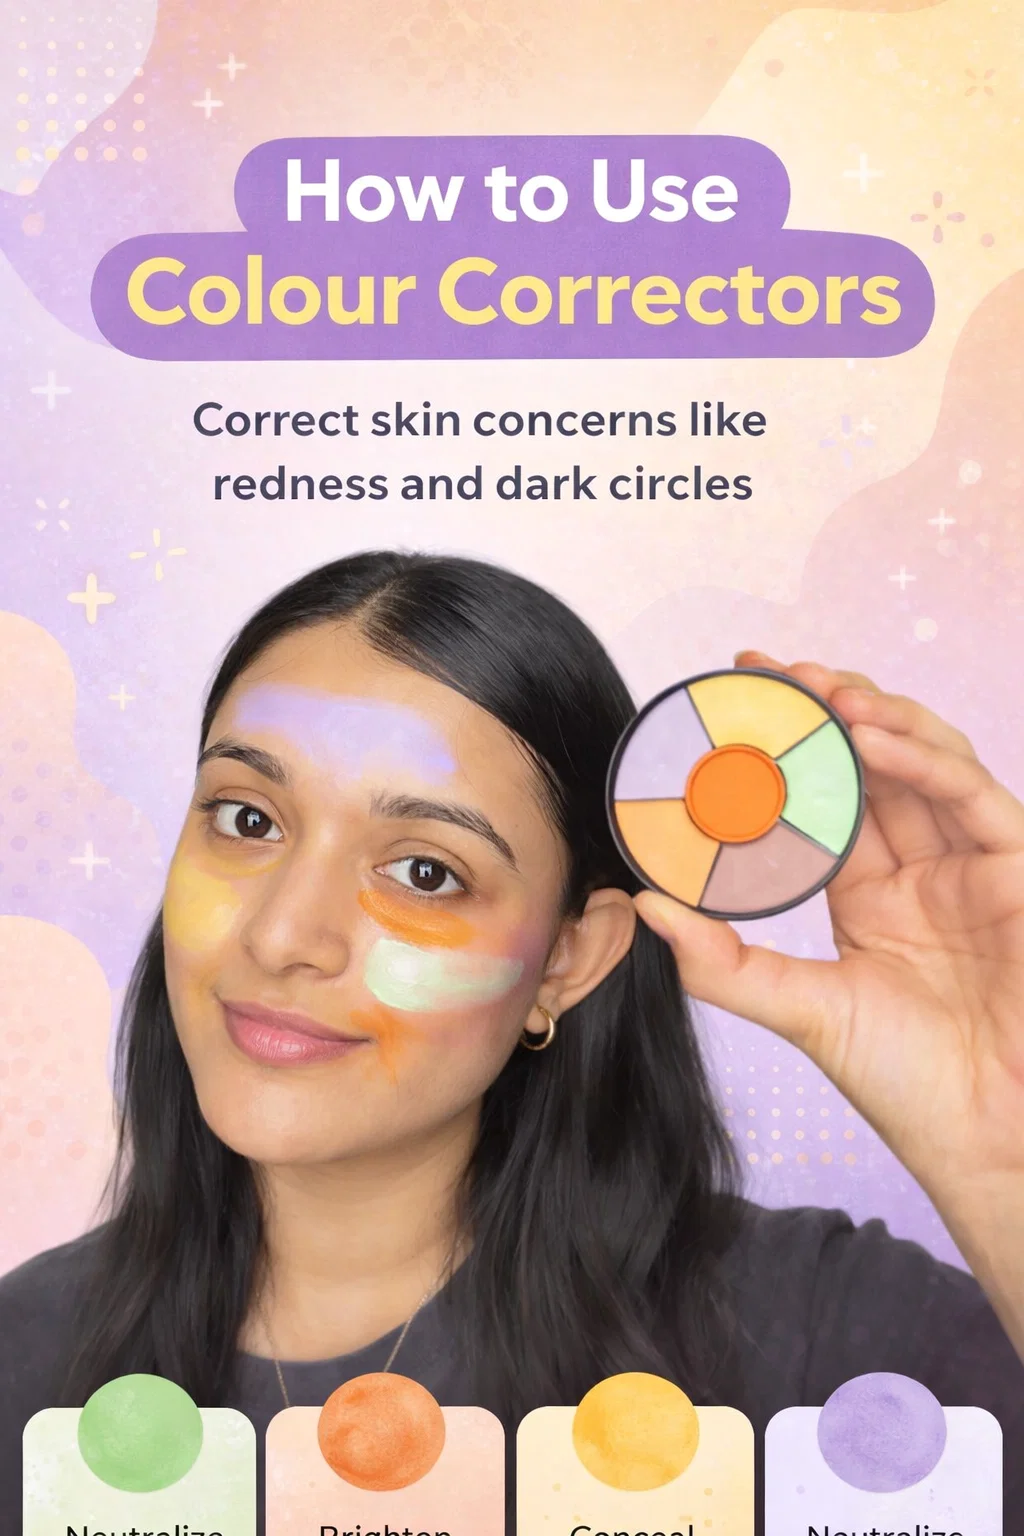
The image above showcases a classic color-correcting palette, featuring a spectrum of shades like lavender, mint green, peach, and yellow. While seeing these bright pigments smeared across your face might feel intimidating at first, the results are nothing short of transformative. By the end of this guide, you will understand exactly which colors to reach for and how to apply them like a pro.
The Science of the Color Wheel in Makeup
To use color correctors effectively, you have to look at a basic color wheel. The fundamental rule of color correction is that colors sitting directly opposite each other on the wheel will cancel each other out. This is known as complementary color theory.
For example, if you have a red pimple, you do not want to just pile on skin-toned concealer, which can often look gray or ashy over inflammation. Instead, you apply a green corrector. Because green is opposite red on the color wheel, it physically neutralizes the red tones, making the blemish disappear into a neutral base that is much easier to cover with a thin layer of foundation.
Breaking Down the Color Correction Palette
Most professional palettes, like the one held in the image, provide a variety of shades to target specific concerns. Let us break down what each of these vibrant hues actually does for your skin.
Green: The Redness Eraser
Green is the most common color corrector used in daily routines. It is the ultimate solution for redness caused by rosacea, acne, or broken capillaries. Because green and red are polar opposites, a minty green shade will instantly calm the look of angry, inflamed skin. It is best applied in thin layers only on the areas that are truly red.
Peach, Orange, and Red: The Dark Circle Solution
If you struggle with dark circles that look blue or purple, these warm tones are your best friend. However, the specific shade you choose depends entirely on your skin tone:
- Peach: Ideal for fair to medium skin tones to hide blue-toned veins or light fatigue.
- Orange: Perfect for tan to deep skin tones to neutralize deep blue or grayish shadows under the eyes.
- Red: Specifically for very deep skin tones where dark spots have a heavy blue or green undertone.
Lavender and Purple: Brightening Sallowness
Notice the lavender streak on the forehead in the image? Purple is used to eliminate unwanted yellow or “sallow” undertones. If your skin looks a bit dull, tired, or yellowish, a light lilac or lavender corrector can add a boost of brightness and vitality back to your complexion.
Yellow: Neutralizing Purple and Topping Up Brightness
Yellow sits opposite purple on the color wheel. This makes it fantastic for hiding purple-toned bruises, very dark veins, or under-eye bags that have a violet tint. It is also a great “universal” brightener for those with olive or warm skin tones who want to highlight the center of the face.
Step by Step: How to Apply Color Correctors Correctly
Applying color corrector is a pre-emptive strike. It happens after your skincare and primer, but before your foundation. Follow these steps to ensure a seamless blend that does not look “cakey” or heavy.
Step 1: Prep the Canvas
Always start with well-hydrated skin. Color correctors, especially cream-based ones found in palettes, can cling to dry patches. Apply your favorite moisturizer and a makeup primer to create a smooth surface for the pigments to glide over.
Step 2: Target the Areas
Using a small concealer brush or your clean ring finger, dab the specific color onto the area of concern. For example, dab green onto the sides of your nose if you have redness, or peach under your eyes. Remember that less is more. You are not trying to paint your face green or orange; you are just trying to tint the skin enough to neutralize the underlying discoloration.
Step 3: Blend, But Do Not Wipe
Use a damp beauty sponge or a soft brush to tap the product into the skin. Use a stippling motion rather than a swiping motion. Swiping will just move the product off the spot you are trying to hide. You want the corrector to stay exactly where the discoloration is.
Step 4: The Foundation Layer
Once your face looks like a soft watercolor painting, it is time for foundation. Gently press your foundation over the corrected areas. Again, avoid heavy buffing or dragging, as this can mix the color corrector into the foundation, leaving you with a green or peach tint to your skin. Patting the foundation on ensures the corrector stays underneath, doing its job invisibly.
Choosing the Right Formula for Your Skin Type
Not all color correctors are created equal. Depending on whether you have oily, dry, or combination skin, you may prefer different formats.
Cream Palettes
The palette shown in the image is a cream formula. These are excellent for targeted correction because they offer high pigment density and a thicker consistency. They are perfect for covering specific spots like acne or dark scars. If you have dry skin, these are often more hydrating and easier to blend.
Liquid Correctors
Liquid formulas are usually more sheer and lightweight. These are ideal for larger areas of the face, such as using a lavender liquid to brighten the whole forehead or a green liquid to tone down general redness on the cheeks. They work well for oily skin types because they set more quickly and feel less heavy.
Crayons and Pens
These are the ultimate tools for precision. If you just have one or two tiny spots to hide, a color-correcting pen allows you to be very surgical with your application, ensuring you do not get green pigment on healthy, non-red skin.
Common Mistakes to Avoid
Even seasoned makeup enthusiasts can run into trouble with color theory. Here are a few pitfalls to watch out for to keep your look natural and fresh.
Using Too Much Product
This is the number one mistake. If you apply a thick layer of orange under your eyes, it will eventually peek through your foundation, leaving you with “raccoon eyes” in reverse. The goal is to see a slight shift in the underlying color, not to completely mask the skin in a solid block of bright pigment.
Using the Wrong Shade for Your Skin Tone
Using a deep orange corrector on very fair skin will be almost impossible to cover up with foundation. Likewise, using a pale peach on deep skin will look ashy and gray. Always match the intensity of the corrector to the depth of your natural skin tone.
Forgetting to Set the Product
If you find that your colors are mixing together and becoming muddy, try lightly dusting a translucent setting powder over your color corrector before applying foundation. This locks the corrector in place and prevents it from sliding around when you apply the next layer of makeup.
When Should You Use Color Correction?
You do not necessarily need to use a full palette every single day. Color correction is a tool you can pull out of your kit whenever you feel your skin needs extra help. It is particularly useful for special events, photography, or days when you are dealing with a breakout or a lack of sleep.
For many people, a single peach or orange corrector for the under-eyes is the only step they need to look refreshed and awake. Others with rosacea may find that a light green primer is their daily holy grail. Experiment with different colors to see which ones make the most significant impact on your unique complexion.
Wrapping Up Your Color Correction Journey
Mastering color correctors is like unlocking a secret level in your beauty routine. It allows you to use less foundation and concealer overall because you are actually treating the “problem” at its source rather than just burying it under layers of beige makeup. By leaning into the science of the color wheel, you can achieve a flawless, radiant finish that looks like skin, only better.
The next time you look in the mirror and see a shadow or a spot that just won’t go away, remember the wheel. Grab your palette, trust the process, and watch your skin transform. Would you like me to help you find specific product recommendations for your skin type or perhaps draft a guide on how to choose the right foundation shade once you have corrected your skin?