Winter Chicken Coop Ventilation Guide How to Block Drafts Prevent Moisture
As the frost begins to settle on the windows and the first dusting of snow covers the coop, every backyard chicken keeper faces the same pressing question: How do I keep my flock warm without sacrificing their health? It is a common instinct to seal every crack and crevice to keep out the cold, but that approach can actually be more dangerous than the freezing temperatures themselves. The secret to a successful winter for your birds lies in a delicate balance of airflow. You need to block the biting drafts at the ground level while allowing the natural rise of warm, moist air to escape through the roof. When you master this flow, you create a sanctuary that keeps your hens dry, healthy, and happy until the spring thaw.
The Science of Chicken Coop Airflow
Understanding why ventilation matters starts with understanding the biology of a chicken. Unlike humans, chickens do not sweat to cool down, and they have a very high metabolic rate. This means they are constantly exhaling moisture and producing heat. In a confined space like a wooden coop, that moisture builds up rapidly. If it has nowhere to go, it settles on the birds’ combs, wattles, and feathers. When the temperature drops at night, that dampness turns into ice crystals, which is the primary cause of frostbite. Furthermore, chicken waste produces ammonia fumes. Without proper air exchange, these fumes can damage the delicate respiratory systems of your poultry.
The Difference Between a Draft and Ventilation
Many new keepers confuse these two concepts, leading to avoidable mistakes. A draft is a concentrated stream of cold air that blows directly onto your birds while they are roosting or nesting. This can strip away their body heat and cause stress. Ventilation, on the other hand, is the controlled movement of air that removes stale, moist air and replaces it with fresh, oxygen-rich air. The goal of a winter-ready coop is to facilitate ventilation high above the birds’ heads while ensuring the area where they sleep and sit remains a still, protected pocket of air.
Strategic Vent Placement: High vs Low
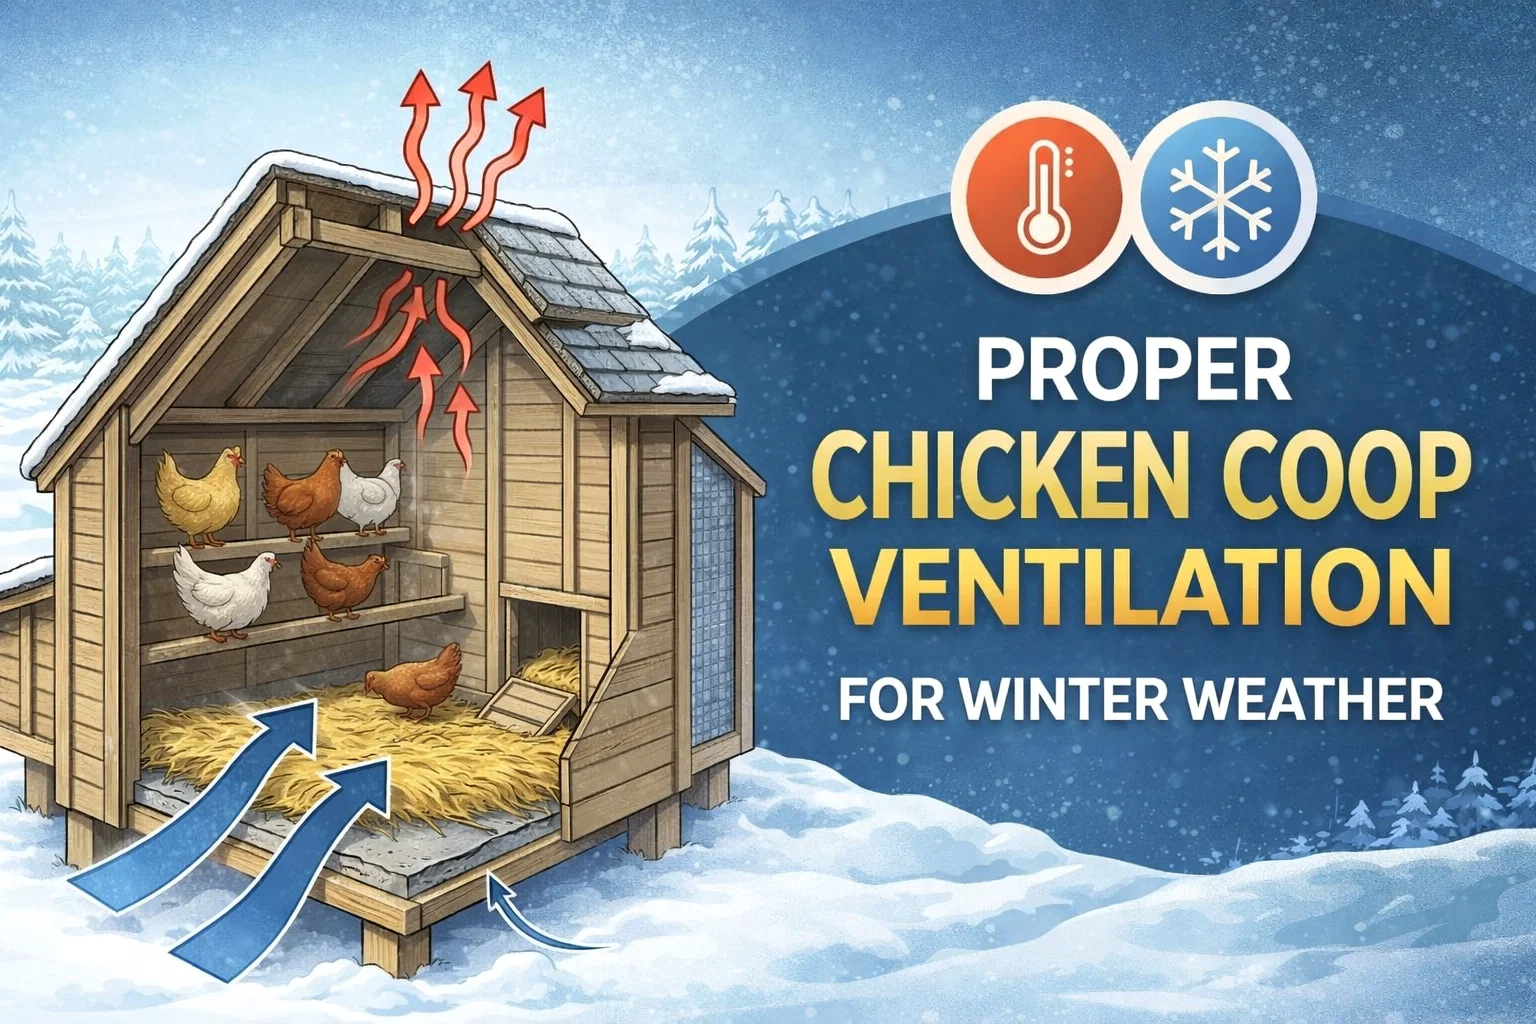
The golden rule for winterizing your coop is to block drafts low and vent high. Because warm air naturally rises, it carries the excess humidity toward the ceiling. By placing vents at the highest point of your structure, such as under the eaves or at the ridge of the roof, you allow that moisture to exit before it can condense and fall back down. If you place vents too low, you risk creating a wind tunnel effect right where your chickens are trying to stay warm. A solid floor with deep bedding acts as an insulator, and as long as the walls are solid up to a point above the highest roosting bar, your birds will remain comfortable.
Utilizing the Deep Litter Method
One of the best ways to manage the floor-level environment in the winter is by using the deep litter method. Instead of cleaning out the coop floor every week, you continue to add layers of carbon-rich material like pine shavings or straw. Over time, the bottom layers begin to compost, which actually generates a small amount of natural heat. This warm base helps keep the floor from becoming a source of chill. However, this method only works if the coop remains dry. If your ventilation is poor, the litter will become damp and moldy, which is why the rising airflow mentioned earlier is so vital to this specific management style.
Protecting the Roosting Area
When the sun goes down, your chickens will head for their roosting bars. This is the time when they are most vulnerable to the cold. To ensure they stay warm, make sure your roosts are wider than they are tall. Using a 2×4 board with the wide side facing up allows the chickens to sit on their feet, covering them with their warm breast feathers. This prevents their toes from being exposed to the air. You should position these bars well below the level of your high vents. This creates a “dead air” space where the birds can huddle together and share body heat without being buffeted by the moving air above them.
Monitoring Humidity Levels
If you want to take the guesswork out of your coop management, consider installing a simple hygrometer. This device measures the humidity in the air. Ideally, you want the coop humidity to stay as close to the outdoor humidity as possible. If you walk into the coop and see condensation on the windows or the underside of the roof, it is a clear sign that you need to open your vents further. Remember that it is better to have a coop that is slightly colder and dry than a coop that is slightly warmer and damp.
Common Winter Coop Myths
There are several misconceptions that circulate in the poultry community regarding winter care. One of the most dangerous is the idea that you must provide a heat lamp. While it seems kind, heat lamps are a massive fire risk and prevent chickens from naturally acclimating to the change in seasons. If the power goes out, birds that are used to a heated coop can die from the sudden shock of the cold. Another myth is that you should cover the coop in plastic wrap. While this stops drafts, it also traps moisture, essentially turning your coop into a sauna that promotes mold and illness. Focus on structural airflow instead of artificial heat or airtight seals.
Handling Extreme Weather Events
During a blizzard or a period of extreme wind, you might need to temporarily adjust your airflow. If the wind is driving snow directly into your high vents, you can partially cover the windward side while keeping the leeward side open. This ensures that the air can still move out without letting the elements in. Once the storm passes, return the vents to their fully functional state. Flexibility is key when dealing with the unpredictable nature of winter weather.
The Benefits of a Healthy Winter Flock
When you prioritize airflow and draft protection, the benefits are immediately visible. You will see fewer cases of respiratory distress and zero instances of frostbite on those beautiful red combs. Your hens will also be more likely to continue laying eggs throughout the darker months because they are not spending 100 percent of their energy simply trying to survive the damp cold. A healthy flock is a resilient flock, and a little bit of engineering at the start of the season goes a long way in ensuring their well-being.
Essential Maintenance Checklist
- Check all floor-level seams for gaps that might cause drafts.
- Ensure the eaves and roof vents are clear of cobwebs or debris.
- Rotate and add to your bedding to keep the floor dry and insulated.
- Clean the waterers daily to prevent ice buildup and excess spills.
- Observe the birds at night to make sure they are not huddling in a way that suggests a draft is hitting them.
Conclusion: Setting Up for Success
Preparing your chicken coop for the winter does not have to be a complicated or expensive endeavor. By following the simple logic of blocking drafts low and venting air high, you work with the laws of physics to create a healthy environment. Your chickens are incredibly hardy creatures that are well-equipped to handle the cold, provided they have a dry place to rest. Take the time to inspect your coop today, feel for those low-level drafts, and look up to make sure your vents are clear. With these small adjustments, you can enjoy the peace of mind that comes with knowing your flock is protected from the harshest elements of the season. Happy winter keeping!