50 Cleaning Hacks for a Cleaner Home Easy, Budget-Friendly Cleaning Tips Tricks
Keeping your home clean doesn’t have to mean spending hours scrubbing, buying expensive products, or tackling every chore at once. With a few clever cleaning hacks, everyday household items, and simple routines, you can make your home feel fresher, tidier, and more comfortable without adding extra stress to your day. From removing microwave splatters and cleaning bathroom grout to freshening mattresses and eliminating stubborn stains, these easy cleaning tips and tricks can help you handle common household messes more efficiently.
Whether you’re looking for budget-friendly cleaning solutions, quick ways to tidy up before guests arrive, or practical ideas for your weekly cleaning routine, these 50 cleaning hacks offer plenty of inspiration. Many use familiar supplies such as baking soda, dish soap, microfiber cloths, and white vinegar. The key is knowing which method works for each surface and using the right technique to avoid unnecessary damage.
Key Takeaways
- Use simple household cleaning supplies for many everyday messes.
- Clean high-touch surfaces, appliances, and frequently overlooked areas regularly.
- Choose gentle cleaning methods that suit each material and finish.
- Use microfiber cloths, soft brushes, and appropriate tools to reduce scrubbing time.
- Build a short daily cleaning routine to prevent dirt and clutter from accumulating.
- Always follow product labels and never mix cleaning chemicals, especially bleach with vinegar or ammonia.
50 Cleaning Hacks for a Cleaner, Fresher Home
These cleaning hacks cover kitchens, bathrooms, bedrooms, windows, floors, and everyday household surfaces. Start with the tasks that cause the most frustration in your home, then add other ideas as needed. You don’t need to complete all 50 in one day to notice a difference.
Kitchen Cleaning Hacks That Save Time
1. Steam-Clean Your Microwave With Lemon
Microwave splatters can quickly become stubborn when food residue dries onto the interior walls. Place a microwave-safe bowl containing water and a few lemon slices inside. Heat until the water produces plenty of steam, then leave the door closed for several minutes. Carefully remove the hot bowl and wipe the softened residue with a damp cloth.
The steam loosens food particles, while lemon adds a fresh scent. Avoid overheating the water, and never place metal utensils or unsuitable containers inside the microwave.
2. Refresh Cutting Boards After Food Preparation
Cutting boards can hold food odors and visible stains, especially after preparing onions, garlic, or colorful produce. Wash the board with hot water and dish soap after each use. For suitable plastic boards, a paste of baking soda and water can help loosen surface residue. Rinse thoroughly and allow the board to dry completely.
Use separate boards for raw meat and ready-to-eat foods, and sanitize them according to food-safety guidance. Avoid acidic treatments on natural stone boards or other surfaces that may be damaged by them.
3. Keep Your Garbage Disposal Fresh
If your garbage disposal smells unpleasant, first remove visible debris safely according to the manufacturer’s instructions. Run cold water and operate the disposal as directed. Clean accessible rubber splash guards with a brush and suitable dish soap after turning the unit off and following the manufacturer’s safety instructions.
Lemon peels may leave a fresh scent, but they are not a substitute for proper cleaning. Avoid putting your hands inside the disposal or adding harsh chemicals that could damage the unit.
4. Remove Grease From Suitable Microwave Surfaces
For greasy microwave splatters, steam with plain water first, then wipe the interior with a soft cloth and a small amount of mild dish soap if the manufacturer’s instructions allow it. Finish with a clean, damp cloth to remove soap residue.
Check the appliance manual before using baking soda or any abrasive cleaner. Avoid scrubbing heating elements, vents, and delicate interior coatings.
5. Clean Yellowed Plastic Carefully
Some plastic containers and kitchen accessories develop discoloration over time. Begin by washing them with warm water and dish soap. If the manufacturer permits it, use a gentle baking soda paste to clean the surface without aggressive scrubbing.
Discoloration caused by heat, age, or permanent staining may not disappear completely. Avoid using baking soda on delicate finishes that scratch easily, and do not heat plastic unless it is specifically labeled microwave-safe.
6. Degrease Kitchen Surfaces With Dish Soap
Dish soap is useful for everyday grease on washable cabinet fronts, stovetops, and other compatible surfaces. Add a small amount to warm water, wipe the area with a soft cloth, and follow with a clean damp cloth. Dry the surface to prevent streaks or water marks.
Always check the manufacturer’s care instructions before cleaning painted cabinets, natural stone, or specialty finishes.
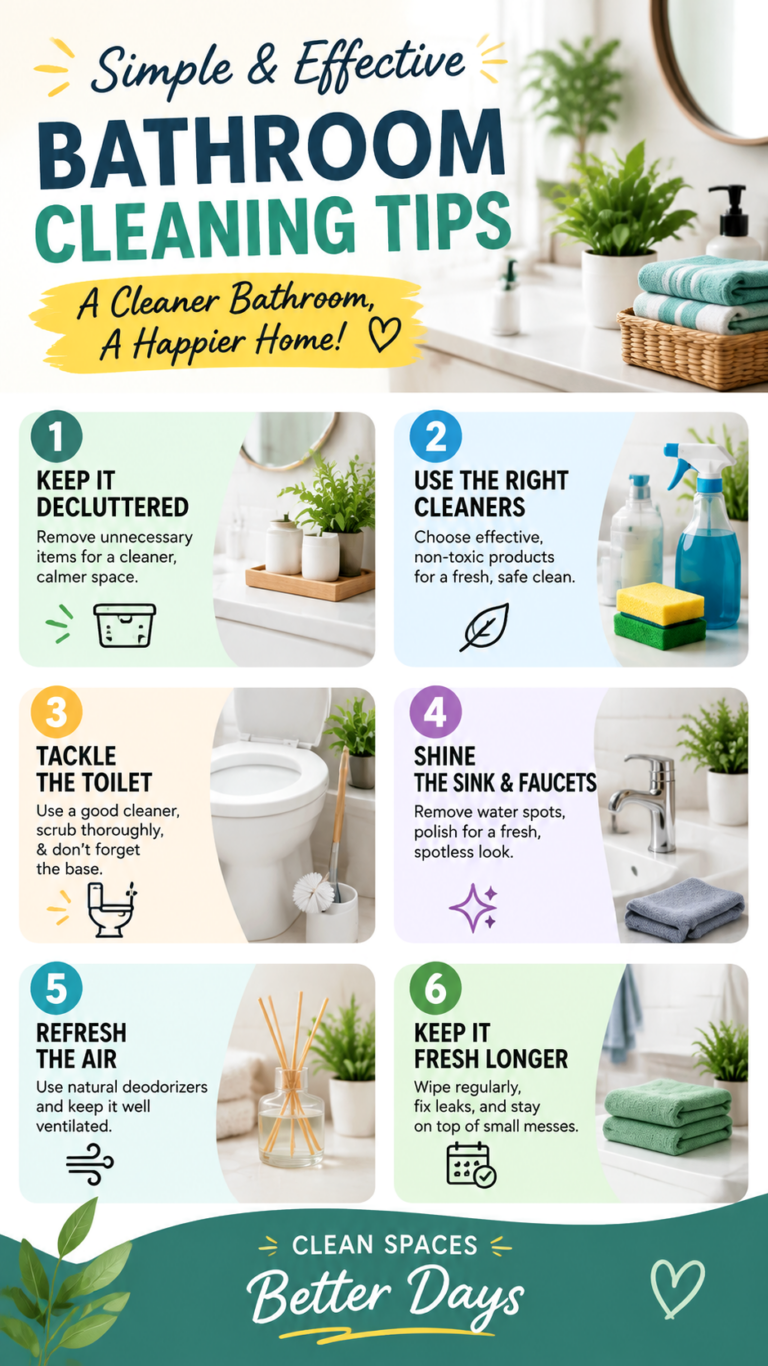
Bathroom Cleaning Hacks for a Fresher Space
7. Remove Shower Scum With Dish Soap
Soap scum forms when soap residue combines with minerals in water. For compatible shower surfaces, apply diluted dish soap with a non-scratch sponge, gently work over the affected area, and rinse thoroughly. A soft brush can help reach corners and textured sections.
For glass, use a cleaner suitable for shower doors and dry the surface with a squeegee after rinsing. Avoid abrasive pads that can scratch glass coatings or acrylic fixtures.
8. Descale Compatible Showerheads
Mineral deposits can block showerhead openings and affect water flow. If the manufacturer’s instructions permit it, soak a removable showerhead in an appropriate descaling solution. White vinegar is suitable for some finishes, but it can damage certain coatings and materials, so check first.
Rinse thoroughly before reinstalling the showerhead. If removal is not recommended, use a soft brush and a suitable bathroom cleaner instead.
9. Refresh Grout Without Harsh Scrubbing
Bathroom grout can collect soap residue and everyday dirt. Start with a grout-safe cleaner and a soft nylon brush. Work in small sections, follow the product’s contact-time instructions, and rinse away the residue.
Baking soda mixed with a little water may help with some surface grime, but it will not resolve every stain or mold problem. Avoid using acidic vinegar on cement-based grout because repeated exposure can gradually damage it.
10. Clean Faucets and Fixtures Gently
Water spots and soap residue can make bathroom faucets look dull. Wipe them with a soft cloth and a cleaner approved for the fixture’s finish. Dry with a microfiber cloth to reduce water marks.
Skip vinegar on marble, limestone, and sensitive metallic finishes unless the manufacturer specifically approves it. Gentle, frequent cleaning is often safer than aggressive stain removal.
11. Make Toilet Cleaning More Effective
Apply a toilet cleaner designed for the bowl, paying attention to the areas beneath the rim. Let it sit for the time specified on the label, scrub with a toilet brush, and flush as directed. Wipe the seat, lid, handle, and exterior using a separate cloth and a suitable disinfectant when needed.
Never mix toilet cleaner with bleach, vinegar, or other cleaning products. Some combinations release dangerous gases. Use one product at a time and follow its instructions carefully.
Bedroom Cleaning Hacks for a More Comfortable Home
12. Freshen Your Mattress With Baking Soda
Mattresses can collect dust, body oils, and everyday odors. Strip the bedding, vacuum the mattress using a clean upholstery attachment, and check the manufacturer’s care instructions. If the material permits, sprinkle a light layer of baking soda over the surface and leave it briefly before vacuuming it up completely.
This method may help reduce some surface odors, but it does not disinfect a mattress or remove every stain. Keep moisture to a minimum because damp mattress materials can take a long time to dry.
13. Wash Pillows According to Their Care Labels
Pillows can retain sweat, dust, and natural oils. Check the care label before washing because some pillows are machine-washable while others require spot cleaning or professional care. Use the recommended detergent, washing cycle, and drying method.
Dry pillows completely before putting pillowcases back on. Tennis balls or dryer balls may help redistribute filling in certain machine-dryable pillows, but only use them if the care instructions permit it.
14. Remove Dust From Blinds With a Sock
Cleaning blinds can feel tedious because dust settles on multiple narrow slats. Slip a clean microfiber sock over your hand and gently wipe each slat. For heavier buildup, slightly dampen the sock if the blind material allows moisture.
Work from top to bottom so dust does not fall onto already-cleaned sections. Finish by vacuuming the windowsill and nearby floor.
15. Clean Keyboard Keys With a Soft Brush
Keyboards collect crumbs, dust, and fingerprints. Disconnect the keyboard or power down the device according to the manufacturer’s instructions. Turn it gently to release loose debris, then use a soft brush or an appropriate electronics-cleaning tool.
Use a lightly dampened cloth for compatible exterior surfaces, keeping liquids away from openings. Never spray cleaner directly onto a keyboard, and avoid soaking key mechanisms.
16. Reduce Pet Hair With the Right Tools
Pet hair can cling to bedding, rugs, and upholstered furniture. A lint roller, upholstery attachment, or pet-hair removal tool can make cleanup easier. On suitable fabrics, a slightly damp rubber glove may help gather loose hair into small clumps.
Test any tool on a hidden area first. Avoid excessive friction on delicate fabrics, and clean pet bedding regularly according to its care label.
Expert Insight: Match the Method to the Surface
The best cleaning hack is not always the strongest one. Baking soda can be mildly abrasive, vinegar is acidic, and even water can damage certain finishes when used incorrectly. Check care labels, test unfamiliar products in an inconspicuous spot, and use the gentlest effective method. Never mix cleaning products, and keep treated surfaces and textiles properly rinsed or dried.
Laundry and Fabric Cleaning Hacks
17. Freshen Washable Fabrics Between Washes
For clothing and household fabrics that are not visibly dirty, airing them out may help reduce stale odors. Hang suitable items in a well-ventilated area and allow them to dry fully. For washable fabrics that need deeper cleaning, follow the garment’s care label and use the recommended detergent.
Fabric refresher products can be useful for compatible upholstery, curtains, and textiles. Always check the label, test for colorfastness, and keep sprays away from children and pets.
18. Minimize Static Cling in Laundry
Static electricity can make lightweight clothing cling together, especially in dry conditions. Avoid overdrying garments, separate suitable fabric types when needed, and consider reusable dryer balls if the garment and appliance instructions permit them.
Dryer sheets may help reduce static on compatible fabrics, but they are not suitable for every textile or appliance. Follow product directions and avoid using fabric softener on materials that require moisture-wicking performance.
19. Remove Ink Stains From Washable Fabrics
Ink stains can spread if rubbed aggressively. Check the garment’s care instructions and identify the type of ink if possible. Blot the stain gently with a clean cloth instead of scrubbing, and use a stain remover approved for the fabric.
Test the product in a hidden area first. Avoid putting the item in a hot dryer until the stain has been removed, since heat may make some stains harder to treat.
20. Treat Red Wine Stains Promptly
Blot fresh red wine with a clean, absorbent cloth to lift as much liquid as possible. Do not rub, because this can push the stain deeper into the fibers. Use a fabric-safe stain treatment and follow its instructions before washing.
Avoid applying white wine as a cleaning method. It does not reliably remove red wine stains and may leave additional residue. Delicate garments and upholstery may need professional cleaning.
Living Room and Everyday Surface Cleaning
21. Dust Baseboards With Microfiber
Baseboards often collect dust that becomes noticeable when sunlight hits the room. Wipe them with a dry microfiber cloth or a vacuum brush attachment. For washable painted surfaces, use a lightly dampened cloth and mild cleaner if needed.
Work around the room in one direction to avoid missing corners. Dry the surface afterward, especially near wood flooring or areas where moisture can collect.
22. Make Mirrors Shine Without Streaks
For clearer mirrors, remove dust first, then use a glass cleaner approved for the surface. Spray the cleaner onto a microfiber cloth rather than directly onto the mirror, especially near the edges where liquid can seep behind the glass.
Wipe with overlapping strokes and finish with a dry section of cloth. Avoid excessive product, which can leave streaks and make the mirror look cloudy.
23. Clean Windows for a Brighter Room
Dust window frames and sills before cleaning the glass. Use a suitable glass cleaner and a lint-free cloth or squeegee. Cleaning when the glass is cool can help reduce rapid drying and visible streaks.
Newspaper is sometimes suggested as an alternative wiping material, but modern printing inks and paper quality vary. A clean microfiber cloth is generally a more predictable option.
24. Freshen Upholstery and Cushions
Vacuum upholstered furniture regularly, paying attention to seams, cushion edges, and areas where crumbs accumulate. Check the manufacturer’s cleaning code before using liquids or stain removers. Some upholstery requires water-free cleaning methods.
Rotate removable cushions when appropriate and wash their covers only if the care label allows it. Regular vacuuming can help keep everyday dust from building up.
Appliance Cleaning Hacks for a Well-Maintained Home
25. Clean Your Washing Machine
Washing machines can develop residue and unpleasant odors when detergent buildup and moisture accumulate. Clean the detergent drawer, wipe the door seal, and leave the door open after a cycle when the manufacturer recommends it.
Run the machine’s designated cleaning cycle using the recommended product. Do not combine vinegar, bleach, descalers, or other cleaning agents. Follow the appliance manual for safe and effective maintenance.
26. Keep Your Refrigerator Clean
Wipe spills as soon as they happen to prevent sticky residue and lingering food odors. Remove shelves and drawers only as directed, wash compatible parts with mild dish soap, and dry them before reinstalling.
Check expiration dates regularly and clean small sections at a time. Use a refrigerator-safe cleaner, and avoid strong fragrances that could transfer to food.
27. Remove Dust From Small Appliances
Toasters, coffee makers, and other countertop appliances benefit from regular exterior cleaning. Unplug the appliance and allow it to cool before wiping the outside with a suitable cloth.
Never immerse electrical appliances unless the manufacturer explicitly states that it is safe. Follow the instructions for cleaning removable parts, filters, and water reservoirs.
28. Maintain Your Oven and Stovetop
Food spills become harder to remove when repeatedly exposed to heat. Once the appliance is cool, remove loose crumbs and use a cleaner specifically approved for your oven or stovetop. A non-scratch cloth or suitable brush can help loosen residue.
For glass cooktops, avoid abrasive pads and utensils that may scratch the surface. Follow the manufacturer’s instructions for baked-on food and never apply cleaner to hot heating elements unless directed.
Floor Cleaning Hacks for a Neater Home
29. Dust Floors Before Mopping
Sweeping or vacuuming before mopping prevents loose dirt from turning into muddy streaks. Start at the farthest corner and work toward the exit. Use a mop and cleaning solution suitable for the floor material.
Hardwood, laminate, natural stone, and vinyl have different care requirements. Avoid excessive water on wood-based floors and never assume a vinegar solution is safe for every finish.
30. Pick Up Small Debris With the Right Tool
A handheld vacuum or soft brush can help remove crumbs from corners, around furniture legs, and along floor edges. Use a tool appropriate for the surface to avoid scratching or damaging delicate finishes.
For pet hair, choose a vacuum attachment designed for upholstery or flooring. Clean the filter and brush roll according to the manufacturer’s instructions to maintain performance.
Quick Cleaning Habits That Make a Big Difference
31. Use a Five-Minute Reset
Choose a short period each day to return misplaced items, wipe obvious spills, clear countertops, and collect rubbish. Set a timer if that helps you stay focused. Small resets prevent mess from spreading throughout the home.
32. Keep Cleaning Supplies Together
Store frequently used cloths, gloves, brushes, and compatible cleaners in a convenient cleaning caddy. Keep products in their original labeled containers and away from children and pets. Never transfer chemicals into drink bottles or unmarked containers.
A well-organized cleaning kit saves time because you do not need to search for supplies before starting a task.
33. Clean From Top to Bottom
Start with higher shelves, light fixtures that are safe to reach, and the tops of furniture. Then clean counters, tables, and lower surfaces before finishing with the floor. This approach keeps falling dust from landing on areas you have already cleaned.
Use stable equipment for elevated areas and avoid climbing on furniture. For ceiling fans or fixtures, turn off the power where appropriate and follow the manufacturer’s safety instructions.
34. Disinfect High-Touch Surfaces When Needed
Door handles, light switches, and frequently used remote controls can collect fingerprints and everyday grime. Wipe them with a cloth and suitable cleaner, following the manufacturer’s instructions for electronic devices.
When disinfection is appropriate, choose a product labeled for the surface and follow its required contact time. Cleaning removes dirt, while disinfecting is a separate step intended to address germs.
35. Reduce Clutter Before Deep Cleaning
Clear surfaces before wiping them, and return items to their usual places before vacuuming or mopping. Use a small basket to collect misplaced belongings, then sort them when you finish the room.
Less clutter means fewer obstacles to clean around and makes regular maintenance feel more manageable.
More Smart Cleaning Tips for Everyday Messes
36. Clean Sink Drains and Strainers
Remove food particles from the sink strainer and wash it with dish soap. Wipe the surrounding sink and faucet, then rinse away residue. For persistent drain odors or slow drainage, follow the plumbing fixture’s maintenance guidance rather than pouring several cleaners into the drain.
37. Wipe Kitchen Cabinet Handles
Cabinet handles collect oils from hands and cooking residue. Wipe them with a soft cloth and a compatible cleaner, then dry thoroughly. Pay extra attention to frequently touched areas around the stove and sink.
38. Refresh Trash Bins Regularly
Empty bins before they overflow and clean spills promptly. Wash suitable bins with soap and water, rinse, and dry completely before adding a new liner. If odors persist, check for leaks or food residue beneath the liner.
Use disinfectants only when appropriate and follow the product label. Never combine them with other cleaning chemicals.
39. Remove Dust From Lampshades
Dust fabric or hard-sided lampshades with a clean microfiber cloth or a suitable soft brush. Turn off the lamp and allow the bulb to cool before cleaning nearby surfaces. Check care instructions before using moisture on fabric shades.
40. Clean Pet Sleeping Areas
Wash removable pet bedding according to its care label and vacuum around the sleeping area. Keep food bowls, water bowls, and litter areas clean using appropriate products. Allow everything to dry fully before returning bedding or accessories to their place.
41. Tackle Dust in Hard-to-Reach Corners
Use a vacuum attachment or soft long-handled duster to reach behind furniture and along ceiling corners. Move lightweight furniture only when it is safe to do so, and avoid pulling heavy items that could injure you or damage the floor.
42. Remove Scuff Marks From Suitable Walls
Test a damp microfiber cloth on a hidden area before wiping a painted wall. For stubborn marks, use a small amount of mild soap diluted in water if the finish permits it. Blot gently and dry the area to avoid leaving water marks.
Avoid aggressive scrubbing, which can remove paint or leave a shiny patch on matte finishes.
43. Keep Entryways Cleaner
Place a doormat at the entrance and encourage everyone to remove outdoor shoes when practical. Shake or vacuum mats regularly, and wipe muddy footprints as soon as possible. This simple habit reduces the amount of dirt tracked through the house.
44. Wipe Down Light Switches and Door Frames
Fingerprints often collect around door frames and switches. Use a soft cloth and a suitable cleaner, applying liquid to the cloth rather than directly onto electrical fittings. Never allow moisture to enter switches or outlets.
45. Prevent Dust From Returning Quickly
Use microfiber cloths that trap dust instead of spreading it around. Replace or wash them regularly, and clean from higher surfaces down to the floor. Vacuum carpets and upholstery according to how frequently each area is used.
Regular ventilation, suitable filtration, and keeping clutter under control can also help manage household dust.
46. Deal With Spills Before They Set
Whether the spill comes from coffee, juice, or food, prompt attention usually makes cleanup easier. Blot liquid with an absorbent cloth, identify the material, and choose a compatible stain remover. Work gently and avoid spreading the stain beyond its original edges.
47. Maintain Clean Cleaning Tools
Dirty cloths, mop heads, sponges, and brushes can spread residue from one surface to another. Wash reusable tools according to their care instructions and allow them to dry completely. Replace damaged or heavily worn items when they can no longer be cleaned effectively.
Keep toilet-cleaning tools separate from kitchen and food-preparation tools. Use dedicated cloths for bathrooms and other areas where cross-contamination is a concern.
48. Make a Simple Weekly Cleaning Checklist
Write down recurring tasks such as vacuuming, changing bedding, wiping bathroom fixtures, and cleaning appliance surfaces. Divide the work across several days rather than trying to complete everything at once.
A short checklist helps you remember less obvious chores while allowing flexibility for busy weeks.
49. Refresh the Air Without Masking Odors
Open windows when outdoor conditions permit, remove rubbish, wash odor-trapping fabrics, and clean the source of unpleasant smells. If a persistent odor comes from a drain, appliance, or damp area, investigate the cause instead of relying on fragrance alone.
Avoid spraying fragrance near food, pets, or people who may be sensitive to scented products. Ventilation and source removal are often the most useful first steps.
50. Finish With a Quick Evening Reset
Spend a few minutes putting away loose items, wiping the kitchen counter, rinsing the sink, and preparing the main living area for the next day. Focus on visible clutter rather than perfection.
This small habit can make mornings feel calmer and prevent everyday messes from turning into a long weekend cleaning project.
How to Build a Simple Home Cleaning Routine
Even the best cleaning tips are more useful when they fit naturally into your schedule. Instead of trying to deep-clean the entire house every weekend, divide tasks into daily, weekly, and occasional routines.
Daily Cleaning Tasks
- Wipe kitchen counters after food preparation.
- Wash dishes or load the dishwasher.
- Put misplaced items back where they belong.
- Wipe visible bathroom splashes.
- Complete a five-minute evening reset.
Weekly Cleaning Tasks
- Vacuum carpets and clean hard floors.
- Dust furniture, shelves, and baseboards as needed.
- Clean mirrors, sinks, toilets, and shower surfaces.
- Change bedding and wash towels.
- Check the refrigerator for spills and expired food.
Monthly or Occasional Cleaning Tasks
- Clean accessible appliance filters and removable parts according to their manuals.
- Dust blinds, vents, and less frequently used shelves.
- Wash washable cushion covers and curtains when appropriate.
- Inspect under furniture and behind appliances when safe.
- Declutter cupboards and organize household cleaning supplies.
Important: Consistency matters more than completing every task perfectly. A few minutes of regular maintenance can prevent many everyday messes from becoming difficult cleaning jobs. Choose the routines that suit your household and adjust them as your needs change.
Common Cleaning Mistakes to Avoid
Some popular cleaning shortcuts can create extra work or damage household surfaces. Keep these practical precautions in mind as you try new cleaning hacks.
- Mixing cleaning products: Never combine bleach with vinegar, ammonia, toilet cleaners, or other incompatible products. Dangerous gases may form.
- Using too much cleaner: Excess product can leave residue, streaks, or sticky surfaces. Follow the label’s recommended amount.
- Ignoring care labels: Upholstery, mattresses, delicate clothing, and specialty flooring may require specific methods.
- Scrubbing too aggressively: Abrasive tools can scratch glass coatings, damage paint, or dull polished finishes.
- Leaving surfaces wet: Moisture can damage wood, encourage mold growth, or affect electrical equipment.
- Expecting every DIY solution to work: Household ingredients cannot replace specialized treatments for every stain, mineral deposit, or hygiene concern.
Safety tip: Test unfamiliar cleaning methods on a small, hidden area first. Read product labels, provide ventilation, wear appropriate protection when directed, and keep cleaners away from children and pets. For serious mold problems, persistent water damage, or unknown chemical spills, use appropriate professional guidance rather than experimenting with household mixtures.
Quick Points: 50 Cleaning Hacks at a Glance
- Kitchen: Steam microwave splatters, clean cutting boards, wipe grease, and maintain appliances.
- Bathroom: Remove soap scum, care for grout, clean faucets, and maintain toilets safely.
- Bedroom: Vacuum mattresses, wash pillows correctly, clean blinds, and manage pet hair.
- Living areas: Dust baseboards, clean mirrors, refresh upholstery, and remove clutter.
- Daily routine: Clean spills promptly, maintain your tools, and finish with a quick evening reset.
Conclusion: Make Cleaning Easier With Small, Smart Habits
A cleaner home does not require an expensive collection of products or an exhausting schedule. The most effective cleaning hacks are often simple habits that help you handle messes before they build up. Steaming microwave residue, using microfiber cloths, cleaning bathroom surfaces regularly, caring for bedding properly, and keeping appliances maintained can all make everyday chores feel more manageable.
Start with three or four tips that solve your biggest cleaning frustrations. Keep the supplies you need within easy reach, follow the care instructions for each surface, and build a routine that works for your household. As these habits become familiar, you can gradually add more tasks without overwhelming your schedule.
Save this collection of 50 cleaning hacks so you can return to it whenever your kitchen needs a refresh, your bathroom needs attention, or your home could use a quick reset. With practical cleaning tips, budget-conscious choices, and a little consistency, you can create a fresher and more comfortable living space one small task at a time.
Tags
Cleaning Hacks
Home Cleaning Tips
Easy Cleaning Tricks
Budget-Friendly Cleaning
DIY Cleaning Solutions
Kitchen Cleaning
Bathroom Cleaning
Home Organization