
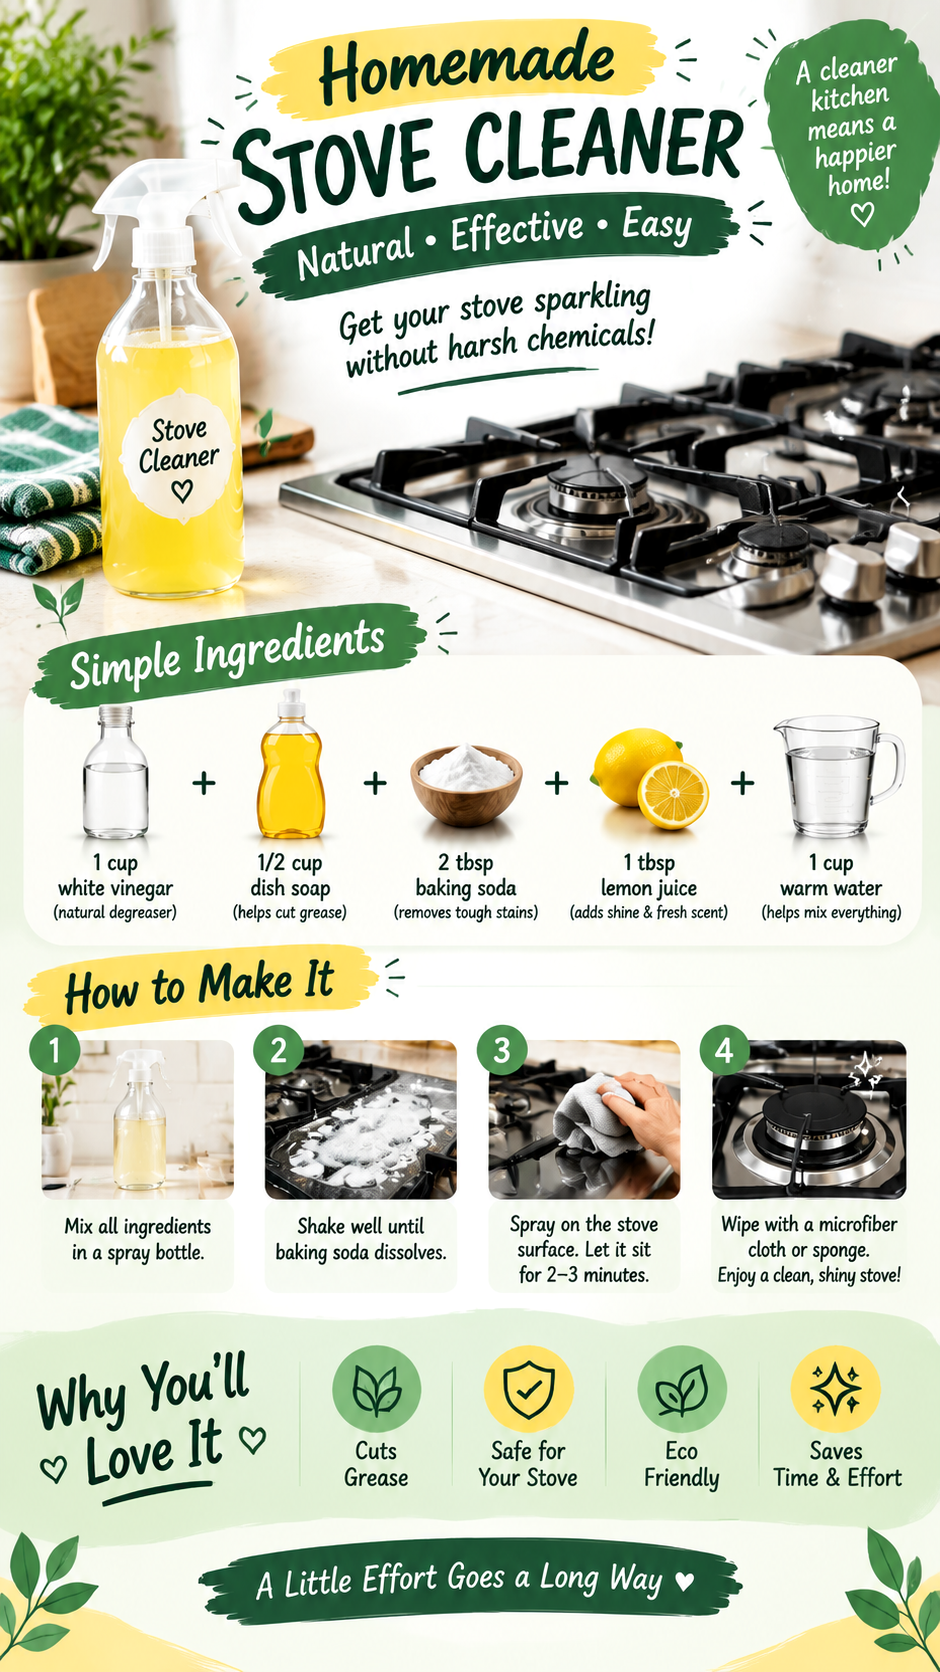
DIY Stove Cleaning Solution Easy Homemade Kitchen Cleaner for Grease and Stains
A clean, sparkling stove can make your entire kitchen feel fresher and more inviting. The good news is that you do not always need an expensive commercial cleaner to tackle everyday grease, food splashes, and cooking residue. With a few common household ingredients, you can prepare a simple DIY stove cleaning liquid that helps make routine kitchen cleaning easier.
This homemade kitchen cleaning solution combines white vinegar, dish soap, baking soda, lemon juice, and warm water. Each ingredient has a different purpose, from helping loosen greasy residue to supporting everyday surface cleaning. When used correctly, this easy stove cleaning hack can become a useful part of your regular kitchen maintenance routine.
Whether you are preparing dinner every evening or simply want to keep your kitchen looking its best, this practical recipe offers a straightforward approach to cleaning your stove. Follow the ingredient measurements, preparation steps, and safety tips below to make a cleaner that fits your household routine.
Key Takeaways
- Make a simple homemade stove cleaner using common household ingredients.
- Use dish soap to help remove everyday cooking grease and oily residue.
- Apply the solution to a cool stove and wipe thoroughly with a suitable cloth.
- Always test the cleaner on a small, inconspicuous area before regular use.
- Check your stove manufacturer’s cleaning instructions, especially for glass, ceramic, and specialty finishes.
- Keep homemade cleaning mixtures properly labeled and away from children and pets.
DIY Daily Stove Cleaning Liquid: Ingredients You Need
The best part of this DIY stove cleaning liquid is its simple ingredient list. Most of the ingredients are familiar household staples, making the recipe convenient for people who prefer practical, budget-conscious cleaning routines.
For this recipe, gather the following ingredients before you begin.
- 1 cup white vinegar: Helps dissolve some mineral deposits and loosen certain types of everyday residue.
- 1/2 cup dish soap: Helps lift grease and oily cooking splashes from suitable stove surfaces.
- 2 tablespoons baking soda: Provides mild abrasive action when used as a paste or scrub, although it can leave residue when mixed into a liquid.
- 1 tablespoon lemon juice: Adds a fresh citrus scent and contains citric acid, which can help with some mineral deposits.
- 1 cup warm water: Dilutes the mixture and helps make it easier to spread and wipe away.
Important safety note: This combination is not automatically safe for every stove or more effective than a standard cleaner. Vinegar and baking soda react with each other, producing carbon dioxide and reducing their individual effectiveness when combined. For a more practical daily cleaner, consider using diluted dish soap and water as your primary cleaning solution, reserving vinegar or baking soda for suitable tasks when your appliance manufacturer permits them.
1. White Vinegar for Everyday Residue
White vinegar is a familiar ingredient in many household cleaning routines. Its acidity can help loosen certain mineral deposits and water marks, making it useful for some hard, washable surfaces.
However, vinegar is not suitable for every stove finish. It may damage some natural stone surfaces, protective coatings, or manufacturer-specific finishes. Always check the appliance manual before applying acidic cleaners.
2. Dish Soap for Grease Removal
Dish soap is one of the most useful ingredients for routine stove cleaning because it is formulated to help remove food oils and grease. A small amount mixed with warm water is often enough to clean fresh splashes before they become stubborn, baked-on messes.
For daily maintenance, you may not need the full half-cup measurement shown in the recipe. Using a smaller quantity can reduce excessive suds and make rinsing easier.
3. Baking Soda for Stubborn Spots
Baking soda is commonly used as a mild abrasive in household cleaning. When a stove has a stubborn spot, a small amount mixed with water can sometimes help lift residue from a compatible surface.
It is important to distinguish between using baking soda as a paste and adding it to a vinegar-based liquid. When these ingredients react, they fizz, but the bubbling does not mean the finished mixture becomes a stronger cleaner. Baking soda may also scratch delicate finishes if rubbed aggressively.
4. Lemon Juice for a Fresh Citrus Scent
Lemon juice gives a homemade cleaner a fresh citrus aroma and contains citric acid. Although it can help with certain mineral residues, it should not be treated as a disinfectant or a guaranteed solution for baked-on grease.
Like vinegar, lemon juice is acidic and may be unsuitable for some surfaces. For a simple daily cleaning routine, you can skip it if your appliance instructions recommend avoiding acidic products.
5. Warm Water for Easy Wiping
Warm water helps dilute dish soap and makes everyday cooking residue easier to wipe away. It is particularly helpful when cleaning fresh spills from a cool stove.
Use warm rather than boiling water, and never pour water into burners, electrical components, ignition openings, or other sensitive areas.
How to Make Homemade Stove Cleaning Liquid
Preparing a homemade kitchen cleaner does not require complicated equipment. A clean cloth, a suitable container, and a few minutes are usually enough for a basic cleaning mixture.
Step 1: Prepare a Simple Cleaning Solution
For everyday cleaning, start with a simple mixture of warm water and a small amount of dish soap. This approach is generally more straightforward than combining several ingredients that may react with one another.
- Pour approximately one cup of warm water into a clean container.
- Add a small squirt of mild dish soap.
- Stir gently until the soap is evenly distributed.
- Transfer the mixture to a clean spray bottle if the bottle is suitable for the solution.
If you prefer the original multi-ingredient recipe, do not automatically combine everything in a sealed spray bottle. The reaction between vinegar and baking soda releases carbon dioxide, which can build pressure in a closed container. Never store a reactive mixture in a sealed bottle.
Step 2: Label Your Cleaner
Write the contents on the bottle and mark it clearly as a homemade cleaning solution. Store it away from food, drink containers, children, and pets. Never reuse a bottle that previously contained a product that could react with the new mixture unless it has been properly cleaned and is suitable for reuse.
Step 3: Gather Your Cleaning Tools
Keep the process simple by preparing a few useful supplies:
- A soft microfiber cloth for wiping and drying.
- A nonabrasive sponge for compatible surfaces.
- A separate cloth dampened with clean water for removing soap residue.
- A small bowl for preparing a fresh cleaning mixture when needed.
Avoid steel wool, harsh scouring pads, and abrasive brushes on delicate stove finishes. The wrong tool can leave scratches even when the cleaning solution itself is mild.
Why This Matters
A good daily stove cleaner should be easy to remove, compatible with the appliance finish, and suitable for frequent use. More ingredients do not necessarily mean better cleaning. A mild dish-soap solution and a soft cloth are often the most practical starting point for routine maintenance.
How to Use DIY Stove Cleaner for the Best Results
Once your cleaning solution is ready, follow a simple routine to remove everyday splashes without damaging the stove or leaving behind a sticky film.
Step 1: Turn Off the Stove and Let It Cool
Before cleaning, switch off all burners and allow the appliance to cool completely. Never spray a cleaning liquid onto a hot burner or heated cooking surface. Heat can cause liquid to evaporate quickly, leave residue, or create a burn risk.
For gas stoves, make sure the burners are off. For electric and induction cooktops, follow the manufacturer’s instructions for confirming that the surface is safe to clean.
Step 2: Remove Loose Crumbs and Food Particles
Use a dry paper towel or soft cloth to collect loose crumbs, dried food particles, and other debris. Removing these first helps prevent the particles from spreading across the surface while you wipe.
If your gas stove has removable grates or burner caps, take them off only when the appliance is cool and the manufacturer’s instructions permit removal. Keep cleaning liquid away from gas ports, igniters, and electrical openings.
Step 3: Apply the Cleaner Carefully
Apply a small amount of the dish-soap solution to a microfiber cloth rather than soaking the stove. Wipe the surface gently, concentrating on areas with fresh grease splashes and fingerprints.
For delicate glass or ceramic cooktops, use only products and cleaning tools approved by the manufacturer. Some surfaces require a specialist cooktop cleaner instead of homemade mixtures.
Step 4: Allow a Short Dwell Time When Appropriate
Fresh grease may loosen after a brief contact with a mild cleaning solution. If the manufacturer’s instructions allow it, let the damp cloth rest over a compatible greasy area for a short time before wiping.
Avoid leaving liquid pooled around burner openings, control knobs, seams, or electrical parts. Do not allow a homemade cleaner to dry on the surface.
Step 5: Wipe Away Residue
Use a clean cloth dampened with plain water to remove soap and loosened grime. This step is important because leftover detergent can create streaks or a tacky surface.
Rinse the cloth as needed rather than spreading dirty water over the entire cooktop.
Step 6: Dry and Inspect the Stove
Finish with a dry microfiber cloth to remove water marks and restore a neat appearance. Check the area around the burners and controls to ensure no moisture or cleaning residue remains.
For gas stoves, make sure removable components are completely dry and correctly positioned before using the appliance again. Never operate a burner if its ports or ignition components are wet or obstructed.
Pro Tip: Clean small spills as soon as the stove is safely cool. Fresh residue is usually easier to remove than grease that has been repeatedly heated and hardened over several cooking sessions.
How to Clean Different Types of Stove Surfaces
Not all stoves have the same surface materials. A method that works well on stainless steel may be unsuitable for glass, ceramic, or a coated finish. Always identify your cooktop type before choosing a cleaner.
Gas Stoves
Gas stoves often collect grease around the burners, grates, and control area. Wipe the main surface with a suitable mild cleaner and a soft cloth. Remove grates and burner caps only as directed in the manual, and clean them separately when appropriate.
Keep liquid out of burner openings and ignition components. Avoid using excess water around the gas outlets, and ensure all parts are fully dry before operating the stove.
Glass and Ceramic Cooktops
Glass and ceramic cooktops can develop visible streaks and burnt-on marks. Use a cleaner specifically approved for the surface, together with a soft cloth or a recommended cooktop pad.
Avoid rough sponges, aggressive scrubbing, and unapproved abrasive powders. If a spill has hardened, consult the manufacturer’s guidance for removing it safely instead of scraping with an improvised tool.
Stainless Steel Stove Surfaces
Stainless steel can show fingerprints, streaks, and water spots. A small amount of mild dish soap diluted in water is often a useful starting point for routine cleaning.
Wipe in the direction of the metal’s grain where visible, then remove soap residue and dry with a soft cloth. Avoid chlorine bleach, harsh abrasives, and acidic cleaners unless the manufacturer specifically approves them.
Common Stove Cleaning Mistakes to Avoid
Even a simple cleaning routine can cause problems if the wrong ingredients or tools are used. Keep these common mistakes in mind when maintaining your stove.
- Cleaning while the stove is hot: Wait until the surface is completely cool to reduce the risk of burns and damage.
- Mixing ingredients without checking compatibility: Vinegar and baking soda react with each other, while other household products may create hazardous fumes.
- Mixing cleaners with bleach: Never combine vinegar, lemon juice, or other acids with chlorine bleach. Never mix bleach with ammonia-containing products.
- Using too much liquid: Excess liquid can enter burner openings, electrical components, and other sensitive areas.
- Scrubbing delicate finishes: Rough pads and abrasive powders may scratch glass, ceramic, and coated surfaces.
- Leaving soap behind: Thoroughly wipe the surface with a clean, damp cloth and dry it afterward.
- Storing a reactive mixture in a sealed bottle: Gas produced by a chemical reaction can create dangerous pressure.
- Assuming homemade means harmless: Household ingredients can still irritate skin or eyes and damage certain materials.
How Often Should You Clean Your Stove?
The ideal cleaning schedule depends on how often you cook and the kinds of meals you prepare. A household that cooks daily may need to wipe the stove every evening, while occasional cooks may need less frequent maintenance.
Daily Cleaning
After cooking, allow the stove to cool and wipe away fresh splashes, crumbs, and light grease with a suitable cloth and mild cleaner. This quick habit helps prevent residue from building up.
Weekly Cleaning
Set aside time to clean accessible areas that need extra attention, such as compatible removable grates, the surrounding countertop, and the exterior of control knobs. Follow the manufacturer’s instructions for removing and reinstalling components.
Deep Cleaning When Needed
For heavy grease or baked-on spills, use an approved cleaner designed for your stove type. A daily dish-soap solution is useful for maintenance, but it may not remove every stubborn deposit.
Do not force a stain away with aggressive scrubbing. The right appliance-safe cleaner and recommended technique are more important than applying extra pressure.
Benefits of a Simple Homemade Kitchen Cleaning Routine
A practical stove cleaning routine can make everyday kitchen maintenance feel less overwhelming. You do not need a complicated collection of cleaning products to manage every small mess.
Convenient and Budget-Friendly
Dish soap, water, and a reusable microfiber cloth are common household supplies. Using what you already have can reduce the need to purchase a separate product for every minor cleaning task.
Less Everyday Buildup
Frequent light cleaning can prevent fresh grease and food residue from accumulating. This may make later cleaning sessions easier because fewer deposits have time to dry or become baked onto the surface.
A More Organized Kitchen
A clean stove contributes to a tidy-looking cooking area. When cleaning supplies are stored safely and the process is simple, it becomes easier to maintain the kitchen without turning every cleanup into a major project.
A Thoughtful Approach to Cleaning Products
Choosing a simple cleaner for suitable everyday tasks can help you avoid unnecessary products. However, homemade mixtures should not automatically be considered safer, more effective, or environmentally superior to every commercial cleaner. Use only what is needed, follow appliance instructions, and dispose of cleaning materials responsibly.
Quick Points: Your Stove Cleaning Routine
- Let the stove cool completely before cleaning.
- Use diluted dish soap and warm water for routine grease and food splashes.
- Choose a soft cloth or nonabrasive tool suited to the surface.
- Wipe away residue with clean water and dry the stove thoroughly.
- Follow the appliance manual for stubborn stains and removable components.
Frequently Asked Questions About DIY Stove Cleaner
Can I Use Homemade Stove Cleaner Every Day?
For many compatible stove surfaces, a mild dish-soap solution can be used for routine cleaning. The correct frequency and product depend on the appliance finish, so always follow the manufacturer’s recommendations.
Does Vinegar and Baking Soda Remove Tough Grease?
The two ingredients react when combined, producing fizzing from carbon dioxide. That reaction does not make the finished mixture a guaranteed heavy-duty degreaser. Dish soap and an appropriate cleaning method are generally a better starting point for greasy cooking residue.
Can I Use This Cleaner on a Glass Stove?
Do not assume that every homemade recipe is suitable for glass or ceramic cooktops. Check the manual and use an approved cooktop cleaner when required. Avoid abrasive powders and rough scrubbing tools that could scratch the surface.
How Long Should I Leave the Cleaner on the Stove?
For routine cleaning with diluted dish soap, a brief application is usually enough for fresh splashes. If your appliance instructions permit a longer contact time, follow that guidance. Do not leave liquid to dry on the surface or pool around burners and controls.
How Should I Store Homemade Stove Cleaner?
Prepare only what you need for the cleaning session when possible. Clearly label any suitable container, keep it away from children and pets, and never store a mixture that is actively reacting in a sealed bottle. Discard mixtures that develop unexpected changes or cannot be identified confidently.
Conclusion: Make Stove Cleaning a Simple Daily Habit
Keeping your stove clean does not have to involve an elaborate routine or a cupboard full of specialized products. A mild dish-soap solution, a soft microfiber cloth, and a few minutes of attention can go a long way toward removing everyday cooking splashes and keeping your kitchen looking neat.
The key to successful DIY stove cleaning is choosing ingredients and tools that suit your appliance. Although vinegar, baking soda, and lemon juice appear in many homemade cleaning recipes, combining them does not guarantee better results, and acidic or abrasive ingredients may damage certain finishes. For regular maintenance, start with the simplest suitable method and follow the manufacturer’s care instructions.
Make it a habit to wipe your cool stove after cooking, remove residue before it becomes stubborn, and dry the surface thoroughly. These small steps can make future cleanups easier and help your kitchen feel fresher every day.
Ready to refresh your kitchen routine? Try a simple, appliance-safe cleaning method, keep your supplies organized, and save this guide for your next cleaning day. A little regular care can make a noticeable difference in the way your kitchen looks and feels.
Tags
DIY Stove Cleaner
Stove Cleaning Tips
Homemade Kitchen Cleaner
Kitchen Cleaning Hacks
Grease Removal
Daily Cleaning Routine
Natural Cleaning Ideas
Clean Kitchen Tips


