How to Remove Grease from Kitchen Cabinets in 4 Easy Steps
Greasy kitchen cabinets can make an otherwise clean kitchen look dull, sticky, and neglected. Cooking oils, food splashes, fingerprints, and everyday dust gradually build up on cabinet doors, especially around handles and frequently used areas. The good news is that you do not need expensive cleaning products or hours of scrubbing to restore a fresh appearance. With a few simple supplies and the right technique, you can learn how to remove grease from kitchen cabinets in four easy steps.
This practical kitchen cleaning method uses warm water, a small amount of dish soap, and white vinegar to help tackle everyday grease and grime. The process involves preparing a gentle cleaning solution, wiping cabinet surfaces, removing any remaining residue, and drying everything thoroughly. Whether your kitchen has wood, laminate, painted, or thermofoil cabinets, a careful approach can help keep your cabinets looking their best.
Key Takeaways
- Mix warm water with a few drops of dish soap for everyday kitchen grease.
- Use a soft microfiber cloth to clean cabinet doors without unnecessary abrasion.
- Pay special attention to handles, edges, corners, and areas near the stove.
- Wipe away cleaning residue with a separate, clean, damp cloth.
- Dry cabinet surfaces thoroughly to help prevent water spots and moisture damage.
- Test your cleaning solution on a hidden area before cleaning the entire cabinet.
Why Do Kitchen Cabinets Get So Greasy?
Kitchen cabinets face a combination of moisture, heat, airborne cooking oils, and frequent handling. Even when you clean your countertops regularly, cabinet doors can collect a thin film of grease that becomes more noticeable over time.
Cooking Oils and Airborne Grease
When you fry, sauté, roast, or cook foods with oil, tiny droplets and particles can settle on nearby surfaces. Cabinet doors close to the stovetop often collect the most residue. As the film attracts dust, it can become sticky and difficult to remove with a quick dry wipe.
Regularly wiping the cabinets near your cooking area helps prevent this buildup from becoming a stubborn cleaning project. Using an appropriate range hood and following its maintenance instructions can also help reduce airborne grease.
Fingerprints and Everyday Handling
Cabinet doors and drawer fronts collect fingerprints, cooking residue, and natural oils from your hands. Handles are particularly vulnerable because they are touched throughout the day, often while preparing meals.
These areas may develop dark or shiny patches that make the entire kitchen look less tidy. Cleaning handles and surrounding surfaces regularly keeps everyday grime from accumulating.
Dust and Sticky Residue
Dust can settle on greasy surfaces, creating a layer that ordinary dusting cannot remove. If cleaning products leave behind residue, the surface may also feel sticky after it dries.
The best solution is a simple routine that loosens grease, removes the loosened dirt, rinses away cleaning residue, and finishes with thorough drying.
What You Need to Clean Greasy Kitchen Cabinets
Before you begin, gather a few basic supplies. Having everything ready makes the process quicker and helps you avoid leaving wet cleaning solution on cabinet surfaces while searching for another cloth.
- Warm water: Helps loosen everyday dirt and oily residue.
- Dish soap: Choose a mild dishwashing liquid that helps break down grease.
- White vinegar: An optional ingredient for suitable, compatible surfaces.
- Small mixing bowl: Provides a convenient container for the cleaning solution.
- Soft microfiber cloths: Use one for cleaning, another for wiping away residue, and a dry one for finishing.
- Soft sponge: Useful for stubborn spots when the cabinet finish permits it.
Important: Cabinet finishes vary, so there is no single homemade cleaner that is safe for every material. Start with mild, diluted dish soap and water. Vinegar is acidic and may damage certain wood finishes, natural stone nearby, or other sensitive materials. Do not use vinegar unless the cabinet manufacturer confirms it is suitable for your surface.
A Simple Cleaning Solution
For everyday grease on a compatible cabinet finish, start with the following gentle mixture:
- 2 cups of warm water
- A few drops of mild dish soap
- 1 tablespoon of white vinegar, only if appropriate for the cabinet material
Mix the ingredients gently in a bowl. The solution should feel lightly soapy rather than thick or concentrated. Too much detergent can leave a film behind, creating extra work during rinsing.
If you are unsure about the cabinet material or finish, leave out the vinegar and use warm water with a few drops of mild dish soap. Follow the manufacturer’s care instructions whenever available.
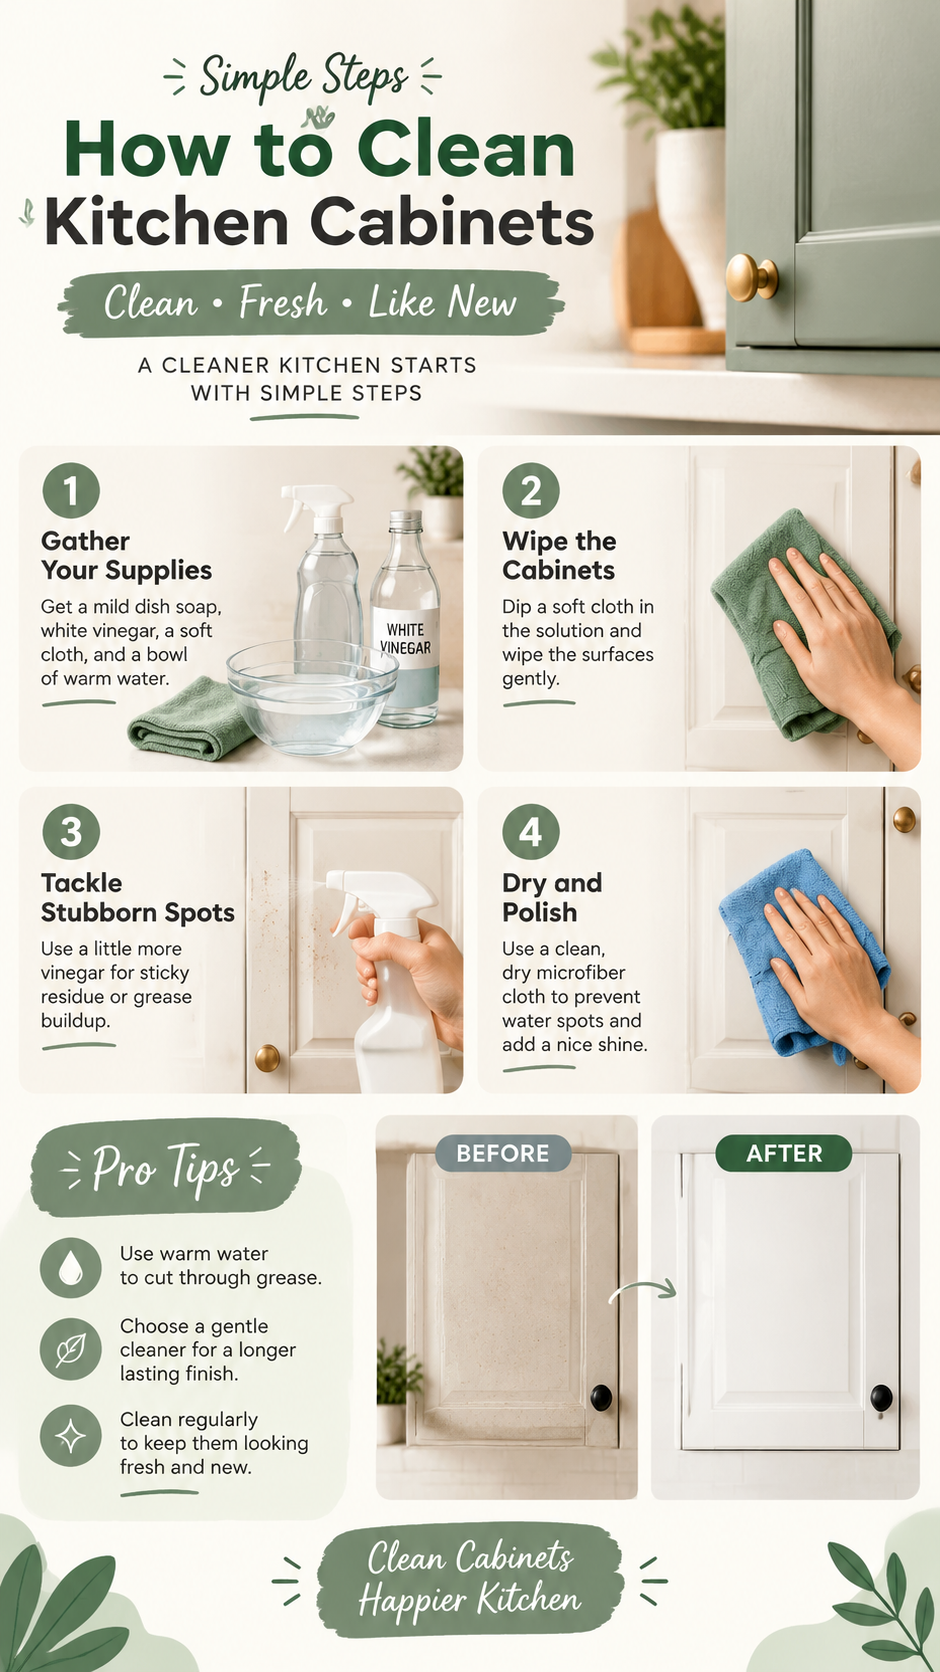
Step 1: Make the Cleaning Solution
The first step in cleaning greasy kitchen cabinets is preparing a mild solution that can loosen everyday residue without unnecessarily exposing the finish to harsh chemicals.
Mix Warm Water and Dish Soap
Pour two cups of warm water into a clean bowl, then add a few drops of mild dish soap. Stir gently to distribute the soap. If your cabinet material is compatible with diluted vinegar, you can add one tablespoon of white vinegar as shown in this cleaning method.
Warm water is useful for loosening everyday grime, while dish soap helps lift oily residue so it can be wiped away. The goal is to create a gentle solution rather than a powerful chemical mixture.
Test Before Cleaning
Dip a soft cloth into the solution and wring it out thoroughly. Choose a small, hidden area inside a cabinet door or another inconspicuous spot. Wipe gently, then remove the residue with a separate damp cloth and dry the area.
Allow the test area to dry completely. Check for discoloration, dullness, swelling, tackiness, or any change in the finish before continuing.
Pro Tip: Avoid combining vinegar with bleach or other cleaning chemicals. Never assume that adding more ingredients will make a cleaner more effective. A mild solution and a soft cloth are often enough for routine cabinet maintenance.
Step 2: Wipe the Greasy Kitchen Cabinets
Once your solution has passed the spot test, it is time to clean the cabinet doors. This step focuses on loosening the grease and removing it without scratching the surface or allowing too much moisture to reach seams and edges.
Use a Soft, Damp Microfiber Cloth
Dip a microfiber cloth into the cleaning solution, then wring it out until it is damp rather than dripping. Wipe the cabinet door using gentle, overlapping strokes. Work from the top toward the bottom so loosened dirt does not run over an area you have already finished.
Clean one door or a small section at a time. This gives you better control over moisture and makes it easier to notice whether the grease is coming away.
Pay Attention to Handles and Edges
Handles, corners, decorative grooves, and the edges of cabinet doors often hold the most visible grime. Wipe around these areas carefully, using a soft cloth corner or a clean, soft brush if the cabinet manufacturer permits it.
For metal handles, use a cleaning method suitable for the handle’s material and finish. Avoid letting the cabinet solution pool around hardware, screw holes, joints, or unsealed edges.
Work in Small Sections
Rather than wetting every cabinet door at once, clean a manageable section before moving to the next. Rinse or replace the cloth when it becomes dirty, because a greasy cloth can spread residue instead of removing it.
For heavier buildup, hold the damp cloth against the affected area briefly to soften the residue, provided the surface is moisture-resistant. Then wipe gently. Do not scrape the grease with a knife, abrasive pad, or other sharp tool.
Expert Insight
Gentle cleaning is more effective than aggressive scrubbing when protecting cabinet finishes. If grease does not come away easily, repeat the process with a fresh cloth and mild solution instead of increasing the pressure. Persistent buildup may require a manufacturer-approved cabinet cleaner.
Step 3: Wipe Again to Remove Soap Residue
After removing the grease, use a second clean cloth dampened with plain water to wipe the cabinet surfaces again. This step is important because leftover detergent can create streaks, dull-looking patches, or a slightly sticky feel once the surface dries.
Use a Separate Clean Cloth
Wet a fresh microfiber cloth with clean water and wring it out thoroughly. Wipe each cleaned section to lift away any remaining soap and loosened dirt. Rinse the cloth frequently so you do not transfer residue back onto the cabinet.
Pay particular attention to the edges, around handles, and along decorative details. These areas can trap small amounts of cleaning solution, so use the cloth carefully without soaking the surface.
Check for Remaining Grease
Look at the cabinet from different angles under your kitchen lighting. If you notice a sticky patch or greasy film, repeat the gentle cleaning process on that spot and wipe it again with plain water.
Avoid repeatedly rubbing one area with excessive force. Some finishes can become scratched, polished unevenly, or damaged by friction, especially when dirt particles are trapped beneath the cloth.
Remember that a clean cabinet should feel free of obvious sticky residue, but it does not need to be scrubbed until every surface looks unnaturally shiny. The goal is to remove grime while preserving the original finish.
Step 4: Dry the Cabinets Thoroughly
The final step is simple but essential. Use a clean, dry microfiber cloth to remove remaining moisture from the cabinet doors, edges, and areas around the hardware.
Prevent Streaks and Water Spots
Dry the surface with gentle, even strokes. Turn the cloth to a dry section as needed, especially when cleaning several cabinet doors. This helps prevent water marks and gives the surface a neat, finished appearance.
Protect Cabinet Seams and Edges
Moisture can be especially problematic around joints, unfinished edges, damaged paint, and areas where a cabinet’s protective coating has worn away. Make sure these areas are dry before finishing the job.
Do not leave damp cloths resting on cabinet doors, and avoid spraying cleaner directly onto the surface. Applying a small amount of solution to a cloth gives you better control and reduces the chance of liquid entering gaps.
Once the cabinets are dry, step back and check the overall result. Removing grease from the doors, cleaning around the handles, and drying the surfaces can make the kitchen feel noticeably fresher.
How to Clean Different Types of Kitchen Cabinets
The four-step method works best when adapted to the material and finish of your cabinets. Before choosing a cleaning solution, check the manufacturer’s care instructions and test it in a hidden area.
Wood Kitchen Cabinets
Wood cabinets may have a painted, stained, lacquered, varnished, or oil-treated finish. Their cleaning requirements vary, but many finished wood surfaces respond well to a soft cloth lightly dampened with a suitable mild cleaner.
Use as little moisture as possible and dry the surface immediately. Avoid soaking wood, scrubbing against delicate finishes, or using vinegar unless the manufacturer specifically approves it. Unfinished or specially treated wood may need a different cleaning approach.
Laminate Cabinets
Laminate cabinet doors commonly have a smooth surface that can be cleaned with a soft cloth and mild soapy water when permitted by the manufacturer. Wipe gently to lift grease and follow with a clean, damp cloth.
Pay attention to seams and edges, particularly if the laminate is lifting or damaged. Excess water can enter compromised joints and cause further deterioration. Avoid abrasive pads that may scratch the finish.
Painted Cabinets
Painted cabinets can look beautiful, but their durability depends on the paint type, curing, and protective coating. A soft microfiber cloth and a mild, diluted cleaning solution are generally a sensible starting point for compatible finishes.
Avoid harsh chemicals, concentrated detergents, abrasive scrubbers, and excessive pressure. These can dull the paint or remove the finish over time. If the paint is peeling or soft, consult the cabinet manufacturer’s guidance before cleaning.
Thermofoil Cabinets
Thermofoil cabinets typically have a smooth surface formed by a vinyl-like covering over a substrate. Gentle cleaning with a suitable mild solution may remove everyday grease, but heat and moisture can affect vulnerable edges and seams.
Use a damp, not wet, cloth and dry the surface thoroughly. Avoid abrasive cleaners, aggressive scrubbing, and excessive heat. If the covering is bubbling, peeling, or separating, do not try to fix the damage by soaking or forcefully rubbing it.
Common Mistakes to Avoid When Removing Cabinet Grease
Even a simple cleaning routine can cause problems if the wrong products or techniques are used. Keep these common mistakes in mind to protect your cabinets while removing everyday grime.
- Using too much water: Excess moisture can seep into seams, edges, and unfinished areas.
- Scrubbing with abrasive materials: Steel wool, rough scouring pads, and abrasive powders can scratch or dull finishes.
- Applying concentrated cleaning products: Strong solutions may discolor paint, damage coatings, or leave residue.
- Skipping the spot test: A cleaner that works on one cabinet material may be unsuitable for another.
- Leaving soap behind: Residue can attract dirt or make the surface feel sticky.
- Ignoring the handles: Frequently touched hardware and surrounding areas often hold stubborn grime.
- Leaving cabinets wet: Moisture around seams and damaged finishes can lead to deterioration.
- Mixing incompatible chemicals: Never combine household cleaners unless their labels explicitly confirm that doing so is safe.
Safety Reminder: If you use a commercial degreaser, read its label, follow the dilution instructions, and ensure suitable ventilation. Keep cleaning products away from children and pets. Never mix bleach with vinegar, ammonia, or other incompatible cleaners.
How to Keep Kitchen Cabinets Clean Longer
Once your cabinets are clean, a few small habits can prevent grease from building up again. Regular maintenance is usually easier than tackling a thick, sticky layer after months of cooking.
Wipe Away Splashes Promptly
After cooking, check the cabinet doors closest to the stove and food preparation areas. When a splash or fingerprint appears, wipe it away with a soft cloth using a suitable cleaner if needed.
Small, frequent cleanups help stop grease from combining with dust and becoming more difficult to remove.
Clean Handles Regularly
Make handles and the areas around them part of your normal kitchen cleaning routine. These high-touch spots can become grimy faster than the rest of the cabinet, but they are easy to maintain with a suitable cleaner and a soft cloth.
Use Your Range Hood
When cooking, use your range hood according to the manufacturer’s instructions. Keep its filters clean and maintained as recommended. A properly functioning ventilation system can help reduce the amount of airborne cooking residue that settles on nearby surfaces.
Create a Simple Cleaning Schedule
There is no need to deep-clean every cabinet every day. Instead, choose a schedule that matches your cooking habits and how quickly your cabinets collect grease.
- As needed: Wipe away fresh splashes and visible fingerprints.
- Weekly: Check handles and cabinets near the stove for sticky spots.
- Monthly or as needed: Give frequently used cabinet doors a more thorough gentle cleaning.
- Periodically: Inspect cabinet edges, seams, and finishes for damage that may require special care.
Adjust the routine to suit your household. A kitchen used for frequent frying may need more attention than one where most meals involve little oil.
Frequently Asked Questions
What Is the Best Homemade Cleaner for Greasy Kitchen Cabinets?
For many compatible cabinet finishes, warm water mixed with a few drops of mild dish soap is a practical starting point. Dish soap helps lift oily residue without requiring a complicated mixture. White vinegar can be used only when the cabinet manufacturer confirms it is suitable for the surface.
Can I Use Vinegar on All Kitchen Cabinets?
No. Vinegar is acidic and may damage certain finishes, including some wood coatings and other sensitive surfaces. Check the manufacturer’s recommendations before using it. If you are uncertain, choose a mild dish soap solution instead.
How Do I Remove Old, Sticky Grease from Cabinets?
Start with a mild cleaner that is compatible with your cabinet material. Hold a damp cloth against the greasy area briefly to help soften the residue, then wipe gently. Repeat as needed with a clean cloth rather than scrubbing aggressively. If the buildup remains, use a cabinet-safe degreaser according to its label.
Can I Use a Magic Eraser on Painted Cabinets?
Use caution. Melamine foam cleaning pads work through abrasion and may dull or remove some painted finishes. Test any such product in a hidden area only if the manufacturer permits it, and use a soft microfiber cloth as your first choice.
Why Do My Cabinets Feel Sticky After Cleaning?
Sticky cabinets may have remaining grease, excess detergent, or residue from a previous cleaning product. Wipe the surface again with a clean cloth dampened with plain water, provided the finish tolerates it, and dry thoroughly. If the sticky feeling persists, check the cabinet material and the product instructions before trying another cleaner.
How Often Should I Clean Greasy Kitchen Cabinets?
Clean visible spills and splashes as they happen. Inspect frequently used handles and cabinet doors near the stove every week, then perform a deeper clean whenever you notice buildup. The ideal schedule depends on your cooking frequency, ventilation, and cabinet finish.
Quick Points: Clean Kitchen Cabinets at a Glance
- Mix warm water with a few drops of mild dish soap.
- Test the solution on a hidden area before cleaning.
- Wipe gently with a soft, well-wrung microfiber cloth.
- Use a separate damp cloth to remove cleaning residue.
- Dry thoroughly and repeat gentle cleaning as needed.
Conclusion: Enjoy Cleaner, Fresher Kitchen Cabinets
Removing grease from kitchen cabinets does not have to involve harsh chemicals, expensive supplies, or hours of scrubbing. By following four simple steps, you can tackle everyday cooking residue while helping protect the appearance of your cabinet doors.
Start by preparing a mild cleaning solution, wipe the greasy surfaces with a soft cloth, remove remaining soap with clean water, and dry everything thoroughly. Give extra attention to handles, corners, and the cabinets closest to the stove, where grease tends to accumulate.
Most importantly, match your cleaning method to the cabinet material. Test products before use, avoid excessive moisture, and follow the manufacturer’s care instructions. With regular maintenance and a little attention to detail, your kitchen cabinets can stay cleaner, fresher, and easier to maintain.
Try these four simple steps during your next kitchen cleanup, and make cabinet care an easy part of your home cleaning routine.
Tags
Kitchen Cabinet Cleaning
Remove Grease from Cabinets
Kitchen Cleaning Hacks
Homemade Cleaning Solutions
Grease Removal Tips
Wood Cabinet Care
Microfiber Cleaning
Easy Home Cleaning