80 Cleaning Hacks for a Cleaner Home Easy, Budget-Friendly Tips Tricks
A cleaner home does not have to mean spending hours scrubbing every surface or buying expensive cleaning products. With a few clever cleaning hacks, everyday household items, and simple routines, you can make your home fresher, tidier, and more comfortable without adding extra stress to your schedule. From removing stubborn kitchen stains to refreshing carpets, cleaning bathroom grout, and keeping laundry smelling fresh, small changes can make a noticeable difference.
These easy cleaning tips and tricks focus on practical ways to tackle common household messes while saving time and money. Whether you are preparing for guests, working through your weekly cleaning routine, or simply trying to keep clutter and grime under control, these ideas can help you build habits that make housekeeping easier.
Key Takeaways
- Use suitable household staples such as baking soda, dish soap, and vinegar for selected cleaning tasks.
- Refresh kitchens and bathrooms with simple techniques that target grease, soap scum, and everyday grime.
- Save time by cleaning in short sessions and keeping frequently used supplies within reach.
- Protect delicate surfaces by choosing the right cleaner and testing it in an inconspicuous spot first.
- Maintain a fresher home with small, repeatable habits instead of relying on occasional deep cleans.
- Follow product labels and never mix cleaning chemicals, especially bleach with vinegar or ammonia.
1. Easy Kitchen Cleaning Hacks That Save Time
The kitchen often needs daily attention because cooking creates grease, food splashes, crumbs, and sticky surfaces. A few targeted cleaning tricks can make the job more manageable without requiring a full kitchen deep clean every day.
Clean Stovetops and Burners Carefully
Stovetops collect grease and food residue quickly, especially around burners and control knobs. Allow the appliance to cool completely before cleaning. Remove loose crumbs and wipe the surface with warm water and a little dish soap. For stubborn residue, let a suitable cleaner sit for the time recommended on its label before gently scrubbing.
A soft toothbrush can help reach narrow spaces around removable burner components, provided the appliance instructions allow it. Avoid soaking electrical parts or using abrasive tools on delicate finishes. Make sure all components are completely dry before putting them back.
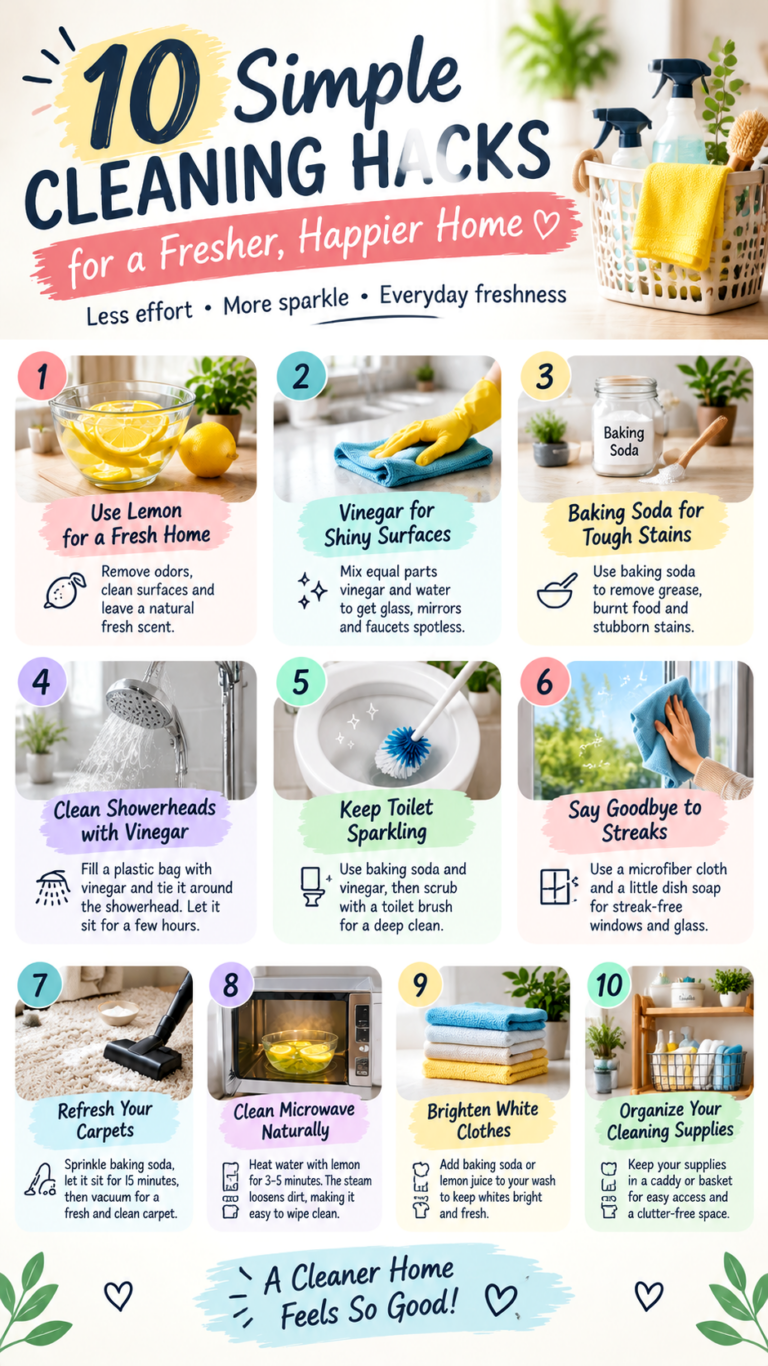
Refresh Your Microwave With Steam
Microwave splatters become easier to remove when softened by steam. Place a microwave-safe bowl containing water inside the appliance and heat it until the water produces steam. Turn the microwave off, allow the bowl to cool enough for safe handling, and carefully remove it. Wipe the interior with a soft cloth.
For a fresh scent, a small amount of lemon may be added to the water if desired. Always use a microwave-safe container, avoid overheating the liquid, and follow the manufacturer’s instructions. Steam helps loosen food residue, so heavy scrubbing is often unnecessary.
Remove Grease From Kitchen Surfaces
Greasy cabinets, backsplash tiles, and countertops often respond well to warm water mixed with a small amount of dish soap. Apply the solution with a soft cloth, wipe away the residue, and follow with a clean, damp cloth when appropriate. Dry the surface to prevent streaks or water marks.
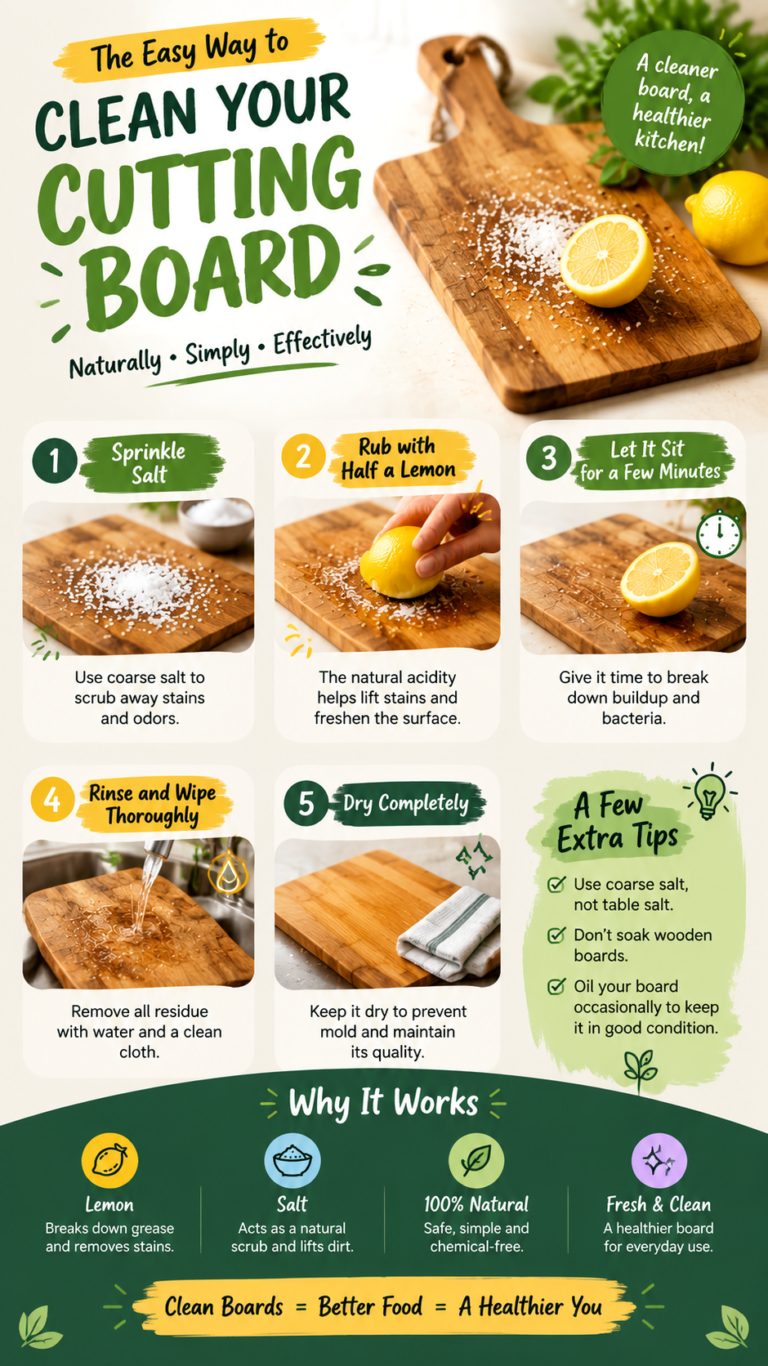
For cutting boards, wash the surface thoroughly after food preparation and sanitize it using a method suitable for the board’s material and the type of food handled. Lemon can help reduce certain odors, but it should not be treated as a substitute for proper cleaning and sanitizing.
Keep Small Kitchen Appliances Fresh
Blenders, kettles, coffee makers, and other appliances benefit from regular maintenance. Wash removable blender parts according to the manufacturer’s directions, taking care around sharp blades. Wipe the exterior with a suitable cloth and keep electrical components dry.
Mineral deposits inside kettles may be removed with a manufacturer-approved descaling solution. Some kettles permit diluted citric acid or vinegar, but others require a different method. Check the instructions before descaling, then rinse thoroughly as directed.
Important: Natural ingredients are useful for selected cleaning jobs, but they are not universal cleaners. Vinegar is acidic and may damage natural stone, certain metals, grout, and other sensitive materials. Always check surface-care instructions before using a homemade solution.
2. Bathroom Cleaning Tips for a Fresher Space
Bathrooms are easier to maintain when soap residue, moisture, and visible dirt are dealt with regularly. Instead of waiting until every surface needs a deep clean, focus on a few high-impact areas during your normal routine.
Remove Soap Scum From Shower Doors
Soap scum forms when soap residue combines with minerals in water and other deposits. For compatible glass surfaces, use a bathroom cleaner designed to remove this buildup. Follow the product directions, rinse thoroughly, and dry the glass with a squeegee or microfiber cloth.
Using a squeegee after showers can reduce water spots and slow the return of visible residue. Store it near the shower so that the task takes only a few seconds.
Clean Grout With the Right Brush
Tile grout can collect dirt in its small grooves, making floors and shower walls look dull. Use a cleaner suitable for the tile and grout material, then gently scrub with a soft or medium nylon brush. Rinse away the loosened residue and allow the area to dry.
A baking soda paste may be suitable for some surfaces, but it is mildly abrasive and is not appropriate for every tile finish. Avoid harsh scrubbing that could wear away grout or damage polished stone. For persistent discoloration, identify whether the problem is dirt, mineral buildup, or mold before choosing a treatment.
Freshen Shower Curtains and Showerheads
Shower curtains can develop residue and musty odors when moisture remains trapped in their folds. Check the care label to determine whether the curtain can be machine-washed. If washing is permitted, use the recommended settings and allow it to dry completely.
Showerheads may develop mineral deposits that interfere with water flow. Use a descaling product approved for the fixture’s material and follow the manufacturer’s instructions. Rinse thoroughly and avoid soaking finishes or components that could be damaged by acidic cleaners.
Keep Toilets Clean Between Deep Cleans
Regular toilet maintenance is easier than dealing with heavy buildup later. Apply an appropriate toilet cleaner according to its label, brush beneath the rim and around the bowl, and flush as directed. Wipe exterior surfaces with a separate cloth reserved for bathroom cleaning.
Never combine toilet cleaners with bleach, vinegar, or other cleaning products. Some combinations can release dangerous gases. Ventilate the bathroom and wash your hands after cleaning.
Expert Insight
The easiest way to maintain a clean bathroom is to prevent residue from accumulating. Dry wet surfaces when practical, keep the room ventilated, and remove visible soap buildup before it hardens. Small maintenance tasks can reduce the effort needed for your next deep clean.
3. Simple Living Room Cleaning Hacks
Living rooms collect dust, pet hair, crumbs, and everyday clutter. A few practical habits can help sofas, shelves, floors, and decorative items stay presentable without making cleaning feel like a full-day project.
Refresh Carpets With Baking Soda
Baking soda is sometimes used to absorb odors from dry carpets and rugs. If the carpet manufacturer’s instructions permit it, test a small hidden area first. Apply a light amount, allow it to sit briefly, and vacuum thoroughly using equipment suitable for your carpet.
Do not use this method on damp carpets, delicate fibers, or materials that could be damaged by powder. Baking soda will not remove every stain or solve an underlying moisture problem. Persistent odors may indicate spills beneath the carpet or another issue that needs attention.
Remove Pet Hair From Upholstery
Pet hair can cling to fabric sofas, cushions, and chairs. Use an upholstery attachment on your vacuum, a suitable lint roller, or a fabric-safe pet-hair removal tool. Work in manageable sections and pay attention to seams where hair tends to collect.
For cushions with removable covers, follow the care label before washing. Avoid applying too much water to upholstered furniture because moisture can penetrate the padding and cause lingering odors.
Dust Fans, Blinds, and Houseplants
Ceiling fans and blinds often accumulate dust that is easy to overlook. Turn off fans before cleaning and use a stable step stool or suitable extension tool. A slightly damp microfiber cloth can collect dust from compatible surfaces without spreading it into the air.
For houseplants, gently wipe broad, sturdy leaves with a clean, damp cloth when the plant’s care requirements allow it. Avoid household cleaners, scented sprays, and oily products on leaves. Use a separate cloth for plants rather than reusing one that has touched household chemicals.
Make Wood Furniture Look Its Best
Wood furniture usually needs gentle dusting and a cleaner suitable for its finish. Wipe away dust with a soft cloth, then use a manufacturer-approved furniture product if additional care is needed. Remove spills promptly and dry the surface instead of allowing water to sit.
Olive oil and other kitchen oils are not universal wood polishes. They can leave residue, attract dust, or affect certain finishes. Choose a product intended for the furniture rather than experimenting on a visible surface.
4. Laundry Room Hacks for Fresher Clothes
Fresh laundry depends on more than detergent. Proper loading, timely drying, and regular appliance maintenance all help clothes come out clean and reduce unwanted odors.
Keep Towels and Clothes Smelling Fresh
Remove clean laundry from the washing machine promptly and dry it according to the fabric-care instructions. Leaving damp clothing in a closed machine for too long can encourage musty smells. If an odor remains, check the machine’s cleaning instructions and consider whether the load needs rewashing.
Dryer sheets may help reduce static or add fragrance when approved for the fabric and dryer, but they are not essential for fresh laundry. Fragrance-free alternatives may be preferable for people who dislike scented products. Avoid using fabric softeners on items whose labels warn against them.
Clean the Washing Machine Regularly
Detergent residue, moisture, and lint can build up inside a washing machine. Run the manufacturer’s recommended cleaning cycle at the suggested interval and use only the specified cleaner. Wipe the door seal and detergent drawer when the instructions permit it, and leave the door open after use if the manufacturer recommends doing so.
For front-loading machines, inspect the rubber seal for trapped debris and moisture. Never dismantle the appliance or reach into moving parts while it is connected to power.
Remember the Dryer Vent and Lint Filter
Clean the lint filter after each load according to the dryer instructions. Lint buildup can reduce airflow and create a fire hazard. Periodically inspect the vent system and arrange proper cleaning when needed, particularly if drying takes longer than usual.
Use a vacuum attachment only where it is safe and suitable. Disconnect power before performing permitted maintenance, and seek professional assistance if the vent is difficult to access or the appliance shows signs of overheating.
5. Quick Cleaning Tricks for Windows, Doors, and Floors
Small details can make an entire room look cleaner. Window tracks, baseboards, door handles, and floor edges often collect grime even when the main surfaces appear tidy.
Clean Window Tracks With a Small Brush
Window tracks collect dust, dead insects, and outdoor debris. Begin by vacuuming loose dirt with a narrow attachment. Use a small soft brush or an old toothbrush to loosen residue from corners, then wipe with a damp cloth and dry the area.
For stubborn buildup, use a cleaner approved for the window material. Avoid flooding the track with water, especially around drainage openings or areas that may allow moisture to enter the wall.
Make Mirrors and Glass Surfaces Sparkle
Use a glass cleaner or a suitable diluted cleaning solution on compatible mirrors and windows. Spray the cloth rather than soaking the surface, especially near mirror edges. Wipe with a clean microfiber cloth and use a dry section to remove remaining streaks.
Avoid abrasive pads that could scratch the glass or damage protective coatings. Cleaning when the surface is cool and out of direct sunlight may also help prevent the solution from drying too quickly.
Refresh Baseboards and Door Frames
Baseboards collect dust from floors and shoes, while door frames gather fingerprints and marks. Dust these areas first with a microfiber cloth or vacuum brush. Wipe washable surfaces using a slightly damp cloth and a little mild detergent if needed, then dry them.
Always check the finish before using moisture or cleaning products. Painted wood, unfinished wood, and specialty finishes may respond differently to water and detergents.
Choose the Right Method for Each Floor
Different flooring materials require different cleaning methods. Vacuum or sweep first to remove grit that could scratch the finish. Then use a floor cleaner approved for the material, following the recommended dilution and moisture limits.
Microfiber mops are useful for collecting fine dust and everyday dirt. Avoid excessive water on wood and laminate floors, and never assume that vinegar is suitable for every tile, stone, or sealed surface.
6. Remove Common Stains and Sticky Residue
Stains are easier to handle when treated promptly and with the right method. Before applying any solution, identify the material and test the cleaner in a hidden spot. Using the wrong product can turn a small mark into permanent damage.
Lift Sticky Residue From Hard Surfaces
For compatible hard surfaces, begin by softening sticky residue with warm water and dish soap. Let the damp cloth rest over the spot briefly, then wipe gently. For labels or adhesive, use a suitable adhesive remover if the material permits it.
Rubbing alcohol can damage some paints, plastics, and finishes, so it should never be applied without checking compatibility. Avoid scraping with sharp metal tools that can scratch the surface.
Remove Crayon and Pencil Marks
On washable painted walls, start with a soft damp cloth and a small amount of mild detergent. Use gentle pressure and test the area first because some paints become shiny or lose color when rubbed. For pencil marks, a suitable eraser may work on certain finishes, but avoid aggressive rubbing.
Hair dryers are sometimes suggested for crayon marks, but heating wax can spread it or damage nearby materials. A surface-safe cleaning method is usually a better starting point.
Clean Jewelry and Leather With Care
Jewelry and leather accessories need special attention because they can be damaged by everyday household cleaners. For jewelry, use a cleaning method recommended for the specific metal and gemstone. Soft soap and water may suit some pieces, but porous stones, glued settings, and delicate finishes may require professional care.
Leather handbags and shoes should be cleaned with products designed for the leather type. Avoid applying olive oil, vinegar, or general-purpose cleaners without checking the manufacturer’s advice, as these may stain, darken, or weaken the material.
7. Cleaning Tools and Everyday Items You Should Not Forget
Some of the most effective cleaning improvements come from maintaining the tools you already use. Brushes, cloths, vacuum attachments, and storage containers can collect dirt if they are never cleaned themselves.
Refresh Hairbrushes and Makeup Brushes
Remove loose hair from hairbrushes regularly, then wash the bristles using a suitable mild cleanser if the brush instructions allow it. Rinse carefully and let the brush dry completely before using it again.
Makeup brushes also need routine cleaning because product residue, oils, and debris accumulate on the bristles. Use a brush cleanser or gentle soap suitable for the brush, rinse thoroughly, reshape the bristles, and dry the brush in a way that prevents water from collecting inside the handle.
Keep Your Keyboard and Small Electronics Clean
Keyboards and remote controls attract fingerprints, dust, and crumbs. Turn off and unplug devices where appropriate before cleaning. Use a soft, dry cloth for general dust and follow the manufacturer’s instructions for deeper cleaning.
Do not spray liquid directly onto electronics, push debris farther between keys, or use excessive moisture. Compressed air may be suitable for certain devices when used according to the manufacturer’s guidance.
Freshen Trash Bins and Remove Odors
Empty bins regularly and clean them with a suitable detergent when spills or residue appear. Rinse if required and allow the bin to dry completely before adding a fresh liner. Keep food waste contained and clean the lid and surrounding area as needed.
Baking soda may help reduce some odors in a dry bin, but it will not replace washing or correct a persistent smell caused by trapped liquid, spoiled waste, or mold. Investigate the source if odors return quickly.
8. How to Build a Simple Cleaning Routine
Even the best household cleaning hacks are easier to maintain when they fit into a realistic schedule. You do not need to clean every room from top to bottom each day. Focus on the tasks that prevent dirt from building up and divide larger jobs across the week.
Daily Cleaning Tasks
- Wipe kitchen counters after preparing food.
- Wash dishes or load the dishwasher after meals.
- Wipe obvious bathroom splashes and hang towels to dry.
- Put frequently used items back in their places.
- Remove visible crumbs and spills before they become harder to clean.
Weekly Cleaning Tasks
- Vacuum carpets and clean hard floors using suitable methods.
- Dust furniture, shelves, fans, and accessible window areas.
- Clean toilets, sinks, shower surfaces, and mirrors.
- Change bed linens and wash towels as needed.
- Check kitchen appliances and remove visible buildup.
Monthly or Occasional Deep Cleaning
- Clean window tracks, baseboards, and overlooked corners.
- Inspect appliance filters, lint traps, and ventilation areas.
- Wash suitable cushion covers and refresh washable curtains.
- Clean storage containers and organize crowded cupboards.
- Review cleaning supplies and replace worn or dirty tools.
Pro Tip: Try a 10-minute reset at the same time each day. Choose one small area, put items away, wipe the most-used surfaces, and stop when your time is up. A short routine you can repeat is often more useful than an ambitious schedule that is difficult to maintain.
9. Cleaning Safety Tips for a Healthier Home
Saving time and money matters, but cleaning safely is just as important. Homemade solutions are not automatically harmless, and combining different products can create dangerous reactions.
- Never mix bleach with vinegar, ammonia, toilet cleaner, or other cleaning products. Dangerous gases can form.
- Read product labels. Follow dilution instructions, contact times, ventilation requirements, and protective equipment recommendations.
- Test delicate surfaces. Apply a small amount of the cleaner to an inconspicuous area first.
- Keep products away from children and pets. Store them in their original containers and follow label guidance.
- Use separate cleaning cloths. Keep bathroom cloths separate from kitchen cloths and wash reusable materials regularly.
- Do not treat fragrance as cleanliness. A pleasant smell does not prove that a surface is clean or disinfected.
- Disinfect when appropriate. Cleaning removes dirt, while disinfection uses suitable products according to their instructions to reduce germs on compatible surfaces.
For food preparation areas, bathrooms, and surfaces exposed to raw meat or bodily fluids, follow appropriate cleaning and sanitizing guidance rather than relying only on lemon, vinegar, or baking soda. Choose a product intended for the task and use it exactly as directed.
10. Quick Points: 80 Cleaning Hacks, Simplified
At a Glance
- Kitchen: Steam microwave splatters, clean grease with suitable detergent, and maintain appliances regularly.
- Bathroom: Use a squeegee, brush grout gently, and keep damp surfaces ventilated.
- Living room: Vacuum upholstery, dust fans and blinds, and refresh carpets with material-safe methods.
- Laundry: Clean the washer as directed, remove lint regularly, and dry clothing promptly.
- Floors and windows: Use microfiber tools and cleaners suited to the surface.
- Stains: Act promptly, test products first, and avoid aggressive scrubbing.
- Routine: Combine small daily resets with weekly cleaning and occasional deep cleaning.
- Safety: Never mix cleaning chemicals, and always follow product labels.
Conclusion: Make Your Home Cleaner With Simple Daily Habits
A cleaner home does not require an endless supply of expensive products or a complicated housekeeping schedule. The most useful cleaning hacks are often small, practical actions that help you deal with everyday messes before they become bigger jobs. A quick wipe of the kitchen counter, a few passes with a shower squeegee, regular dusting, and a well-maintained washing machine can all contribute to a fresher living space.
Start with the rooms that need the most attention and choose two or three cleaning tips that fit your routine. Once those habits feel natural, add another task when you have time. Remember that the right method depends on the surface, so use appropriate products, test unfamiliar cleaners, and prioritize safety over shortcuts.
Keep these easy cleaning hacks handy for your next home reset. Save your favorite ideas, share them with someone who loves an organized home, and return to the list whenever you need a little inspiration. With consistent care and a few clever tricks, you can make housekeeping simpler and enjoy a cleaner, more comfortable home every day.
Tags
Cleaning Hacks
Easy Cleaning Tips
Home Cleaning
Budget-Friendly Cleaning
Kitchen Cleaning
Bathroom Cleaning
Housekeeping Tips
Cleaning Routine