How to Clean Plastic, Copper, Steel Glass Bottles Easy DIY Cleaning Hacks
Reusable bottles are convenient, eco-friendly alternatives to disposable containers, but keeping them clean can sometimes feel like a challenge. Plastic bottles may develop cloudy residue, copper bottles can lose their shine, and stainless steel or glass bottles may collect unpleasant odors and stubborn buildup over time. Fortunately, a few simple household ingredients and the right cleaning techniques can make bottle care much easier.
Whether you use a bottle for drinking water, carrying beverages to work, or staying hydrated throughout the day, regular cleaning helps remove residue and keeps your containers fresh. From using vinegar and rice to clean plastic bottles to combining lemon and salt for copper bottles, these practical cleaning hacks offer straightforward ways to care for different materials.
The most important thing is to choose a cleaning method that suits your bottle. Plastic, copper, stainless steel, and glass each have different care requirements, so a technique that works for one material may not be appropriate for another. With the tips below, you can build a simple bottle-cleaning routine using ingredients you may already have at home.
Key Takeaways
- Use mild dish soap and warm water for routine cleaning of most reusable bottles.
- Vinegar and uncooked rice can help loosen residue inside suitable plastic bottles.
- Lemon and salt may help remove tarnish from compatible copper bottles.
- Baking soda can help neutralize odors in suitable stainless steel and glass bottles.
- Rinse thoroughly, allow every part to dry completely, and follow the manufacturer’s care instructions.
- Use caution with hot water, abrasive ingredients, and cleaning solutions that may damage a bottle’s material or finish.
Why Regular Bottle Cleaning Matters
A reusable bottle comes into contact with your mouth, hands, drinking water, and sometimes other beverages. Moisture can remain inside after use, while mineral deposits, drink residue, and odors may gradually build up. Bottles with narrow openings can be especially difficult to clean because it is not always easy to reach the bottom and sides.
Regular washing helps remove leftover liquids and residue before they accumulate. It also gives you an opportunity to inspect the bottle for scratches, corrosion, damaged seals, or other signs that it needs extra care.
How Often Should You Clean a Reusable Bottle?
For bottles used daily, wash them after each day of use, or sooner if they contain juice, flavored drinks, or other liquids that leave residue. Wash the cap, drinking spout, and removable seals as well. These areas can trap moisture and buildup even when the bottle itself looks clean.
If you notice an unusual smell, visible film, discoloration, or slippery residue, give the bottle a thorough wash before using it again. Bottles used for drinks other than plain water may require more frequent cleaning.
Important: A bottle that looks clean is not necessarily free of residue. Always clean the inside, cap, threads, seals, and drinking opening, then rinse well. Let the bottle dry completely before closing it or storing it.
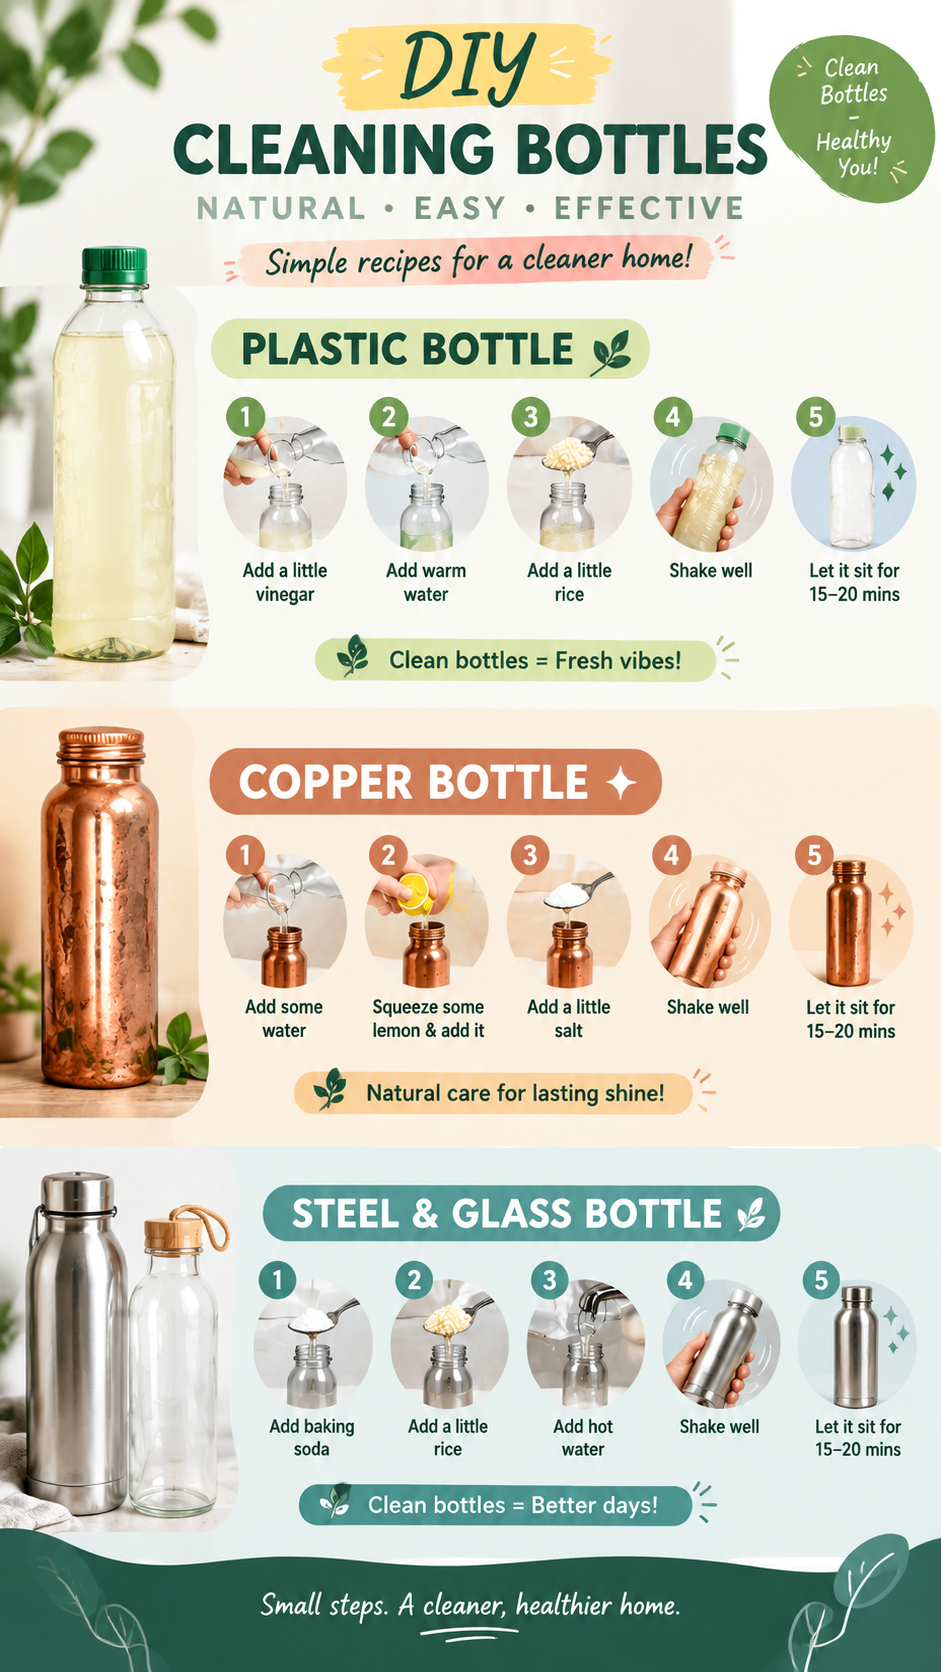
How to Clean Plastic Bottles With Vinegar and Rice
Plastic bottles can develop cloudy residue, lingering odors, and deposits that are difficult to remove by simply swirling water inside. A combination of vinegar, water, and uncooked rice can help loosen some types of buildup through gentle agitation.
This method is most appropriate for sturdy, reusable plastic bottles that can safely tolerate the ingredients. Check the manufacturer’s instructions first, particularly if the bottle has a special coating, printed finish, or delicate components.
What You Will Need
- White vinegar
- Warm water, not boiling water
- A small amount of uncooked rice
- Mild dishwashing liquid
- A bottle brush, if needed
- A clean drying rack
Step-by-Step Plastic Bottle Cleaning
- Empty the bottle. Pour out any remaining liquid and remove the cap, strap, or other detachable parts.
- Add a little vinegar. Pour a small amount of white vinegar into the bottle. Avoid filling it completely.
- Add warm water. Add enough warm water to help the cleaning solution move around inside. Never use boiling water unless the bottle is specifically rated for it.
- Add a small amount of rice. Place a teaspoon or two of uncooked rice inside, adjusting the amount to the bottle’s size.
- Shake gently. Close the bottle securely and swirl or shake it so the rice moves around the interior. Avoid forceful shaking if the bottle is fragile or has a damaged closure.
- Discard the mixture. Pour the contents into a suitable waste container rather than leaving rice in the bottle.
- Wash with dish soap. Clean the bottle with mild dishwashing liquid and a bottle brush if necessary.
- Rinse and dry. Rinse several times with clean water and leave the bottle open to air-dry.
Why Does Rice Help Clean a Bottle?
Uncooked rice moves around as you swirl the liquid, providing mild mechanical agitation that can help loosen residue from the interior. Vinegar adds acidity, which may help with certain mineral deposits. Neither ingredient replaces proper washing with dish soap and clean water.
Avoid using rice if the bottle has delicate internal coatings or a narrow opening that could trap grains. A long-handled bottle brush is often a safer and more convenient choice for everyday cleaning.
How to Clean a Copper Bottle Naturally
Copper bottles are popular for their distinctive metallic appearance, but their surfaces can darken or develop spots as they react with air and moisture. This change is commonly known as tarnishing. A simple mixture involving lemon and salt may help remove some surface tarnish from compatible, uncoated copper.
Before cleaning, check whether the bottle is made entirely of copper or has a protective lining, lacquer, decorative coating, or other material inside. Different finishes require different care, and acidic ingredients may damage certain surfaces.
What You Will Need
- A little fresh lemon juice
- A small amount of salt
- Clean water
- A soft cloth or nonabrasive sponge
- Mild dish soap, if recommended for the bottle
Step-by-Step Copper Bottle Cleaning
- Empty and inspect the bottle. Check the interior and exterior for discoloration, corrosion, or damaged coatings.
- Prepare the cleaning mixture. Mix a little lemon juice with a small amount of salt to form a light cleaning solution.
- Apply carefully. For a compatible exterior surface, use a soft cloth to apply the mixture gently. Avoid aggressive scrubbing.
- Clean the surface. Work on small areas and stop if the finish changes unexpectedly.
- Rinse thoroughly. Remove all traces of lemon juice and salt from the exterior.
- Dry completely. Wipe the outside with a clean, soft cloth.
Can You Use Lemon and Salt Inside a Copper Bottle?
Do not automatically assume that a copper bottle can be cleaned internally with acidic ingredients. Lemon juice is acidic, and prolonged contact with copper may increase metal dissolution. Salt can also contribute to corrosion under some conditions.
Safety note: For a copper bottle intended for drinking, follow the manufacturer’s interior-cleaning instructions. If the inside is unlined copper, avoid storing acidic liquids or leaving acidic cleaning solutions in contact with it. If the bottle has corrosion, a damaged lining, or a persistent metallic taste, stop using it until you can confirm it is safe.
For routine care, use only the cleaning products and methods approved for your particular bottle. If its interior is lined with stainless steel or another material, follow the care guidance for that lining rather than assuming the entire bottle should be treated as copper.
How to Clean Stainless Steel and Glass Bottles
Stainless steel and glass bottles are often straightforward to clean because their smooth interiors are less likely to retain odors than some scratched or worn plastic surfaces. However, narrow openings, removable lids, and built-up deposits can still make proper washing important.
A practical cleaning routine uses warm water, mild dish soap, and a bottle brush. Baking soda may also help with certain lingering odors, while uncooked rice can provide gentle agitation when the bottle’s design and material make that approach suitable.
What You Will Need
- Mild dishwashing liquid
- Warm water
- A bottle brush
- A small amount of baking soda, if needed
- Uncooked rice, if appropriate for the bottle
- A clean drying rack or towel
Step-by-Step Cleaning Method
- Remove the cap and seals. Separate all detachable parts that the manufacturer permits you to remove.
- Add warm water. Fill the bottle partially with warm water suited to its material and construction.
- Add a little baking soda if needed. A small amount may help neutralize some unpleasant odors. Do not combine it with vinegar in the expectation of stronger cleaning, because the ingredients react and largely neutralize each other.
- Use a bottle brush. Gently scrub the base, interior walls, shoulder, and neck of the bottle.
- Clean the cap separately. Wash the threads, mouthpiece, and removable seals with mild dish soap. Use a small brush for difficult areas.
- Rinse thoroughly. Flush away all soap and baking soda residue.
- Air-dry completely. Place the bottle and its parts on a clean rack, keeping them open until all moisture has evaporated.
Using Rice to Loosen Stubborn Residue
If the manufacturer permits it, a small amount of uncooked rice with water may help loosen residue in a bottle that is difficult to reach with a brush. Swirl the contents gently, empty the bottle, and finish by washing with dish soap.
Rice is not essential, though. A bottle brush is generally easier to control and allows you to clean specific areas without leaving grains behind.
Important Precautions for Stainless Steel and Glass
Stainless steel bottles may have vacuum insulation, painted exteriors, or special internal finishes. Do not soak an insulated bottle unless the manufacturer allows it, and never place it in a dishwasher unless it is labeled dishwasher-safe.
Glass bottles can break if exposed to sudden temperature changes. Avoid pouring boiling water into a cold glass container, and never shake a glass bottle vigorously when it contains hard cleaning materials. Check for chips and cracks before using it again.
For stainless steel, avoid chlorine bleach and harsh scouring pads unless the manufacturer specifically approves the product. These can damage finishes or contribute to corrosion. For glass, nonabrasive cleaning tools help preserve a smooth, easy-to-clean surface.
How to Remove Bottle Odors and Stubborn Residue
Sometimes a bottle still smells unpleasant after a quick rinse. This may happen when a drink has been left inside, a cap has trapped moisture, or residue has collected around the threads and seals.
Start With a Thorough Wash
Use warm water, mild dish soap, and a suitable bottle brush. Pay special attention to the bottom of the bottle, the narrow neck, the underside of the lid, and any grooves where residue can accumulate. Rinse until no soap remains.
Try Baking Soda for Lingering Smells
For compatible plastic, stainless steel, or glass bottles, a small amount of baking soda dissolved in water may help reduce some lingering odors. Let the solution sit briefly if the manufacturer’s instructions permit, then wash and rinse thoroughly. Avoid this method if the bottle’s care instructions prohibit it.
Inspect the Lid and Drinking Spout
If a smell remains after cleaning the bottle, the problem may be in the lid rather than the main container. Remove washable seals where possible and clean each component separately. Replace damaged, cracked, or persistently dirty seals according to the manufacturer’s guidance.
Expert Insight: Match the Method to the Material
The best bottle-cleaning trick is not always the one with the most ingredients. Mild dish soap, a suitable brush, thorough rinsing, and complete drying are the foundation of good bottle care. Use vinegar, baking soda, rice, or lemon only when they are compatible with the bottle’s material and finish.
Common Bottle-Cleaning Mistakes to Avoid
Even simple cleaning methods can cause problems when used on the wrong material. Avoid these common mistakes to keep your reusable bottles in better condition.
1. Using Boiling Water in Every Bottle
Not all plastic bottles are heat-resistant, and sudden temperature changes can damage glass. Use water at a temperature approved for your particular container. Warm water is usually sufficient for everyday washing.
2. Leaving Cleaning Solutions Inside for Too Long
Long soaking times are not automatically better. Acidic solutions can affect certain metals and coatings, while prolonged moisture can be undesirable for some bottle components. Follow the manufacturer’s recommended cleaning procedure and rinse promptly.
3. Scrubbing With Abrasive Materials
Steel wool, rough scouring pads, and coarse powders can scratch plastic, damage coatings, or dull decorative finishes. Choose a soft sponge or bottle brush designed for the material.
4. Mixing Cleaning Products
Never mix vinegar with chlorine bleach or other cleaning products unless the label explicitly confirms that doing so is safe. Mixing household chemicals can release dangerous fumes or create irritating solutions. Use one suitable cleaning method at a time, and rinse thoroughly before switching products.
5. Putting the Cap Back on Too Soon
Closing a bottle while its interior is still wet can trap moisture and encourage unpleasant odors. Allow the bottle, cap, and seals to dry separately before reassembling them for storage.
How to Keep Reusable Bottles Clean Longer
A consistent routine can reduce the amount of scrubbing needed later. You do not need a complicated collection of cleaning ingredients to maintain your bottles. A few practical habits can make a noticeable difference.
- Wash after daily use. Do not leave leftover drinks sitting in a bottle overnight.
- Rinse promptly. If you cannot wash the bottle immediately, empty it and rinse it as soon as practical.
- Clean all removable parts. Caps, mouthpieces, straws, and seals need attention too.
- Use the right brush. Select a brush that reaches the bottom without scratching the interior.
- Dry everything separately. Keep the lid off until the bottle is completely dry.
- Store bottles in a clean place. Avoid sealing away moisture or storing bottles with leftover liquid inside.
- Check for damage. Replace bottles or components that are cracked, corroded, or no longer easy to clean.
Pro Tip: Keep a dedicated bottle brush near your dishwashing supplies. When the right tool is easy to reach, cleaning your reusable bottle becomes a quick daily habit rather than a chore you keep postponing.
Quick Points: Bottle Cleaning at a Glance
- Plastic: Start with dish soap and a bottle brush. Vinegar and rice may help loosen residue when the material permits.
- Copper: Check the interior material and manufacturer’s instructions before using acidic ingredients. Lemon and salt may be suitable for certain exterior finishes.
- Stainless steel: Use mild soap, warm water, and a soft brush. Avoid harsh abrasives and unapproved bleach.
- Glass: Wash with dish soap and a suitable brush. Avoid sudden temperature changes and inspect for cracks.
- Every bottle: Clean the lid and seals, rinse thoroughly, and let all components dry completely.
Frequently Asked Questions About Cleaning Bottles
Can I Use Vinegar to Clean Every Type of Bottle?
No. Vinegar may help loosen certain mineral deposits, but its acidity can affect copper and some protective finishes. Check the bottle’s care instructions before using it, and never leave an unapproved acidic solution inside a drinking container.
Does Baking Soda Remove Bad Bottle Smells?
Baking soda may help neutralize some odors in compatible materials. However, persistent smells often mean that residue remains around the cap, seals, or interior. Wash these areas thoroughly and allow the bottle to dry completely.
How Can I Clean a Bottle With a Narrow Opening?
A long-handled bottle brush is usually the easiest solution. Choose one that fits through the opening and reaches the bottom without forcing it. If the bottle cannot be cleaned properly, consider whether its design allows the use of suitable cleaning tablets or other manufacturer-approved methods.
Can I Put Reusable Bottles in the Dishwasher?
Only if the bottle and its removable components are labeled dishwasher-safe. Some insulated stainless steel bottles, plastic containers, copper bottles, and glass designs require handwashing. When in doubt, follow the manufacturer’s instructions.
When Should I Replace a Reusable Bottle?
Consider replacing a bottle if it develops cracks, deep scratches that are difficult to clean, corrosion, damaged internal coatings, or persistent odors that remain after thorough cleaning. Replace worn seals and lids when necessary, and stop using any container whose safety is uncertain.
Conclusion: Make Bottle Cleaning an Easy Daily Habit
Cleaning plastic, copper, stainless steel, and glass bottles does not have to be complicated. With mild dish soap, warm water, a suitable bottle brush, and a few carefully chosen household ingredients, you can remove everyday residue and keep your reusable containers in better condition.
For plastic bottles, vinegar and rice may help loosen certain deposits. For compatible copper surfaces, lemon and salt can help address tarnish, although acidic mixtures should not be used inside unlined copper bottles without clear manufacturer approval. Stainless steel and glass bottles generally benefit from gentle washing, careful rinsing, and complete drying.
The secret is to choose a method that suits your bottle, avoid harsh or incompatible cleaning products, and pay attention to the lid and seals as well as the main container. A simple cleaning routine helps your bottles stay fresh, usable, and ready for everyday hydration.
Save these practical bottle-cleaning tips for your next kitchen refresh, and share them with anyone who loves simple DIY cleaning ideas. A few minutes of regular care can make reusable bottle maintenance much easier.
Tags
Bottle Cleaning
DIY Cleaning Hacks
Plastic Bottle Cleaning
Copper Bottle Care
Stainless Steel Bottle
Glass Bottle Cleaning
Eco-Friendly Home Tips
Kitchen Cleaning